
How to Tell When Your Sourdough Starter Is Ready to Bake

A sourdough starter can look lively long before it is truly ready to raise bread. That is the trap many bakers fall into: bubbles appear, the jar smells pleasantly tangy, and yet the dough still bakes up dense. The goal is not just an active starter. The goal is a starter that is strong, predictable, and at the right point in fermentation to do real work in dough.
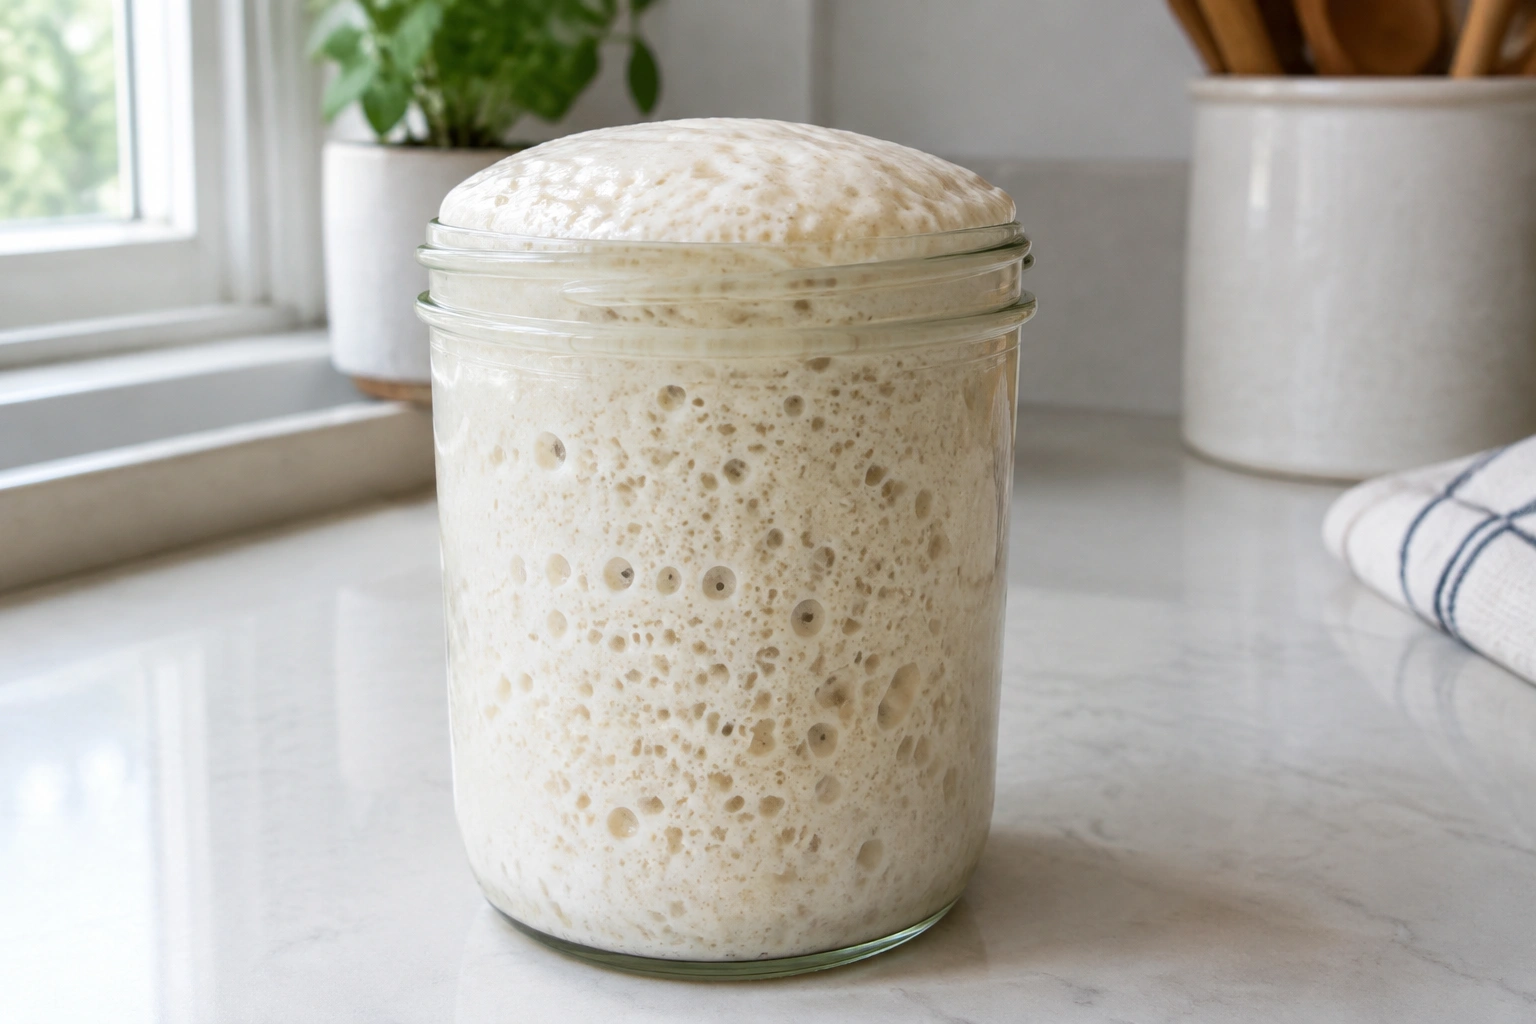
As Ethan Baker, I like to think of starter readiness as a performance test, not a beauty contest. A ready starter should rise well after feeding, hold structure, and be at or near its peak when you mix it into dough. That is the difference between “alive” and “ready to bake.”
Quick Answer: Bake Now, Wait, or Feed Again
Use this simple decision tree if you want the shortest possible answer.
- Bake now: the starter has clearly risen, the top is domed or just beginning to flatten, it smells pleasantly fermented, and it is at or very near peak.
- Wait: the starter is rising but has not reached peak yet, or it is still gaining volume and the dome is strong.
- Feed again: the starter shows little rise, smells harsh or overly acidic, or has clearly collapsed and looks weak.
A starter that is slightly past peak can still be usable if it has only just started to fall and still looks airy and active. As a practical rule, if the starter has fallen only a little and still smells pleasant, it may be fine for pizza dough or a flexible schedule. If it has dropped a lot, looks loose or deflated, or smells sharply alcoholic, feed again for the best bread results.
What It Means for a Sourdough Starter to Be Ready
A sourdough starter is ready when it can reliably leaven dough. In plain terms, that means the wild yeast and lactic acid bacteria are active enough to produce gas, build strength, and create lift in bread.
That is why bubbles alone are not enough. A starter can bubble from fermentation and still be too weak, too acidic, or too far past peak to give you a strong loaf. Readiness is really about three things working together:
- enough rise
- a stable, airy structure
- timing that lines up with peak activity
Think of it this way: an active starter is fermenting. A ready starter is fermenting well enough to bake with confidence.
Quick Readiness Checklist
Use this as a fast decision tool before you mix dough.
Your starter is probably ready if most of these are true:
- It has doubled in size, and sometimes tripled if it is especially vigorous.
- The top is domed or just beginning to flatten at peak.
- The jar is full of bubbles, including bubbles along the sides.
- The texture looks airy, not watery or soupy.
- It smells pleasantly fermented, tangy, or mildly sweet-sour.
- It has been rising predictably after recent feedings.
- It is at or very near its highest point.
If several of those signs are missing, wait and feed again.
If the starter has risen and then collapsed, it may still work, but it is no longer at its strongest point.
Visual Signs Your Starter Is Ready
The most reliable visual sign is rise. A healthy starter usually needs to show a clear increase in volume after feeding. Many bakers look for at least a doubling, and some starters will rise even more when they are strong and well fed.
Doubling or Tripling
A starter that doubles consistently is usually in good shape for baking. Tripling can happen, especially with a very active starter, but doubling is the more practical benchmark because it is easier to repeat across different kitchens and flours.
If your starter only rises a little and then sits there, it may be active but not powerful enough yet.
A Domed Top
A domed top usually means the starter is still climbing toward peak. When the top starts to flatten, you are often close to the best baking window. Once the dome sinks in the center, the starter is moving past peak.
Bubbles Throughout the Jar
Bubbles are useful, but they matter most when they appear together with rise. A few bubbles on the surface can be misleading. What you want is a network of bubbles through the starter and up the sides of the container, showing that fermentation is happening throughout the mixture.
An Airy, Structured Look
A ready starter often looks lighter and more elastic than a young or sluggish one. It may hold its shape better when you swirl the jar. A runny starter can still be active, but if it never thickens or lifts, it may not be ready yet.
Smell, Texture, and Peak Timing Cues
Visuals tell part of the story. Smell and texture fill in the rest.
Smell
A ready starter usually smells pleasantly fermented. That may mean tangy, yogurt-like, mildly fruity, or pleasantly sour. A sharp alcoholic smell can mean it has gone a little too long between feedings. That does not always mean it is unusable, but it often signals that peak has passed.
If the smell is rotten, putrid, or clearly off, do not use it.
Texture
Right after feeding, a healthy starter should not be runny. It should feel like a thick paste that can trap gas as it ferments. If it is too loose, it may still ferment, but it often struggles to hold bubbles well enough to rise strongly.
Hydration changes appearance, so a wetter starter will naturally look looser than a stiff one. Even so, it should still show structure and lift.
Peak Timing
Peak is the sweet spot. That is when the starter has risen to its highest point and is still strong enough to leaven dough. Many bakers aim to use it right at peak or just before it begins to fall.
Why not wait until it collapses? Because after peak, the starter has already used much of its available food. Gas production slows, structure weakens, and leavening power becomes less predictable.
How Long After Feeding a Starter Is Usually Ready
There is no universal clock for sourdough readiness. Time depends on temperature, feeding ratio, flour type, and the strength of the culture itself.
A warm kitchen can push a starter to peak much faster than a cool one. A cooler room slows fermentation and stretches the window.
At typical room temperatures, a starter is often ready somewhere in the 4 to 12 hour range after feeding, but that is only a starting expectation. A very active starter in a warm kitchen may peak sooner, while a cooler room, a stiffer starter, or a larger feeding ratio can stretch the window longer. The exact timing depends on your starter’s ratio and your kitchen temperature.
Temperature Changes the Clock
Warmer temperatures speed up fermentation. That can be helpful if you want a starter ready sooner, but it also shortens the window between peak and collapse. In a warm kitchen, you may need to watch the jar closely so you do not miss the best moment.
Cooler kitchens slow everything down. That can be frustrating, but it often gives you a broader peak window.
Feeding Ratio Changes the Clock
Feeding ratio affects how quickly the starter burns through its food.
- A smaller feed can peak sooner, but it may also become overripe faster.
- A larger feed can take longer to peak, but it may stay strong for a longer window.
If your starter peaks too quickly and then falls before you are ready, a larger feeding ratio can help. If it takes forever to rise, a smaller feed or warmer spot may make it more practical.
How to Test Starter Strength Before Baking
Here is a simple way to judge whether the starter is actually strong enough.
- Feed the starter and mark the level in the jar.
- Watch for a clear rise, not just surface bubbles.
- Check whether the top domes and then begins to flatten.
- Look for a light, airy texture through the jar.
- Smell it at peak. It should smell pleasantly fermented, not harsh or rotten.
- If you want a secondary check, use the float test only after the starter already looks strong.
About the Float Test
The float test can be useful, but it is not foolproof. A starter may look active and bubbly and still fail to float the way you expect. That can happen because the starter is too dense, too wet, or simply not trapping enough gas at that moment.
So treat the float test as a backup, not the main decision-maker. Visual rise and peak timing are more dependable.
If the float test fails but the starter has clearly doubled, shows a domed top, and is at or near peak, it can still be good enough to bake with. If the float test fails and the starter also shows weak rise, a flat top, or a collapsed structure, it is better to wait and feed again.
Ready vs Not Ready vs Past Peak
This comparison helps remove guesswork.
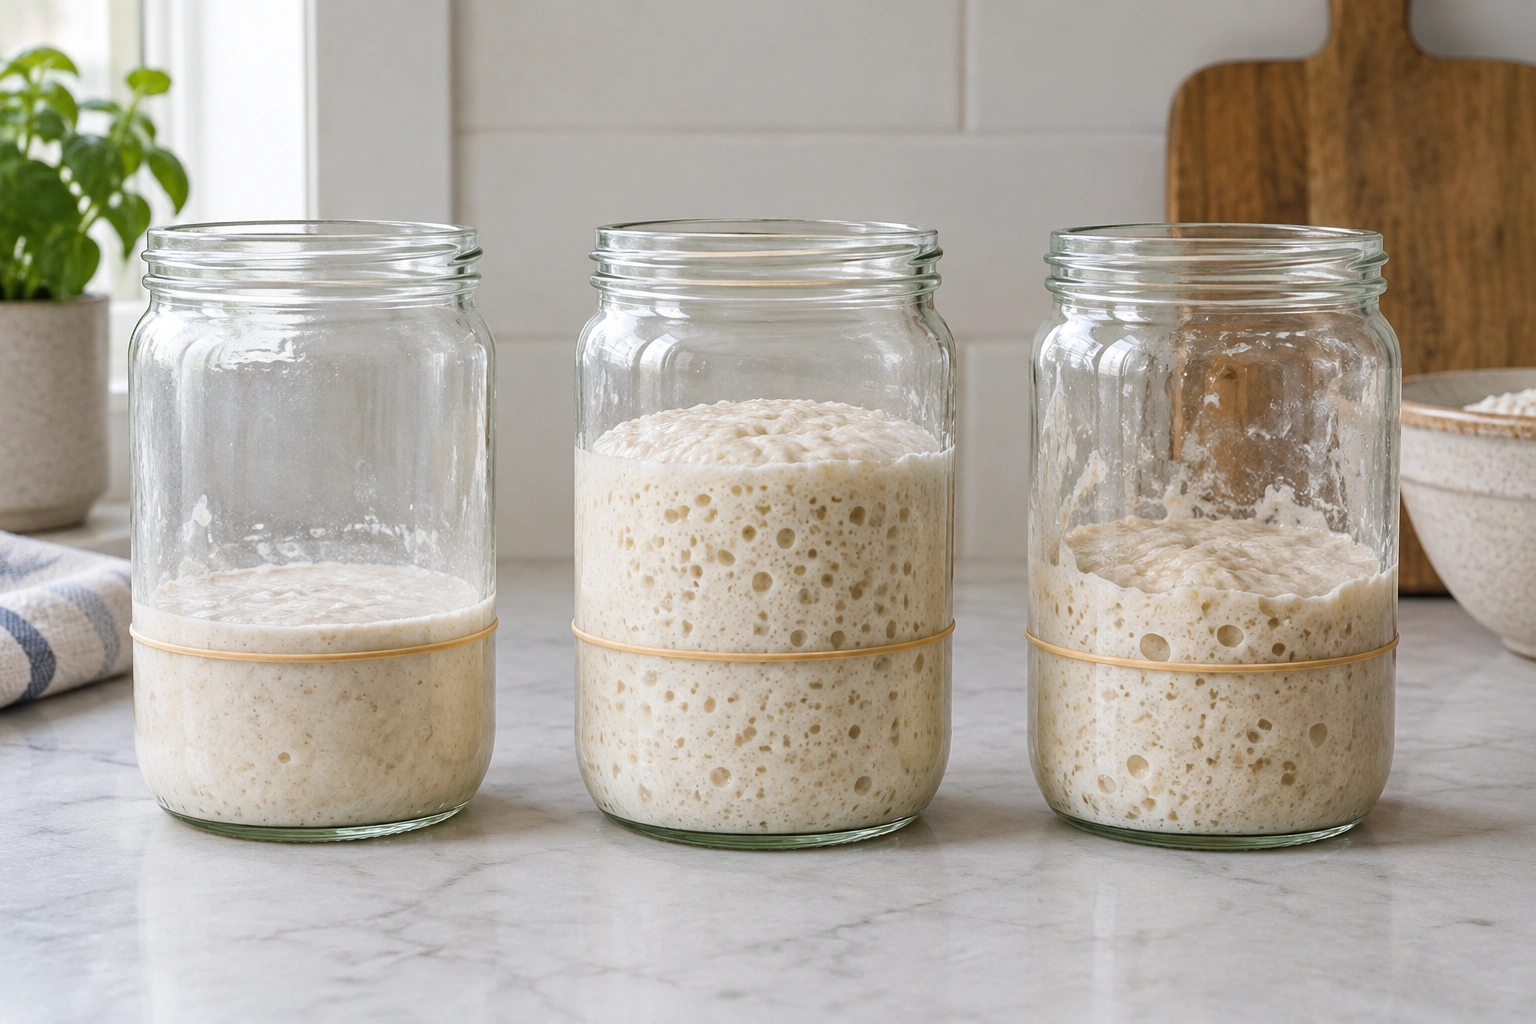
| State | What it looks like | Smell | Timing | Reliability for baking |
|---|---|---|---|---|
| Ready | Doubled or more, airy, domed or just flattening | Pleasantly fermented, tangy | At or near peak | Strong and predictable |
| Not ready | Some bubbles, but little rise | Mild, sometimes still floury | Too early after feeding | Weak and inconsistent |
| Past peak | Has risen and started to collapse | More acidic or alcoholic | After highest rise | Can work, but less reliable |
A starter that is past peak is not automatically useless. If it still has some strength, it may bake fine in a pinch. But if you want the most reliable oven spring, use it at peak.
What to Do If Your Starter Is Close but Not Quite Ready
If the starter is bubbling but not rising enough, do not rush it into dough. You have three practical choices.
Wait Longer
This is the best option when the starter is simply slow. Give it more time at room temperature and watch for a stronger rise.
Move It to a Warmer Spot
If your kitchen is cool, a warmer environment can help fermentation move along. Just remember that warmer conditions also shorten the peak window.
Adjust the Feeding Ratio
If the starter peaks too fast and collapses before you can use it, increase the feed. If it is sluggish, a smaller feed may help it become active sooner.
The key is to solve the timing problem, not just chase bubbles.
Common Mistakes That Make Bakers Misjudge Readiness
A few errors show up again and again.
Bubbles Alone
Bubbles are encouraging, but they do not prove strength. A starter can bubble without rising enough to leaven bread well.
Relying on the Float Test Alone
The float test is a snapshot, not a full assessment. It can give a false negative even when the starter is usable.
Ignoring Peak
Using starter after it has clearly fallen is one of the easiest ways to weaken your dough’s fermentation.
Expecting Every Kitchen to Behave the Same Way
A starter in a warm kitchen may peak hours before the same starter in a cool room. Timing is local.
Judging from One Feeding Only
A single good rise is promising. Repeated, predictable rises are more convincing. Consistency matters more than one lucky jar.
Troubleshooting a Starter That Bubbles but Won’t Double
If your starter bubbles but never seems to build enough volume, the issue is usually one of three things: temperature, feeding balance, or maturity.
The Starter Is Too Cool
Cold slows fermentation. If your kitchen is cool, the starter may be active but not energetic enough to rise strongly. A warmer environment often solves this.
The Feed Is Too Large or Too Small
A very large feeding can dilute the culture and delay peak. A very small feeding can make the starter run out of food too quickly. If the timing feels off, adjust the ratio and observe the next few feedings.
The Starter Is Still Young
A young starter may smell good and bubble well before it develops the strength needed for dependable baking. That is normal. What matters is whether it rises consistently over several feedings.
New Starter vs Mature Refrigerated Starter
A newly created starter and an established refrigerated starter can both be ready, but they are not judged the same way.
- New starter: look for repeated, predictable rises over several feedings. One strong day is encouraging, but consistency matters more because the culture is still developing.
- Mature refrigerated starter: look for how it performs after a refresh. If it rises reliably after feeding, domes at peak, and smells clean and pleasantly fermented, it is usually ready even if it needs a little time to wake up from the fridge.
If you are building confidence in your bread dough as well as your starter, it helps to compare the two processes side by side. My guide on how to tell when bread dough is ready can help you see how fermentation cues translate from starter to finished dough.
Practical Examples of Ready and Not-Ready Starters
Example 1: The Reliable Peak Starter
You feed your starter in the morning. By early afternoon, it has doubled, the top is rounded, and the jar is full of bubbles. When you gently tilt the container, the texture looks airy and elastic. That is a strong candidate for baking.
Example 2: The Bubbly but Weak Starter
The starter has lots of surface bubbles, but the volume barely changes. It smells fine, but it never climbs high enough to show real strength. That starter is active, but not ready to carry a loaf on its own.
Example 3: The Missed Peak Window
The starter rose beautifully overnight, then collapsed before breakfast. It may still work for some doughs, but if you want the most dependable rise, feed again and catch the next peak.
Example 4: The Cool-Kitchen Starter
A starter in a cool room may need much longer to peak. It is not necessarily weak; it may simply be slow. Patience, not panic, is the fix.
How Readiness Differs for Bread, Pizza Dough, and Other Recipes
Not every recipe asks the same thing from your starter.
Lean bread dough usually benefits from the strongest, freshest starter you can give it. That is where peak timing matters most. If a starter is only partly risen or already clearly past peak, it may still ferment dough, but it is more likely to underperform in a lean loaf.
Pizza dough can be a little more forgiving, depending on the formula and fermentation schedule. A starter that is slightly past peak, or one that rises well but does not quite reach the same height as your best bread starter, may still be perfectly usable for pizza because the dough often has more time to ferment.
For enriched doughs or recipes with sugar and fat, starter strength still matters, but the recipe itself may slow fermentation. In those cases, a fully ready starter gives you a better starting point.
The practical rule is simple: the leaner and more demanding the dough, the more you want your starter at peak.
When to Consult a Master Baker
If your starter has been fed consistently, kept at a reasonable temperature, and still never rises predictably, it may be time to get a second set of eyes from an experienced baker or baking instructor. A master baker can help you assess whether the issue is hydration, flour choice, feeding ratio, or starter maturity.
That is especially useful if you are baking in a school setting or preparing for professional production, where consistency matters as much as flavor.
A sourdough starter does not need to be mysterious. Once you learn to read rise, peak, smell, and texture together, the jar starts telling you what it needs. The more often you watch it through a full feed cycle, the easier it becomes to know when it is truly ready.
FAQ
Can I use sourdough starter after it peaks?
Yes, if it has only just started to fall and still looks airy, active, and pleasantly fermented. If it has dropped a lot or smells sharply alcoholic, feed it again for the most reliable results.
How much should sourdough starter rise before baking?
A good starting benchmark is a clear doubling in volume. Some strong starters may triple, but a starter that reliably rises about 50% may still be usable for more forgiving doughs if it is otherwise strong and timed well. For lean bread, aim for a more pronounced rise and use it at or near peak.
Is a failed float test always a bad sign?
No. A starter can fail the float test and still be ready if it has clearly risen, domed, and reached peak. Use the float test as a backup, not the main decision.
How do I know if my starter is ready after refrigeration?
Feed it and watch for a predictable rise. A mature refrigerated starter may need time to wake up, but if it rises consistently after feeding, smells clean, and domes at peak, it is usually ready to bake with.
What if my starter bubbles but never doubles?
That usually points to temperature, feeding ratio, or starter maturity. Give it more time, adjust the feeding schedule, or keep it a little warmer and see whether the next few feedings improve.
How long after feeding is sourdough starter ready?
At typical room temperature, many starters are ready in about 4 to 12 hours, but that window changes with temperature, feeding ratio, flour, and starter strength. Watch the rise and peak, not just the clock.