
How to Braid Bread for a Neat, Professional-Looking Loaf

Braiding bread looks impressive, but the technique is simpler than it appears once you understand the rhythm of the dough. The real secret is not the braid itself — it’s preparing strands that are even, relaxed, and strong enough to hold their shape through proofing and baking.
If you’ve ever had a braid that looked tidy on the counter but spread, unraveled, or lost definition in the oven, you’re in the right place. The fix usually comes down to three things: equal portions, the right strand tension, and a braid that is snug enough to stay put but loose enough to expand.
Below, I’ll walk you through the whole process the way I teach it to serious home bakers and culinary students: how to judge dough readiness, choose a braid style, shape the strands, braid them cleanly, and bake the loaf so the pattern still shows at the end.
What You Need Before Braiding Bread
Before you touch the dough, make sure it’s ready to shape. A braided loaf works best when the dough is smooth, elastic, and not overly sticky. If the dough tears easily, feels slack, or keeps sticking to your hands, it will be harder to roll into even strands.
A quick visual test helps: the dough should look cohesive and feel supple, not rough or ragged. If it keeps shrinking back while you try to shape it, that usually means the gluten needs a short rest. Resting lets the dough relax so it stops fighting you.
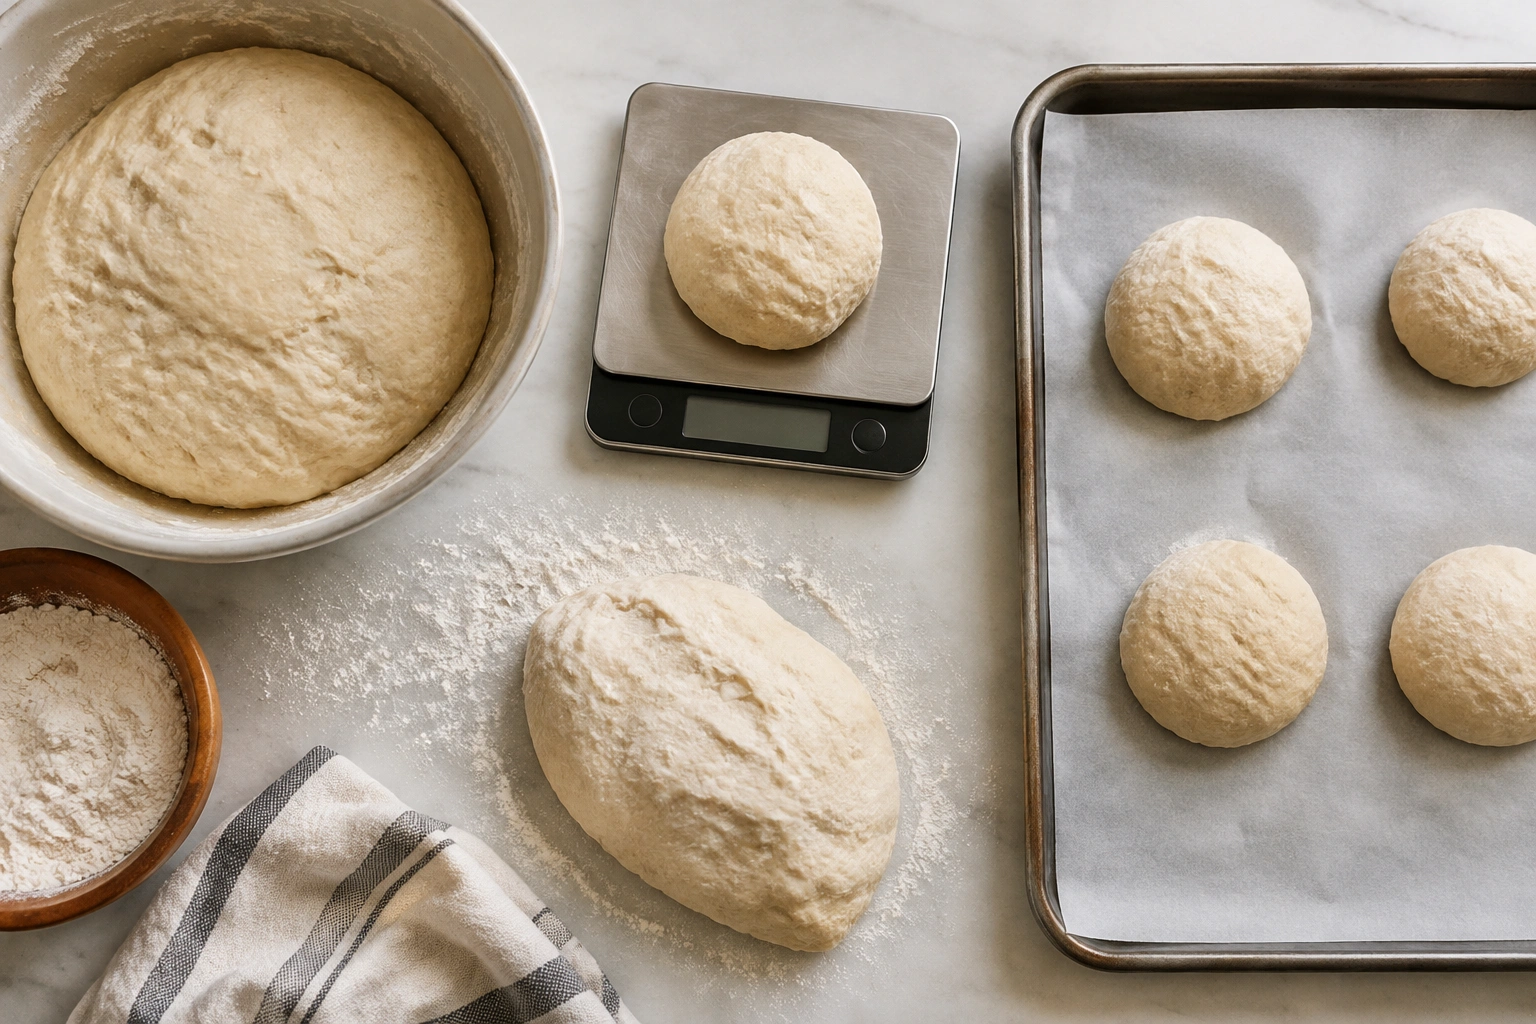
You’ll also want a clean work surface, a kitchen scale, parchment paper, and a baking sheet or loaf pan. A scale matters more than most people realize. When the portions are even, the braid stays balanced and bakes more evenly. Uneven pieces create a loaf that twists to one side or has one thick, underbaked section.
One more practical note: if you’re using a rich dough, such as challah-style dough, it often shapes more smoothly than a lean dough because the added fat and sugar make the dough more tender. That doesn’t mean lean dough cannot be braided; it just tends to feel firmer and less forgiving.
Quick decision guide
| Choice | Best when | Trade-off |
|---|---|---|
| 3-strand braid | You want the easiest classic braid | Less decorative than more complex braids |
| 4-strand braid | You want a more intricate look | Harder to keep even |
| Loaf pan | Your dough is soft or you want support | Less rustic shape |
| Free-form on a baking sheet | You want a more open, bakery-style look | More spreading risk |
| Enriched dough | You want a smoother, more pliable braid | Usually less lean and rustic |
| Lean dough | You want a firmer bread style | Can be less forgiving during shaping |
Best Dough Types for Braided Bread
Not every dough behaves the same way under your hands. Enriched doughs — the kind often used for challah, brioche-style loaves, and other soft breads — are usually the easiest to braid cleanly because they’re supple and easy to roll. They also tend to hold a polished shape well.
Lean doughs can still be braided, but they often resist shaping more. If the dough is stronger and drier, expect more spring-back during rolling. That doesn’t mean the loaf will fail; it just means you may need a short rest before continuing.
For beginners, a 3-strand braid is the most forgiving place to begin. It’s the classic braid and the easiest to keep symmetrical. If you want a more decorative loaf later, a 4-strand braid adds visual interest, but it also demands more attention to strand order and tension.
If your goal is a neat loaf with clean lines, choose the simplest braid that still gives you the look you want. A well-shaped 3-strand loaf usually looks more professional than a complicated braid done unevenly.
How to Divide Dough Evenly
Equal portions are the foundation of a balanced braid. If one strand is much larger than the others, it will dominate the loaf and make the braid lopsided.
Use a kitchen scale and divide the dough into the number of strands you need. For a 3-strand loaf, portion it into three equal pieces by weight. For a 4-strand loaf, divide it into four equal pieces. The exact weight depends on your recipe, but the principle stays the same: equal volume, equal structure, equal baking behavior.
If you’re working by eye, pinch off the pieces first, then weigh them and adjust. Small differences matter less than huge ones, but the closer you get now, the cleaner the braid will look later.
After dividing, shape each piece into a loose log and let the pieces rest briefly if they keep shrinking back. That short pause gives the gluten a chance to relax before you roll them into full strands. King Arthur Baking’s braiding guide recommends flattening the dough piece first, folding the upper edge over to the center, and sealing the seam well by pressing it. That fold-and-seal step helps create a smoother strand with better surface tension.
How to Roll Dough Into Even Strands
A good strand is even in thickness from end to end. Beginners often roll from the ends outward, which can leave the middle too thin and the ends bulky. A better method is to work from the center outward so the strand stays balanced.
Flatten each piece slightly, then roll it into a log. As you roll, use your hands to push gently from the center toward the ends. If one section gets thinner than the rest, pause and even it out before continuing.
A strand that is too thin will stretch and tear when you braid it. A strand that is too long and skinny can also dry out in the oven. As The Kitchn notes in its challah braiding guide, a thicker loaf bakes better, while a very long, thin loaf can dry out quickly. That’s a useful reminder: shape for structure, not just length.
If the dough keeps snapping back, stop and let it rest for a few minutes. That pause is often more effective than forcing the dough, which only tightens the gluten more. If the dough feels sticky, dust the work surface lightly rather than flooding it with flour. Too much flour can make the seam harder to seal and can create rough patches in the final loaf.
A useful visual cue
A properly rolled strand should look like a soft rope with rounded sides, not a flattened ribbon and not a tapered cord. If the strand has a dramatic bulge in the middle, keep rolling until the thickness is more even.
How to Braid a 3-Strand Bread Loaf
This is the core method, and once you learn it, you can use it for many braided breads.
- Place the three strands side by side on your work surface.
- Pinch the top ends together firmly so the braid starts from one anchored point.
- Cross the right strand over the center strand.
- Cross the left strand over the new center strand.
- Repeat, alternating right over center and left over center until you reach the end.
- Keep the braid loose rather than pulling the strands tight.
- Pinch the bottom ends together when you finish.
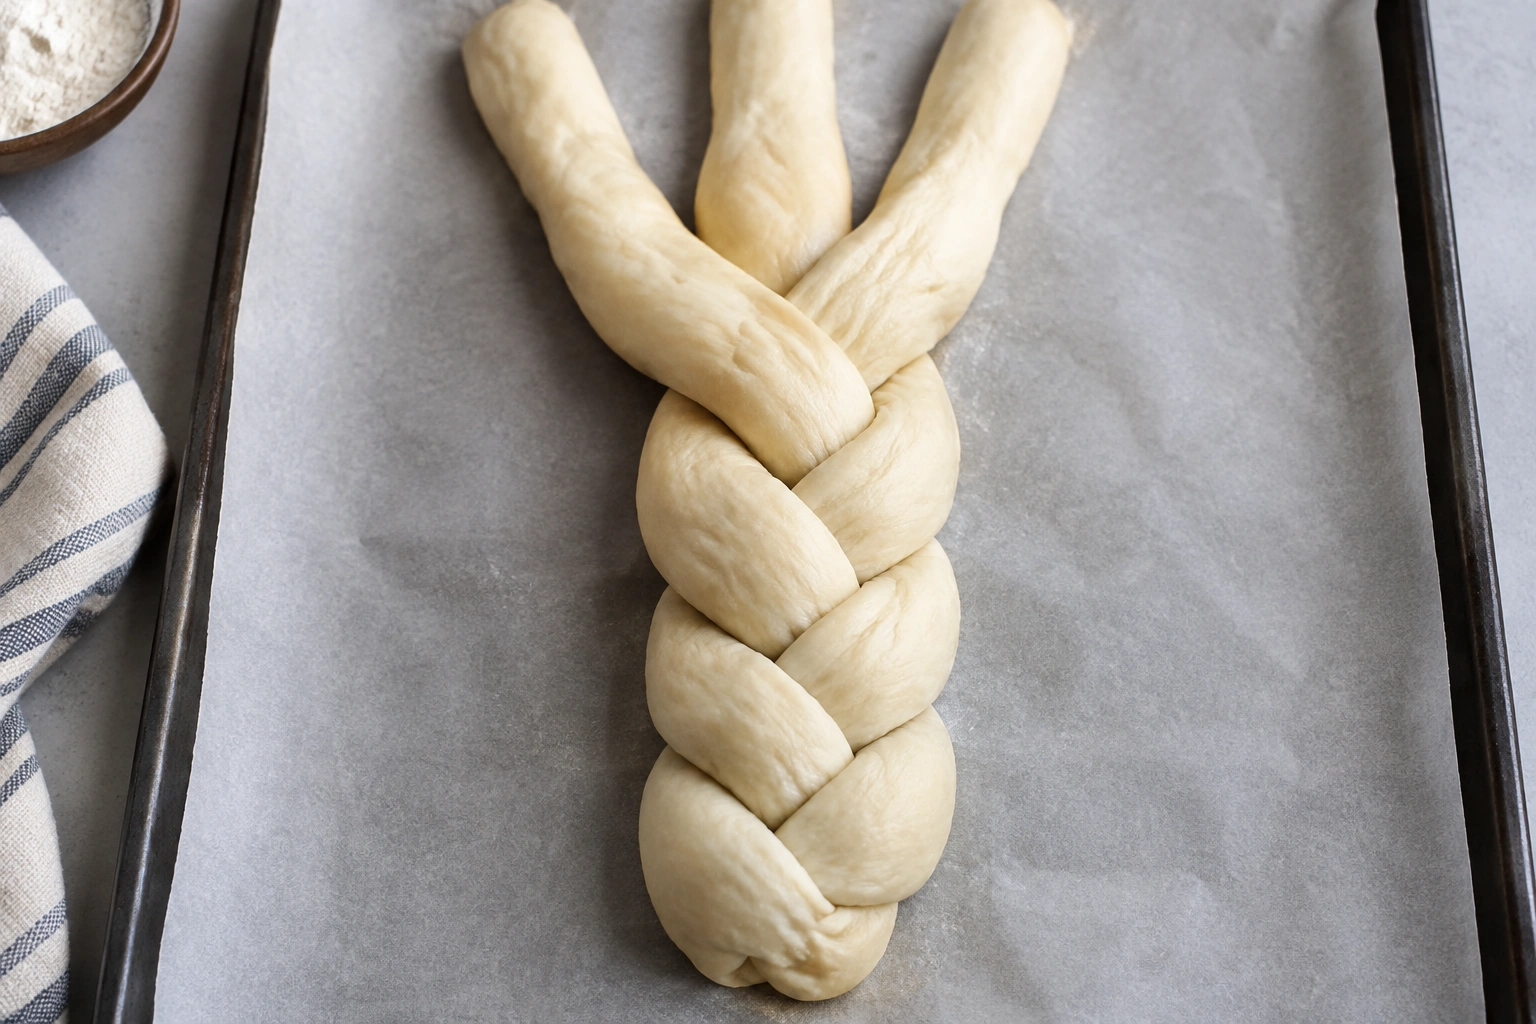
That alternating motion is the whole braid. The challenge is not remembering the pattern; it’s maintaining even tension as you go. If you pull too hard, the loaf looks stretched and may restrict expansion. If you braid too loosely, the loaf can open up during proofing.
One three-strand method that works especially well for an even look is to begin in the middle, braid toward one end, then flip the loaf and braid the other side from the center. That approach can help keep the braid balanced from end to end.
Think of the braid as a woven path, not a tight knot. The strands should sit next to each other with room to expand.
How to Tuck, Seal, and Shape the Ends
The ends matter more than many bakers expect. If they aren’t secured well, the braid can unravel while proofing or open in the oven.
After pinching the ends together, tuck them underneath the loaf if the shape allows it. That hidden seam gives the loaf a cleaner look and helps keep the braid anchored. If the dough is soft, you may also want to press the pinched end slightly into the loaf so it doesn’t lift during baking.
If the braid looks uneven at the ends, gently nudge the strands back into place before proofing. Once the dough rises, major reshaping becomes harder. This is one reason a slightly tighter braid is useful: it gives the loaf enough structure to hold its pattern, but it still leaves room for oven spring.
How to Proof a Braided Loaf Without Losing Definition
Proofing changes the braid. That’s normal. The strands soften, the gaps widen slightly, and the loaf puffs up. The goal is not to preserve the braid exactly as it looked at shaping; the goal is to keep the structure readable after the rise and bake.
A braid that is too loose before proofing can spread into a flat, vague loaf. A braid that is too tight can restrict expansion and look pinched after baking. The middle ground is a braid that feels secure but not compressed.
If you’re proofing free-form on a baking sheet, pay extra attention to shape retention. A loaf pan gives the dough more support, so it’s a safer choice if the dough is very soft or if you want a more upright profile.
Watch the dough itself rather than the clock alone. When it has visibly expanded and looks soft and pillowy, it’s usually closer to baking readiness. If you wait too long, the braid can lose definition and the loaf may spread more in the oven.
Egg Wash, Pan Choice, and Finishing Touches
Egg wash is optional, but it does two useful things: it deepens color and highlights the braid pattern. The sheen catches the light and makes the strands stand out after baking. If you want a matte finish or a more rustic look, you can leave the loaf plain.
A loaf pan offers more support and is often the better choice for soft doughs or for bakers who want less spreading. A baking sheet gives you a more open, rustic presentation, but the braid needs to be shaped with a little more discipline because it has less support.
Here’s a simple rule of thumb: if the dough feels soft in your hands, use a pan. If the dough feels firm and well-developed, free-form baking is more realistic.
Before the loaf goes into the oven, brush it gently with egg wash if using. Be careful not to drag the strands out of position. A light hand is enough.
How to Bake Braided Bread So It Holds Its Shape
Braided bread needs enough heat to expand, set, and brown without collapsing into a flat shape. The exact baking time depends on the recipe, loaf size, and dough style, so I won’t pin this to one universal number. What matters is that the loaf should go into a properly preheated oven and bake until the crust is set and the interior is finished according to your recipe.
If you’re baking free-form, parchment paper helps you move the loaf and keeps the base from sticking. It also makes the transfer cleaner, which matters when you’ve spent time shaping a neat braid.
Watch the loaf during the first part of baking. A well-shaped braid should expand a little and keep its definition. If the loaf spreads aggressively, the braid may have been too loose or the dough too soft for free-form baking.
The best braid is one that looks slightly tighter before baking than you want it to look finished. Proofing and oven spring will relax the lines.
Common Braiding Mistakes and How to Fix Them
Uneven strands
Problem: One strand is much thicker than the others, so the braid twists off-center.
Fix: Reweigh the dough portions next time. If you catch it early, you can still trim and redistribute a little dough before rolling.
Dough that keeps shrinking back
Problem: The strands resist rolling and spring back as soon as you stop.
Fix: Let the dough rest briefly, then continue. Resting is often better than forcing the dough tighter.
Strands that tear
Problem: The dough is too dry, too thin, or overworked in one area.
Fix: Stop stretching, press the torn section back together if possible, and reduce the length of the strand slightly. Thicker strands are more forgiving.
Braid that opens during proofing
Problem: The ends were not sealed well, or the braid was too loose.
Fix: Pinch the ends more firmly and tuck them underneath. Keep the braid snug enough to hold together, but not so tight that it can’t expand.
Flat, blurry braid after baking
Problem: The loaf overproofed or spread too much during the final rise.
Fix: Shape the loaf with more structure next time and consider using a loaf pan for support.
Troubleshooting: If Your Dough Springs Back, Tears, or Feels Too Soft
If the dough springs back, pause and give it a short rest. That’s the cleanest solution and usually the fastest one too. Dough that tears is telling you it needs gentler handling, less stretching, or a slightly shorter strand.
If the dough feels too soft, chilling it briefly can make shaping easier, especially for enriched dough. Soft dough can still be braided, but it often benefits from support. That’s where a loaf pan becomes a practical tool rather than a compromise.
If the dough is sticky, use the lightest dusting of flour you can manage. Too much flour can make the braid look dusty and can weaken the seal where the strands meet.
3-Strand vs 4-Strand Braids: Which One Should You Use?
The 3-strand braid is the best choice if you want a classic loaf and a low-stress shaping process. It’s easy to memorize, easy to correct, and forgiving if your strands are not perfectly perfect.
A 4-strand braid creates a more decorative loaf, but it asks more from you during shaping. You need to track the strand order more carefully, and the braid can look messy if one strand gets ahead of the others.
If you’re teaching bread shaping or learning it yourself, I’d recommend mastering the 3-strand braid first. Once your hands know how to keep tension even, moving to a 4-strand braid becomes much easier.
Braided Bread Examples and What to Expect
A challah-style loaf is one of the most common braided breads because the dough is usually supple and easy to shape. That softness is helpful, but it also means the braid benefits from careful support and a secure seal.
A pan-supported braid is a smart choice when the dough is rich or especially soft. The pan helps the loaf rise upward instead of outward, which keeps the braid more defined.
A free-form braid on parchment has a more rustic look, but it needs tighter shaping and a firm tuck at the ends. If the braid is loose, the loaf can spread and lose the clean lines you worked for.
The same braid can look noticeably different depending on proofing. A lightly proofed loaf will show stronger definition, while an overproofed loaf may look puffy but less distinct. That’s why shaping with a little extra structure at the beginning matters.
When to Consult a Master Baker
If your dough repeatedly tears, collapses, or refuses to hold a braid even after resting and careful shaping, it may be worth consulting a master baker or an experienced instructor. Sometimes the issue is not the braid at all — it’s dough development, hydration, or fermentation balance. A trained eye can spot whether the dough needs more strength, less proofing, or a different shaping approach.
Braiding bread gets easier with repetition, but the learning curve is gentler when you pay attention to the dough’s feel instead of trying to force a pattern. Once you learn to divide evenly, roll with consistent pressure, and keep the braid loose enough to breathe, the loaf starts to look polished almost on its own.