Baking soda can clean silver safely when the tarnish is light and the piece is not delicate. Use gentle methods, rinse well, and avoid abrasive scrubbing or risky mixed-material items.
Baking soda can help clean tarnished silver at home, but it is not the right choice for every piece. Used carefully, it can lift surface tarnish and restore shine without harsh chemicals.
- Best use: Baking soda works well on light tarnish and simple silver pieces.
- Safety first: Avoid scrubbing hard, especially on plated or detailed items.
- Material matters: Skip baking soda on pearls, glued parts, oxidized finishes, and delicate stones.
- Finish properly: Rinse, dry, and buff gently to prevent residue and water spots.
Baking Soda and Silver Cleaning: What It Can and Can’t Do at Home
Baking soda is useful for light to moderate tarnish because it helps loosen the dark film that forms on silver over time. It works best on surface tarnish, not on deep discoloration, heavy corrosion, or damage that has already etched the metal.
It is also important to know what baking soda cannot do. It will not repair scratches, remove pitting, or safely clean every decorative finish, so the goal is gentle cleaning, not aggressive scrubbing.
If you are unsure whether a piece is sterling silver, silver-plated, or finished with another coating, check the maker’s mark or the care instructions before cleaning. When in doubt, start with the mildest method first.
Why Baking Soda Works on Tarnished Silver
Tarnish on silver is usually a surface reaction, not dirt in the usual sense. Over time, silver reacts with sulfur compounds in the air and forms silver sulfide, which looks dark or dull.
The science behind tarnish removal
Baking soda is mildly abrasive and can help lift that surface film when used as a paste or in a foil-lined bath. In the foil method, the baking soda helps create an electrochemical reaction that can move tarnish away from the silver and onto the foil.
That is why the piece may look brighter after a short soak, especially if the tarnish is even and not too thick. The effect is strongest on smooth silver surfaces and less predictable on ornate areas with deep grooves.
Many silver-cleaning methods work by removing or converting tarnish, not by polishing the silver itself. That is why a gentle method often preserves detail better than a heavy polish.
When baking soda is a better choice than silver polish
Baking soda is often a better first step when you are cleaning lightly tarnished flatware, serving pieces, or everyday jewelry. It is also helpful if you want a low-cost option for routine upkeep rather than a strong commercial polish.
Commercial silver polish may be better for stubborn tarnish, but it can also be more abrasive or leave residue if used carelessly. If you are cleaning a piece you use often, a mild baking soda method may be enough to keep it presentable between deeper cleanings.
- Gentle on light tarnish when used correctly
- Easy to find in most kitchens
- Useful for simple home maintenance
- Not ideal for heavy tarnish or delicate finishes
- Can scratch if rubbed too hard
- May leave residue if not rinsed well
Safe Ways to Clean Silver with Baking Soda
Before you start, work on a soft towel or a padded surface so the piece does not get scratched if it slips. Use cool judgment as much as warm water: the wrong cloth or too much pressure can do more harm than the tarnish itself.
Baking soda paste for light tarnish on silverware and decor
For light tarnish, mix baking soda with a small amount of water to make a soft paste. The paste should look spreadable, not dry and gritty, because a thick, dry paste can drag across the surface and leave fine marks.
Apply it with your fingers or a soft cloth, then rub very gently in straight or small circular motions. Rinse promptly and dry right away so the baking soda does not leave a chalky film.
Combine baking soda with just enough water to form a smooth, creamy paste.
Spread a thin layer over the tarnished area using a soft cloth.
Wash away all residue, then dry with a clean lint-free towel.
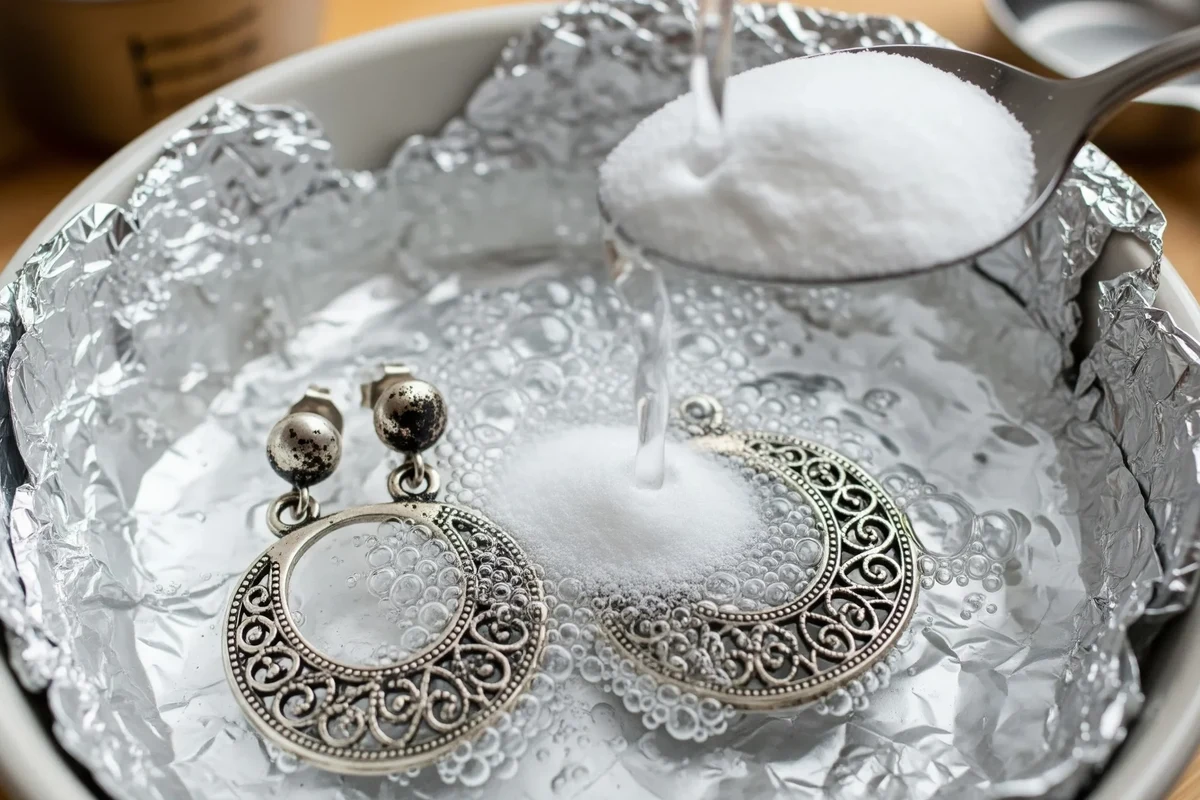
Foil, hot water, and baking soda for heavily tarnished pieces
The foil method is useful when the tarnish is more noticeable and the item is plain enough to soak safely. Line a bowl or pan with aluminum foil, place the silver so it touches the foil, add hot water, and stir in baking soda.
This method is especially helpful for flatware and simple serving pieces. It is less suitable for items with glued parts, porous stones, or finishes that should not be exposed to heat and moisture.
Use hot, not boiling, water and handle the bowl carefully to avoid burns. If the silver piece has gemstones, adhesive settings, wood, or lacquered details, skip the soak and use a gentler dry method instead.
How much baking soda to use and how long to leave it on
There is no single exact amount that works for every piece, because size, tarnish level, and water volume all matter. As a general home method, use enough baking soda to lightly cloud the water in the foil bath or enough to make a spreadable paste for spot cleaning.
Do not leave silver in the bath longer than needed. Once the tarnish loosens or lifts, remove the piece, rinse it well, and dry it immediately to avoid residue or spotting.
The silver still looks dull after cleaning.
The tarnish may be too heavy for baking soda alone, or the piece may need a second gentle pass. If the finish is delicate, stop before scrubbing harder and switch to a safer silver-specific polish or professional cleaning.
What Types of Silver Can Be Cleaned This Way
Not all silver items respond the same way, even if they look similar on the table or in a jewelry box. The metal type, finish, and any added materials determine whether baking soda is a good option.
Sterling silver vs. silver-plated items
Sterling silver is a solid silver alloy, while silver-plated items have a thin silver layer over another metal. Both can sometimes be cleaned with baking soda, but plated items need extra caution because the silver layer is thinner and easier to wear down.
If you are cleaning silver-plated pieces, use the lightest method first and keep rubbing to a minimum. If the plating is already thin or worn at the edges, a stronger cleaning approach can expose the base metal underneath.
Jewelry, flatware, trays, and decorative pieces
Flatware and plain trays are usually the easiest to clean because they have smooth surfaces and fewer fragile details. Simple sterling jewelry can also be cleaned carefully, especially if it has no soft stones or glued accents.
Decorative pieces with engraving, raised patterns, or tight corners may need more patience. Tarnish often hides in small details, so a soft cloth or cotton swab can help without forcing abrasive particles into the design.
- Test a small hidden area first
- Use soft cloths and light pressure
- Rinse and dry completely after cleaning
- Scrubbing with steel wool or rough pads
- Soaking pieces with glued or porous parts
- Leaving baking soda residue on the surface
Pieces that should not be treated with baking soda
Avoid baking soda on silver with pearls, opals, turquoise, amber, or other delicate stones unless the manufacturer specifically says it is safe. Also avoid it on blackened, oxidized, or intentionally antiqued finishes, because the cleaning can remove the decorative contrast.
If a piece has glued components, enamel, wood, or a protective coating, water and abrasion can weaken the assembly. For those items, check the care label or ask a professional before trying any home cleaning method.
Common Mistakes That Can Scratch or Damage Silver
Most problems happen not because baking soda is dangerous on its own, but because it is used too aggressively. Silver is soft enough that careless scrubbing can leave marks faster than many people expect.
Using too much pressure or abrasive scrubbing tools
Pressing hard does not clean better. It usually just increases the chance of micro-scratches, especially on polished flatware, mirror-finish trays, and thin plated items.
Choose a soft cloth, sponge, or cotton pad instead of abrasive scrubbers. If the tarnish is stubborn, repeat a gentle cleaning rather than trying to force the shine back in one pass.
Cleaning oxidized finishes, gemstones, or glued components
Oxidized silver is intentionally dark in recessed areas, so baking soda can remove the look that gives the piece its character. Gemstones and glued settings are also risky because moisture and rubbing can loosen adhesives or dull the stone surface.
When a piece combines silver with other materials, think about the most fragile part, not just the metal. The safest cleaning method is the one that protects the entire item, not only the silver surface.
Mixing baking soda with unsafe or ineffective products
Do not mix baking soda with random household cleaners unless you know the product is compatible. Some combinations can create fumes, reduce cleaning effectiveness, or leave a film that is harder to remove than the original tarnish.
For silver care, simple is usually better: baking soda, water, foil, a soft cloth, and careful rinsing. If you want stronger results, use a silver product made for the material and follow the label exactly.
How to Rinse, Dry, and Polish Silver After Cleaning
The finishing steps matter as much as the cleaning itself. Residue, water spots, and rough drying can undo the improved look you just created.
Proper rinsing and drying to prevent residue and water spots
Rinse silver thoroughly under clean water so no baking soda remains in seams or engraving. Leftover powder can dry into a pale film, especially on detailed pieces and flatware handles.
Dry immediately with a soft towel, then let the item air-dry fully before storing it. Moisture trapped in cloth-lined boxes or drawers can encourage new tarnish.
Buffing for shine without overpolishing
After drying, buff gently with a clean microfiber cloth to bring back the shine. The goal is to smooth the surface, not to keep rubbing until the metal feels warm from friction.
If the piece still looks hazy, check for leftover residue before you polish harder. Many times the issue is not lack of polishing but incomplete rinsing.
For regular upkeep, wipe silver after use and store it dry. A few minutes of gentle care now can reduce the need for stronger cleaning later.
Storage habits that slow down future tarnish
Store silver in a dry place away from rubber bands, newspapers, and other materials that can speed tarnish. Soft anti-tarnish cloths or lined storage sleeves can help, especially for pieces you do not use every day.
Try to keep silver separated so pieces do not rub against one another. Scratches make future tarnish more noticeable because they catch light unevenly.
When to Skip DIY Cleaning and Choose a Professional Method
Home cleaning is useful, but it is not the safest answer for every item. Some silver pieces are better handled by a professional cleaner, especially when value, age, or construction is a concern.
Heirloom, antique, and high-value silver considerations
Heirloom and antique silver can have collector value that depends on original finish, maker’s marks, and condition. A cleaning method that seems harmless can reduce that value if it removes patina or alters the surface.
If the piece is rare, insured, or sentimental, consider professional advice before using baking soda. That is especially true when you are not sure whether the finish should stay bright or slightly aged.
Deep tarnish, delicate detailing, and mixed-material pieces
When tarnish is very deep, baking soda may only improve the surface and leave dark areas behind. Intricate filigree, hollow handles, and mixed materials also make home cleaning harder because residue can hide in tiny spaces.
In those cases, a professional method may be faster and safer than repeated DIY attempts. It can also reduce the risk of bending, loosening, or scratching fragile parts.
Final recap: choosing the safest cleaning method for your silver
Baking soda and silver cleaning can work well at home when the tarnish is light, the item is simple, and the cleaning is gentle. Start with the mildest method, stop if the piece has delicate materials, and always rinse and dry carefully.
If you are dealing with antiques, mixed materials, or deeply tarnished silver, choose the safest route rather than the strongest one. For more home care guidance that respects material limits, see our related posts on air fryer basket care and safe liner use, where the same principle applies: match the cleaning method to the material.
For everyday silver, a careful baking soda routine is often enough to keep pieces looking bright without overworking the metal. When in doubt, use less pressure, less time, and more caution.
Always check manufacturer care instructions for jewelry, serving pieces, and plated items before using any home cleaning method. If a piece has unknown materials or special finishes, professional cleaning is the safer choice.
Frequently Asked Questions
No. Baking soda works best on light to moderate surface tarnish. Deep tarnish, delicate finishes, and mixed-material pieces may need a different method.
Sometimes, but only with very gentle cleaning. Silver-plated items have a thin silver layer, so avoid heavy scrubbing that can wear it down.
Only as long as needed for the tarnish to loosen. Remove the piece promptly, then rinse and dry it well to prevent residue.
Not always. Delicate stones, glued settings, and coated pieces can be damaged by moisture or abrasion, so check the care instructions first.
The tarnish may be too heavy for baking soda alone, or residue may still be on the surface. Rinse and dry thoroughly before deciding whether a second gentle pass is needed.
Store it dry, separate pieces so they do not rub, and wipe them after use. Anti-tarnish cloths or lined storage can also slow future tarnish.
