Baking soda can clean lightly tarnished silverware safely when you use a gentle paste or soak and rinse well. For deep tarnish, plated finishes, or decorative pieces, start carefully and switch methods if the shine does not return.
Baking soda for cleaning silverware is a simple, budget-friendly way to lift light tarnish and restore shine. Used the right way, it can clean forks, spoons, and knives without the harsh smell or higher cost of many commercial polishes.
- Best use: Baking soda works well for light tarnish and routine silverware upkeep.
- Safety first: Use soft cloths, light pressure, and thorough drying to avoid scratches and spots.
- Material matters: Stainless steel is easiest; silver-plated and decorative pieces need extra care.
- Know the limit: Deep tarnish or antique finishes may need commercial polish or professional restoration.
Why Baking Soda Works on Tarnished Silverware
Baking soda helps loosen the dull film that builds up on silverware over time. That film is usually a mix of oxidation, food residue, and minerals from water, so a gentle alkaline cleaner can help break it apart and make wiping easier.
The science behind lifting oxidation and dull residue
When silver or silver-plated pieces tarnish, the surface darkens as a chemical reaction occurs over time. Baking soda does not magically erase deep tarnish, but it can soften surface buildup so you can remove it with less rubbing.
Its mild abrasiveness also helps with stuck-on residue. That matters in a kitchen setting, where dried sauce, tea stains, or water spots can make silverware look older than it really is.
Baking soda is often used in cleaning because it is mildly alkaline and slightly abrasive, which makes it useful for loosening grime without the stronger odor of many specialty cleaners.
When baking soda is a better choice than commercial silver polish
Baking soda can be a smart choice when the tarnish is light, the item is used often, or you want a low-cost cleaning option for routine upkeep. It is also helpful when you want a more familiar pantry ingredient instead of a dedicated polish.
Commercial silver polish may work faster on deep tarnish, but it can also require stronger ventilation, more careful handling, and extra rinsing. For everyday maintenance, baking soda is often the gentler first step.
What Silverware Types and Materials Can Be Safely Cleaned
Before you start, identify what kind of silverware you have. The right method depends on whether the piece is stainless steel, silver-plated, or sterling silver, because each material reacts differently to abrasion and moisture.
Stainless steel, silver-plated, and sterling silver differences
Stainless steel is the most forgiving. It usually handles gentle baking soda cleaning well, especially when you use a soft cloth or sponge and avoid aggressive scrubbing.
Silver-plated pieces have a thin layer of silver over another metal. They can be cleaned with baking soda, but you need a lighter touch because too much abrasion can wear down the plating over time.
Sterling silver is more durable than plating, but it still benefits from gentle care. If a piece has engraving, decorative edges, or a dark antique finish, test a small hidden area first.
If you are not sure whether a piece is silver, silver-plated, or stainless steel, check the maker’s mark or care instructions first. When in doubt, use the mildest method and avoid anything that could scratch a decorative finish.
Materials and finishes to avoid scrubbing with baking soda
Avoid using baking soda as a scrub on soft metals, delicate gold plating, lacquered pieces, or items with painted details. The same caution applies to blackened, oxidized, or intentionally aged finishes, since scrubbing can remove the look you were trying to keep.
Also avoid abrasive cleaning on hollow-handled flatware if you do not know how it was made. Some decorative handles and bonded pieces can be damaged by prolonged soaking or heavy pressure.
Simple Baking Soda Cleaning Methods for Everyday Silverware
For routine cleaning, keep the method simple. The goal is to remove surface dullness without grinding away the finish.
Dry paste method for light tarnish on forks, spoons, and knives
For light tarnish, make a soft paste with baking soda and a little water. Apply it with a damp cloth, rub gently in short strokes, then rinse well and dry right away.
This method works well when the silverware looks dull but not deeply stained. It is also useful for spot-cleaning individual pieces after a meal.
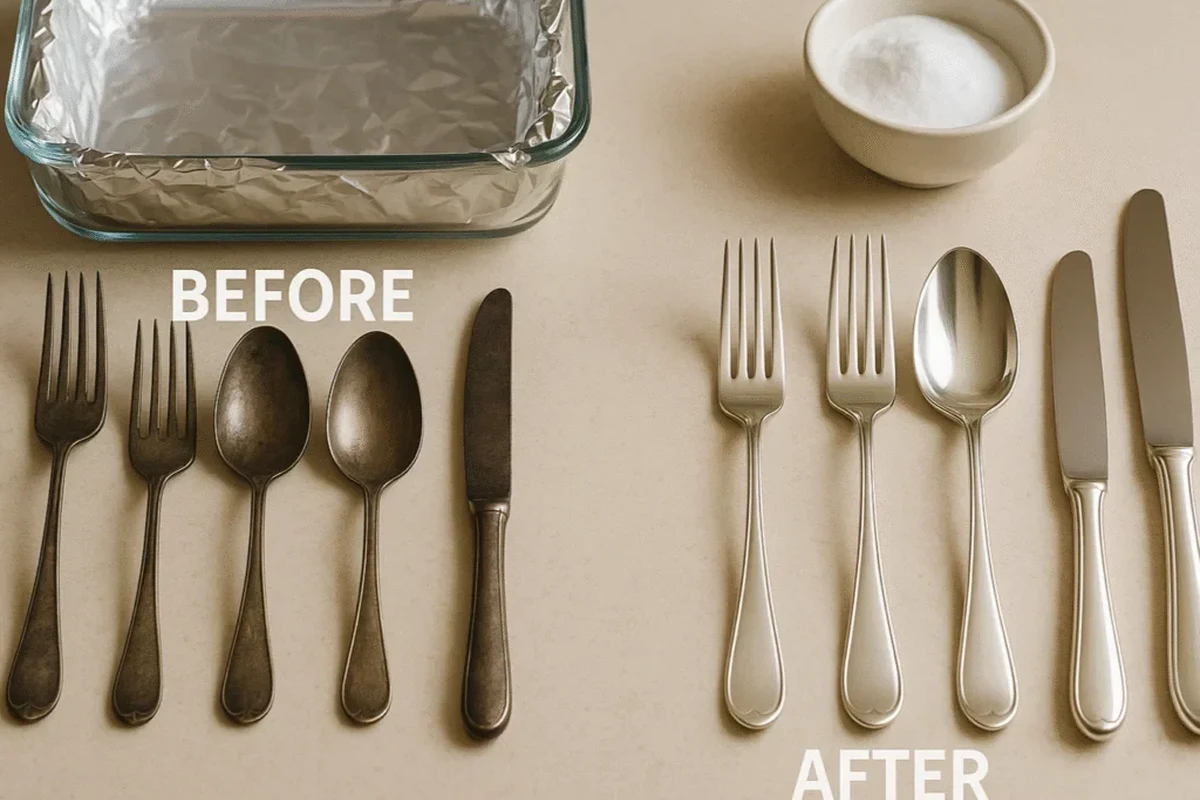
Foil-and-hot-water soak for heavier discoloration
For more noticeable tarnish, line a bowl with aluminum foil, add hot water, and stir in baking soda. Place the silverware so it touches the foil, let the reaction help loosen the tarnish, then remove, rinse, and dry completely.
This method is often better than repeated hand rubbing because it relies more on the cleaning reaction than on friction. That can be especially helpful for patterned handles or pieces with small details.
The exact amount of baking soda depends on bowl size and how many pieces you are cleaning. A common home approach is to use enough to lightly cloud the water, then add a little more if the tarnish is stubborn.
How much baking soda to use and how to mix the right consistency
For a paste, start with a small amount of baking soda and add water slowly until it looks spreadable, not watery. You want it thick enough to cling to the surface but soft enough to wipe off easily.
For a soak, dissolve baking soda in hot water and keep the mixture loose rather than gritty. If you see undissolved clumps, stir before adding the silverware so the pieces are cleaned evenly.
Step-by-Step Process for Getting an Even Shine Without Scratches
A careful sequence matters more than force. Clean silverware usually looks better when you remove loose soil first, apply the cleaner evenly, and dry it fully before putting it away.
Pre-rinse, apply, rinse, and dry in the correct order
Rinse off food residue with lukewarm water so you are not grinding dried bits into the finish.
Use either the paste or soak method, depending on the level of tarnish.
Remove all residue so the surface does not dry with a chalky film.
Use a clean towel and do not leave silverware to air-dry if you want the brightest finish.
Using soft cloths, non-abrasive sponges, and safe pressure
Choose a soft cloth or a sponge without a rough scrubbing pad. Mild pressure is enough; if you have to press hard, the tarnish may be deeper than a home method should handle.
Think of it like polishing a delicate pastry finish: steady, light contact gives a better result than aggressive rubbing. Too much force can leave tiny scratches that make the metal look cloudy later.
Be careful with sharp knife edges and wet handles. Dry each piece one at a time so you do not cut yourself or drop slippery silverware into the sink.
Polishing patterns that help prevent streaks and water spots
Wipe in one direction rather than scrubbing in circles. Straight strokes help reduce visible streaks, especially on flat handles and knife blades.
Finish by buffing with a dry cloth. That last pass removes moisture and helps prevent water spots, which are one of the most common reasons cleaned silverware still looks dull.
Common Mistakes That Can Damage Silverware or Reduce Shine
Most problems come from trying to speed up the job. Baking soda is useful, but it still needs a gentle hand and a clean rinse.
Over-scrubbing, using the wrong abrasive tool, and leaving residue behind
Over-scrubbing can leave fine scratches that scatter light and make silverware look less shiny. Rough pads, steel wool, and abrasive powders are especially risky on plated items.
Leaving baking soda residue behind can also create a chalky film. If the silverware looks cloudy after drying, it usually means it needs a better rinse and a fresh towel buff.
- Use a soft cloth and rinse completely
- Dry each piece right away
- Test a hidden area on older silverware
- Scrubbing with steel wool or rough pads
- Letting paste dry hard on the metal
- Using heavy pressure on plated pieces
Mixing baking soda with unsafe cleaners or harsh acids
Do not mix baking soda with bleach or other strong cleaners. That can create unsafe reactions or reduce cleaning effectiveness, depending on the product.
Also avoid pairing it casually with strong acids unless you know exactly what the cleaner is meant to do. In a kitchen, simple usually works best: one cleaner, one purpose, and a full rinse.
Why soaking too long can affect finishes and decorative details
Short soaks are usually enough. Leaving silverware in a baking soda bath for too long can dull decorative finishes, loosen adhesives on handled pieces, or leave mineral film behind if the water cools and dries on the surface.
If the silverware has ornate engraving or mixed materials, check it sooner rather than later. A quick look after a few minutes can prevent overcorrection.
Cleaning Heavily Tarnished Silverware: When Baking Soda Is Not Enough
Some silverware responds beautifully to baking soda, but some does not. If the tarnish is deep, uneven, or old enough to look black rather than gray, a pantry method may only improve it a little.
Signs the tarnish is too deep for a home method
If the piece still looks dark after a gentle paste or soak, the tarnish may be beyond surface residue. Deep pitting, rough texture, or dark spots that do not lighten usually mean the finish needs stronger treatment.
Another sign is if you can feel buildup with your fingertips after cleaning. That suggests the discoloration is not just surface dust, and more careful restoration may be needed.
When to switch to commercial polish or professional restoration
Switch to a commercial silver polish if the item is valuable, deeply tarnished, and labeled as safe for that product. Follow the manufacturer’s directions closely, since formulas vary and some require specific cloths or rinsing steps.
For heirloom pieces, antique silverware, or items with sentimental value, professional restoration may be the safer option. That is especially true if the piece has engraving, unusual plating, or a finish you do not want to risk.
Practical examples of safe cleanup versus risky overcorrection
A lightly dulled teaspoon usually does well with a baking soda paste and a soft cloth. A heavily blackened serving spoon may need more than a home method, but that does not mean it should be attacked with a rough pad.
In other words, choose the mildest effective method first. If the result is only partly improved, stop before you create scratches that are harder to fix than the tarnish itself.
Drying, Storing, and Preventing Future Tarnish
Good drying and storage habits matter almost as much as cleaning. Silverware that stays dry and protected will usually need less polishing later.
Best drying methods to avoid spots and moisture damage
Hand-dry each piece with a lint-free towel as soon as you rinse it. Water droplets left on metal can leave spots, and moisture trapped in drawer organizers can slow the shine over time.
If you have a lot of pieces, lay them on a clean towel in a single layer before putting them away. That helps prevent water from pooling in crevices or along decorative edges.
Storage choices that slow tarnish in humid kitchens
Store silverware in a dry drawer or a lined container rather than in an open, humid area. Anti-tarnish cloths or sleeves can also help reduce exposure to air, which is what drives tarnish in the first place.
In very humid kitchens, even good silverware can dull faster. Keeping it away from the sink, dishwasher steam, and damp dish towels makes a noticeable difference over time.
Routine care habits for special-occasion and everyday silverware
For everyday use, a quick wash, rinse, and dry is often enough to keep silverware looking clean. For special-occasion pieces, occasional baking soda cleaning can help maintain a bright finish without resorting to heavy polishing.
If you also care for other kitchen tools, it helps to use the same calm, material-specific mindset. For example, knowing when a surface can take heat or moisture matters just as much with appliances, whether you are checking whether air fryers need to preheat or deciding how to clean a delicate utensil finish.
Final Verdict: Is Baking Soda the Best Easy Shine Solution for Silverware?
For many households, yes, baking soda is one of the easiest ways to clean silverware. It is affordable, familiar, and often strong enough for light tarnish and routine maintenance.
Best use cases for quick maintenance, budget cleaning, and gentle polishing
Choose baking soda when you want a low-cost cleaner for weekly or monthly touch-ups. It is also a good fit when you are cleaning mixed sets of forks, spoons, and knives and want a simple method that does not require specialized supplies.
If you are already keeping your kitchen routine efficient, the same practical approach can help with other cleanup decisions too, such as checking whether air fryer baskets are dishwasher safe before you scrub a coated part the wrong way.
When to choose a different method based on material, tarnish level, and time
Choose a different method when the silverware is heavily tarnished, antique, plated with a fragile finish, or made from a material you cannot identify confidently. In those cases, the safest route is to verify the care instructions, test a hidden area, or use a product made for that exact finish.
Baking soda for cleaning silverware is best seen as a gentle first-line method, not a fix for every problem. Used carefully, it can bring back a clean, even shine while helping you avoid scratches, residue, and unnecessary expense.
Baking soda is a smart choice for light tarnish, regular upkeep, and quick shine restoration on many types of silverware. For deep tarnish or delicate finishes, start gently and switch methods before you damage the surface.
Frequently Asked Questions
Yes, if you use a soft cloth or non-abrasive sponge and light pressure. Scratches are more likely when you use rough pads, steel wool, or scrub too hard.
Use a small amount for a paste and add water slowly until it is spreadable. For a soak, add enough baking soda to lightly cloud the water, then adjust based on tarnish level and bowl size.
Usually yes, but use a very gentle touch because plating is thinner than solid silver. Test a hidden spot first and avoid heavy scrubbing or long soaking.
Rinse again, dry with a clean towel, and check for leftover residue or water spots. If the tarnish is still dark or rough, the piece may need a commercial polish or professional restoration.
It is better not to rely on that mix for silverware cleaning. The reaction can reduce cleaning effectiveness, and you still need to rinse thoroughly to avoid residue.
Dry it completely after washing and store it in a dry place away from humidity. Anti-tarnish cloths or sleeves can also help slow future tarnish.
