
Dry Measuring Cups vs Liquid Measuring Cups: How to Choose the Right One Every Time

If you’ve ever wondered why your recipe asks for one type of cup instead of another, the answer is simpler than it looks: dry measuring cups vs liquid measuring cups are built for different jobs. They may hold the same volume, but they are not designed to be used the same way.
For busy home cooks, that difference matters. A flour-heavy muffin batter, a thin soup, and a cookie dough all behave differently when measured. Using the right cup helps you avoid spills, reduce waste, and keep recipes consistent.
What’s the Difference Between Dry Measuring Cups and Liquid Measuring Cups?
Dry measuring cups are meant for ingredients you scoop and level, like flour, sugar, oats, rice, and nuts. They usually come as a nested set with standard sizes such as 1/4 cup, 1/3 cup, 1/2 cup, and 1 cup. King Arthur Baking notes that some sets also include extra sizes, such as 1/8 cup, 2/3 cup, and 3/4 cup, which can be helpful when baking.
Liquid measuring cups are meant for pourable ingredients like water, milk, broth, and oil. They usually have a spout and measurement markings on the side so you can pour accurately without filling to the rim.
The practical difference is this:
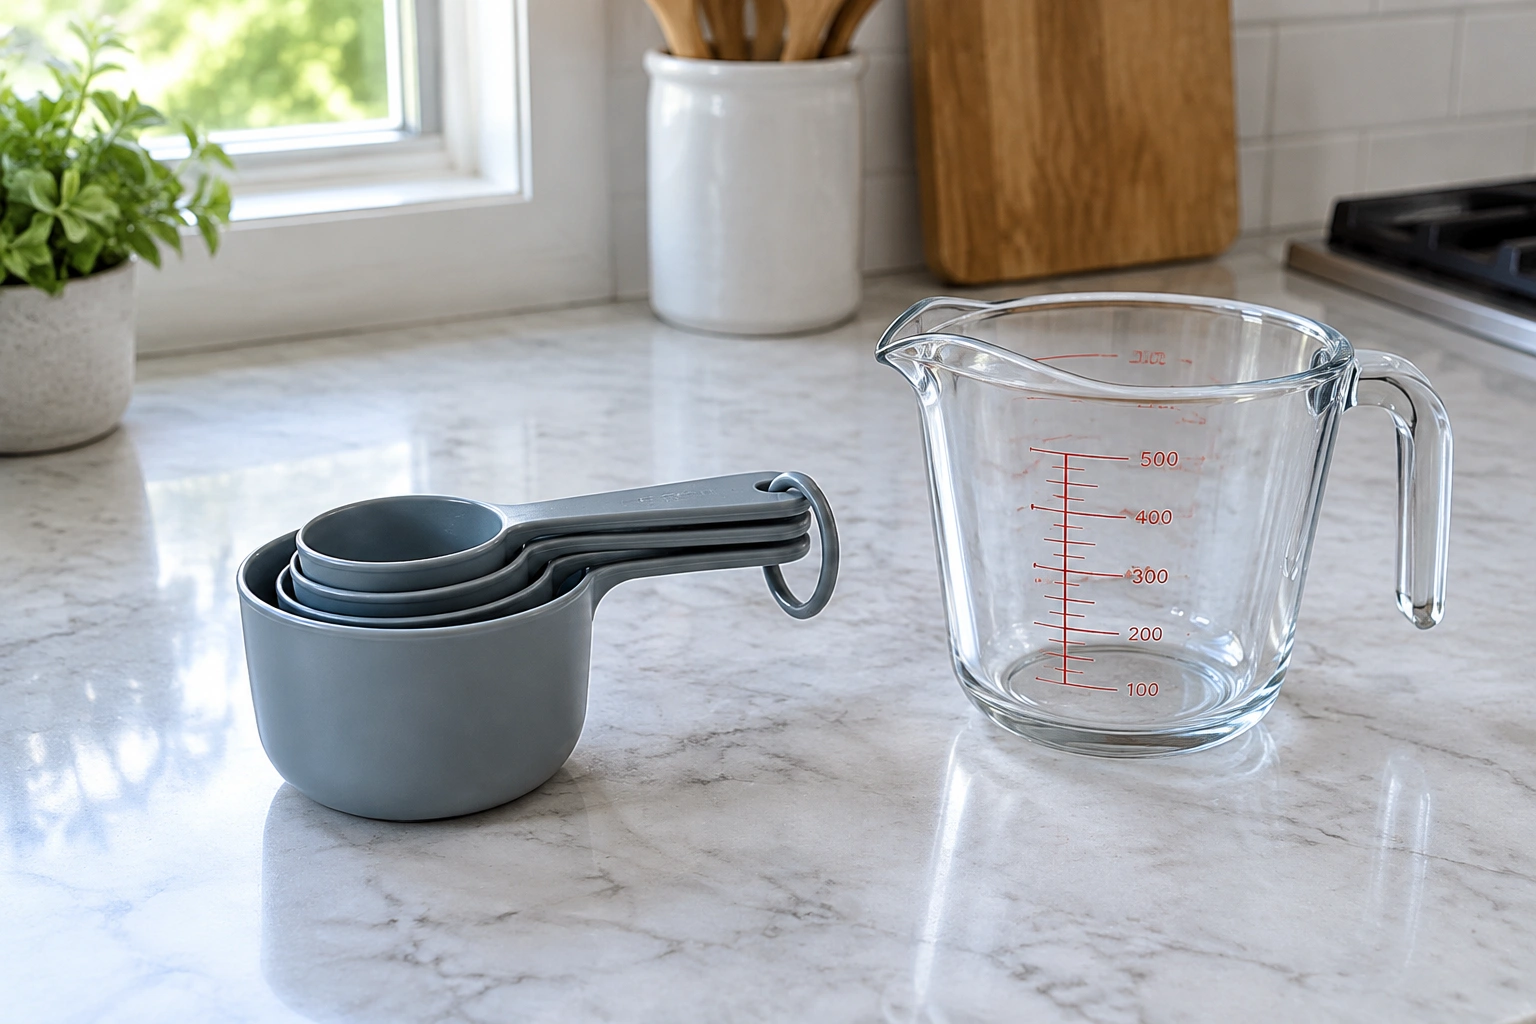
- Dry cups are for leveling solids or scoopable ingredients.
- Liquid cups are for reading a pourable ingredient at eye level.
America’s Test Kitchen notes that both types hold the same volume, but they should not be used interchangeably because the shape makes them better for different measuring tasks.
How Their Shapes and Markings Work
The shape of each cup is doing real work for you.
Dry measuring cups are typically short and wide. That shape makes it easy to fill the cup all the way and then level off the excess with a straight edge, like the back of a knife or a spatula. Because the top is open and flat, you can get a consistent measurement without guessing where the line should be.
Liquid measuring cups are taller and usually have extra space above the highest fill line. That headroom matters. It keeps liquid from sloshing over while you carry the cup to the bowl, and it gives you room to read the markings accurately. You should set the cup on a flat surface and read the line at eye level, and you should not fill it to the top unless the recipe specifically calls for that amount and the cup is designed for it.
Here’s the rule that saves the most mistakes: read liquid measurements at eye level, not from above. Looking down into the cup can make the line appear higher or lower than it really is.
When to Use a Dry Measuring Cup
Use a dry measuring cup for ingredients that can be scooped, leveled, or packed according to the recipe.
Common examples include:
- Flour
- Granulated sugar
- Brown sugar, when the recipe says to pack it
- Oats
- Rice
- Nuts
- Chocolate chips
- Shredded coconut
The leveling method is the key. Fill the cup until it’s heaped, then level it off with a flat edge. That gives you a repeatable measure.
A few practical notes:
- Flour: Spoon it into the cup, then level it. Scooping directly from the bag can compress it and give you more flour than the recipe expects.
- Brown sugar: Usually packed firmly into the cup unless the recipe says otherwise.
- Oats and rice: Scoop and level; don’t shake the cup to settle them unless the recipe instructs you to do that.
If a recipe is sensitive to texture, especially cakes, muffins, and cookies, this method matters more than most people realize.
When to Use a Liquid Measuring Cup
Use a liquid measuring cup for ingredients that pour.
Common examples include:
- Water
- Milk
- Broth
- Oil
- Vinegar
- Juice
- Melted butter, if the recipe allows it
The easiest way to use one correctly is to place it on a flat counter, pour in the liquid, and bend down so your eyes are level with the markings. Stop when the bottom of the meniscus, the curved surface of the liquid, reaches the line you need.
That eye-level check is why liquid cups are shaped the way they are. A narrow cup makes reading the line easier, and the spout makes pouring safer and cleaner.
For soups, sauces, and pancake batter, this cup is usually the most practical choice because it reduces spills and helps you measure without transferring ingredients twice.
How to Measure Common Ingredients Correctly
Flour
Flour is one of the easiest ingredients to overmeasure.
Best method:
1. Fluff the flour in the container.
2. Spoon it into a dry measuring cup.
3. Level it off.
Why this helps: flour compacts when you scoop it directly. That can throw off baked goods enough to make them dense or dry.
Brown Sugar
Brown sugar is usually measured by packing it into a dry measuring cup unless the recipe says to leave it loose.
Press it in firmly enough that it holds the shape of the cup when turned out. If you’re unsure, follow the recipe language exactly, because “packed” and “lightly packed” are not the same thing.
Milk
Use a liquid measuring cup.
Pour slowly, then check the line at eye level. For recipes like pancakes or custards, even a small overpour can change the batter consistency.
Oil
Use a liquid measuring cup, especially if the amount is more than a tablespoon or two.
Oil is slippery and easy to misread in a dry cup. A liquid cup gives you a cleaner pour and less chance of overshooting the amount.
Broth
Use a liquid measuring cup.
Broth is one of the clearest examples of why the right cup matters. It’s thin, easy to spill, and often used in larger amounts. A spouted cup makes it easier to move from counter to pot without drips.
Can You Substitute One Cup Type for the Other?
Sometimes, yes. But only in a pinch.
Because both types hold the same volume, a 1-cup dry measuring cup and a 1-cup liquid measuring cup are equal in capacity. The issue is not volume; it’s usability.
Use either cup if you’re in a pinch and the recipe is low-stakes, like casual cooking where a small measuring difference won’t matter much. Use the proper cup for baking and for any ingredient that needs exact leveling or careful reading.
A dry cup can work for liquids if you’re careful, but it’s easy to spill before you reach the top. A liquid cup can work for dry ingredients, but leveling flour or sugar in a tall cup is awkward and less precise.
Use this simple decision rule:
- Cooking a soup, sauce, or stew? A small measuring error is usually less damaging, so either cup can work in a pinch.
- Baking cookies, cake, or bread? Use the correct cup whenever possible, especially when you need to level dry ingredients or read a line accurately.
If you’re measuring a dry ingredient in a liquid cup, the result is often a little messy and a little less accurate. If you’re measuring liquid in a dry cup, you may lose some of the ingredient before it reaches the bowl.
Why Accurate Measuring Matters for Baking and Cooking
In cooking, a little variation is often acceptable. In baking, the margin is much smaller.
Too much flour can make muffins heavy. Too little liquid can make batter too thick. Too much oil can make a recipe greasy. Too little broth can leave a soup underseasoned and too thick.
That’s why measuring tools are not just about convenience. They protect texture.
This is also where volume and weight come into the conversation. Volume measurements are familiar and fast, but a kitchen scale can be a helpful option, especially for dry ingredients when a recipe lists weights. If you bake often, a scale can reduce guesswork for flour, sugar, and other dry ingredients.
For meal prep, accuracy also helps with consistency. If you make the same grain bowl or sauce every week, using the same measuring method keeps the result steady and reduces waste.
Common Measuring Mistakes to Avoid
Filling a liquid cup to the brim
Liquid cups are designed with extra space. If you fill them to the top, you’re more likely to spill and less likely to read the line accurately.
Reading liquid measurements from above
This is a common source of error. Get down to eye level so the line is honest.
Scooping flour directly from the bag
This often packs the flour, which can lead to too much in the cup.
Guessing with brown sugar
Some recipes want packed sugar. Others don’t. Guessing here can change the moisture and structure of the final dish.
Using the wrong cup for a messy ingredient
Oil, broth, and milk are easier in liquid cups. Flour and oats are easier in dry cups. Matching the tool to the ingredient saves time and cleanup.
Do You Need Both Types of Measuring Cups?
For most kitchens, yes.
A nested dry cup set is compact, inexpensive in practical terms, and fast to grab for flour, sugar, oats, and rice. A liquid measuring cup is worth having because it makes pouring and reading easier for water, milk, broth, and oil.
If you cook mostly savory meals and only bake occasionally, one liquid cup and a basic dry set will cover nearly everything. If you bake regularly, having both is the safer, less frustrating setup.
A kitchen scale is the third tool worth considering if you want more consistency, especially for baking. But it does not replace the convenience of a liquid cup for soups or a dry cup for quick scooping.
If you’re also organizing pantry staples for meal prep, it helps to pair accurate measuring with good storage habits. This guide on how to store dry goods so they stay fresh can help keep flour, rice, and oats easy to measure and use.
Quick Reference: Which Measuring Cup Should You Use?
Use this fast guide when you’re in the middle of cooking:
| Ingredient | Best Cup Type | Why |
|---|---|---|
| Flour | Dry measuring cup | Can be spooned and leveled accurately |
| Granulated sugar | Dry measuring cup | Easy to scoop and level |
| Brown sugar | Dry measuring cup | Usually needs to be packed |
| Oats | Dry measuring cup | Solid ingredient, easy to level |
| Rice | Dry measuring cup | Better for scoop-and-level measuring |
| Milk | Liquid measuring cup | Easier to pour and read |
| Water | Liquid measuring cup | Clear liquid, best read at eye level |
| Broth | Liquid measuring cup | Prevents spills and overpouring |
| Oil | Liquid measuring cup | Slippery, easier to control when pouring |
| Nuts | Dry measuring cup | Scoop and level for repeatability |
If you only remember one thing, remember this: dry cups are for leveling, liquid cups are for pouring.
Final Takeaway
The difference between dry and liquid measuring cups is less about capacity and more about design. Dry cups help you measure solids cleanly and consistently. Liquid cups help you pour and read liquids without guessing.
For busy households, that distinction pays off in fewer mistakes, better texture, and less wasted food. Once you match the cup to the ingredient, the rest of the recipe gets easier.