
How to Make Sourdough Starter at Home: A Reliable Beginner’s Guide

If you’ve ever wanted to bake real sourdough bread, the first skill to learn is how to make sourdough starter from scratch. It sounds mysterious at first, but the process is straightforward: flour, water, time, and a little consistency.
A starter is simply a living culture of wild yeast and lactic acid bacteria that feed on flour. The yeast creates lift, while the bacteria produce the tangy flavor and help shape the starter’s environment. Once the culture is strong enough, it can raise bread dough without commercial yeast.
The part that usually trips people up is not the mixing. It’s the waiting. A starter often looks lively early on, then quiets down for a few days before becoming active again. That pause is normal, and it’s one reason beginners quit too soon.
What a Sourdough Starter Is and Why It Works
Think of starter as a small fermentation ecosystem. Flour provides food. Water wakes up the microbes and lets them move. Over time, the culture becomes more stable as the right organisms multiply and the less helpful ones fade.
That’s why sourdough is not just “flour and water sitting on the counter.” It is a controlled fermentation. The goal is to build a culture that rises predictably, smells pleasantly tangy, and can lift dough on command.
In practical terms, you are looking for a starter that peaks after feeding, shows bubbles throughout, and falls back down in a predictable cycle. That rise-and-fall rhythm tells you fermentation is happening in a healthy way.
What You Need: Ingredients, Tools, and Flour Choices
You do not need special equipment, but a few basics make the process much easier.
Ingredients
- Flour
- Water
Useful tools
- A clean glass jar or bowl
- A spoon or spatula
- A kitchen scale
- A loose cover, such as a lid set on top, plastic wrap, or a cloth
A scale is the most useful tool here because sourdough is much easier to manage by weight than by volume. Flour packs differently in a cup depending on how it’s scooped, which changes hydration. Weight keeps your starter consistent.
Which flour should you use?
You can build a starter with all-purpose flour, whole wheat flour, rye flour, or a blend.
Here’s the practical trade-off:
| Flour choice | What it does well | Trade-off |
|---|---|---|
| All-purpose flour | Familiar, easy to find, neutral flavor | May ferment a little more slowly at first |
| Whole wheat flour | Often shows activity sooner and can jump-start fermentation | Stronger flavor, sometimes more visible sediment |
| Rye flour | Very active and often ferments quickly | Can look dense or sticky and may be harder to read visually |
If you want the easiest beginner path, a blend is often a smart compromise. A starter made with mostly all-purpose flour and a portion of whole wheat or rye can give you the familiarity of AP flour with the extra fermentation push of whole grain flour.
Water: tap or filtered?
If your tap water tastes fine and is not heavily chlorinated, it often works. If your starter seems sluggish and your water has a strong chlorine smell, filtered water is a sensible test. You are not hunting for perfection here—just removing one possible obstacle if fermentation seems slow.
Before You Begin: Set Yourself Up for Success
A starter is most cooperative in a warm-ish room, not a cold kitchen. A steady room temperature helps the culture rise on a regular schedule. If your kitchen is cool, the starter may still work, but it will likely move more slowly.
Clean equipment matters, too. You do not need to sterilize everything, but a clean jar and clean spoon reduce the chance of unwanted contamination.
One more mindset tip: don’t judge the starter by day one or day two alone. Early bubbles can happen quickly because flour already contains microorganisms. That first burst is encouraging, but it is not the same thing as a mature starter that can reliably bake bread.
Day-by-Day Sourdough Starter Schedule
There are many valid starter methods. The one below is a practical beginner schedule built around simple equal-parts feeding by weight.
Day 1: Mix the first culture
In a clean jar, combine:
– 50 g flour
– 50 g water
Stir until no dry flour remains. The mixture will look thick and pasty, somewhere between batter and dough. Scrape down the sides, cover loosely, and leave it at room temperature.
What you may notice:
– A smooth paste
– A mild flour smell
– Possibly no visible change yet
Day 2: Look for the first signs
Check for small bubbles or a slightly puffed surface. If you see activity, good. If not, that’s still normal.
Feed with:
– 50 g starter
– 50 g flour
– 50 g water
Discard the rest before feeding so the jar does not grow out of control.
Day 3: Repeat the feeding
By now, the starter may smell a little sharp or tangy. That can be normal during fermentation.
Feed again using the same ratio:
– 50 g starter
– 50 g flour
– 50 g water
If the mixture seems very thick, add water gradually next time rather than dumping in extra all at once.
Day 4: Watch for rise and fall
This is often the day people get excited—or discouraged. You may see bubbles, a domed top, or a starter that rises and then collapses. That collapse is not bad news. It means fermentation is active enough to create gas and then release it.
Feed the starter again:
– 50 g starter
– 50 g flour
– 50 g water
Day 5: Expect a quieter phase
After an early burst of activity, the starter may look less lively. That can happen as the microbial balance shifts.
Feed the same way:
– 50 g starter
– 50 g flour
– 50 g water
If your starter is in a cool room, this quieter stretch may last longer.
Day 6: Look for steadier behavior
Now you want more consistency. The starter should smell cleaner and more pleasantly sour, with bubbles distributed through the mixture rather than just on top.
Feed again at the same ratio.
Day 7 and beyond: Judge performance, not hope
A starter is usually ready when it reliably rises after feeding, not when it merely looks bubbly once in a while.
If it is still slow, keep feeding daily until it becomes predictable. Many starters are usable in about a week, but some need longer depending on flour, temperature, and kitchen conditions.
What to Expect: Texture, Smell, and Activity
A healthy starter changes as it matures.
Early stage
The mixture is thick, paste-like, and not especially dramatic. Small bubbles may appear around the edges or on the surface.
Middle stage
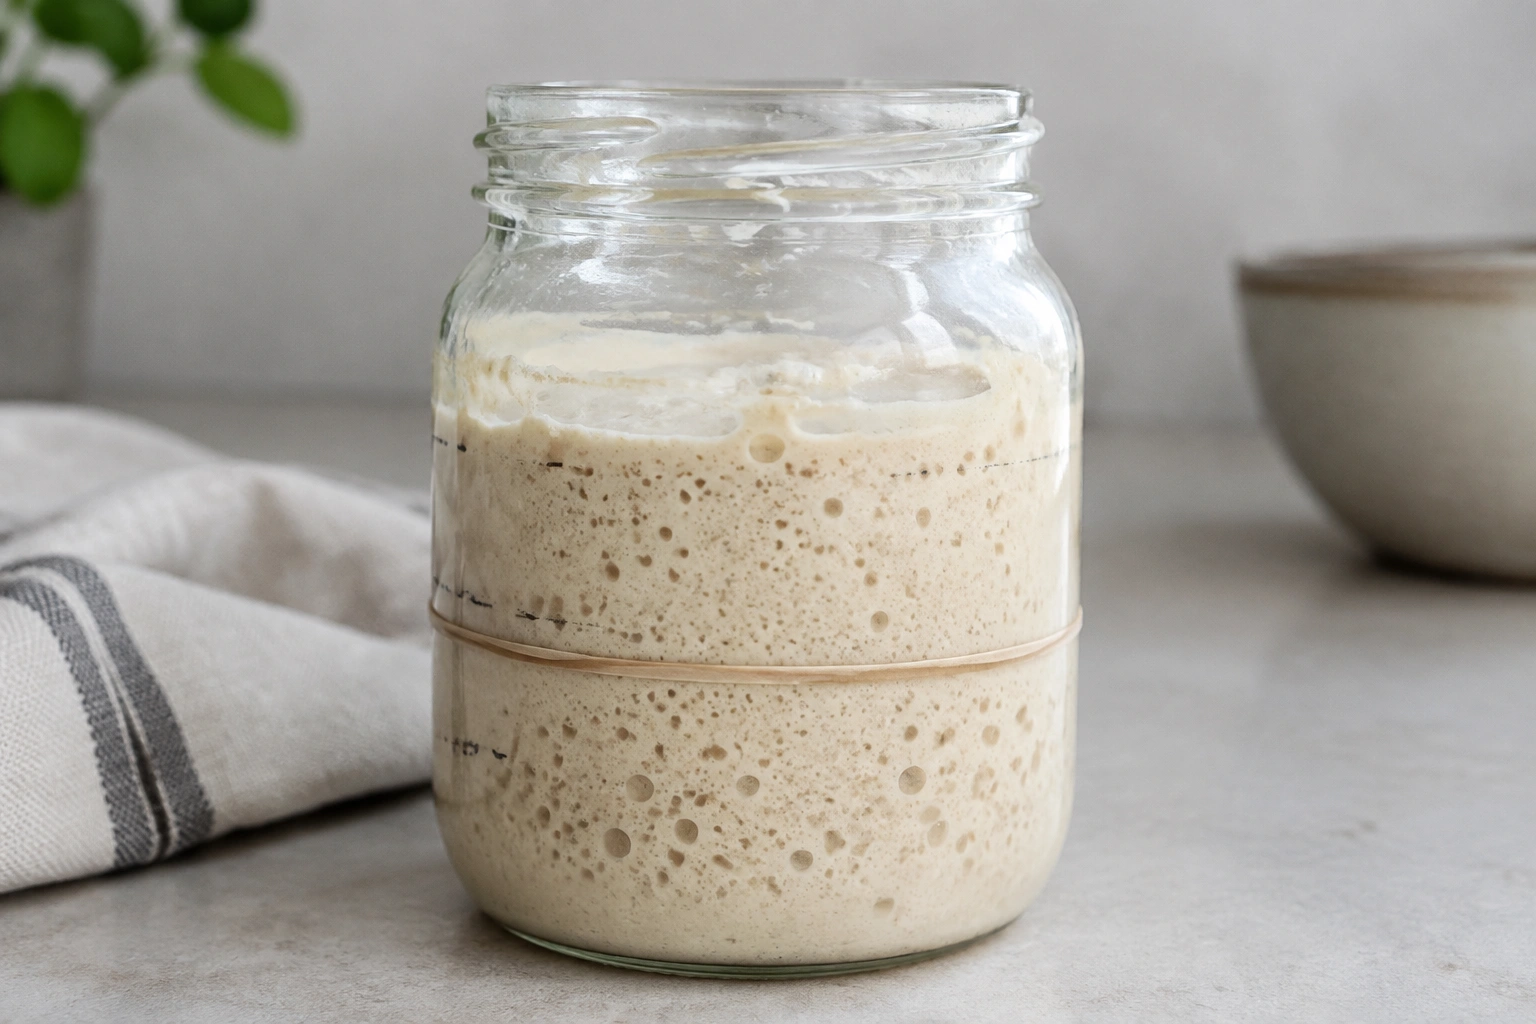
The starter becomes more aerated. It may rise after feeding, then sink. The smell often shifts from plain flour to tangy, yeasty, or lightly acidic.
Mature stage
A mature starter should have a pleasant sour aroma, visible bubbles throughout, and a noticeable rise after feeding. It should not smell rotten, putrid, or like something spoiled.
A vinegary smell alone is not automatically a problem. Very harsh, foul, or rotten odors are the ones that should make you pause.
How to Know When Your Starter Is Ready to Bake With
Bubbles are helpful, but they are not enough by themselves. A starter is ready when it behaves predictably.
Use these readiness checks:
- It doubles in volume after feeding
- It does so within a consistent window, often within several hours at room temperature
- It has a domed, airy look before it peaks
- It smells pleasantly tangy rather than sharply unpleasant
- It shows a clear rise-and-fall cycle
A simple readiness test is the float test: drop a small spoonful of starter into a glass of water. If it floats, that can be a helpful sign that it has enough gas trapped inside to use for baking. It is not perfect on its own, but it can support the other checks above.
If you want a timing benchmark, a starter fed at room temperature should show a clear rise on a predictable schedule after several regular feedings. That matters more than one occasional bubbly jar.
If your starter rises once and then performs unpredictably, keep feeding it a little longer. Reliability matters more than one good day.
How to Feed and Maintain an Active Starter
Once your starter is established, maintenance becomes easier.
If you keep it at room temperature
For a starter that lives on the counter, feed it once a day if you bake regularly or want it ready often. A simple maintenance ratio is 1:2:2 by weight, such as 20 g starter, 40 g flour, and 40 g water.
If your starter is very active and peaking too quickly, you can move to a slightly larger feeding, such as 1:3:3, to give it more food between feedings.
If you keep it in the refrigerator
For a refrigerated starter, feed it about once a week. A practical maintenance ratio is also 1:2:2 or 1:3:3, depending on how long it will sit before the next feeding. For example, 20 g starter, 40 g flour, and 40 g water is a simple weekly refresh.
When you want to bake, take it out, let it warm up, and give it one or two room-temperature feedings until it becomes active again.
A simple routine
- Room temperature starter: feed daily, usually 1:2:2 or 1:3:3
- Refrigerated starter: feed weekly, usually 1:2:2 or 1:3:3
- Before baking: refresh at room temperature until the starter rises predictably
Common Mistakes to Avoid
Here are the errors that cause the most frustration.
Quitting after the first burst
A starter often gets bubbly early, then goes quiet. That quiet phase is normal. If you stop here, you miss the real fermentation build-up.
Feeding by volume only
Cups can work in a pinch, but they are inconsistent. A scale gives you repeatable results, which matters when you are trying to learn what healthy starter looks like.
Keeping it too cold
A cool room can slow everything down. The starter may still work, but your timeline will stretch.
Changing too many variables at once
If you change flour, water, feeding ratio, and location all at once, you can’t tell what helped. Adjust one thing at a time.
Ignoring contamination
Mold, fuzz, or a truly rotten smell are not “just part of the process.” Those are signs to stop.
Troubleshooting a Slow, Watery, Thick, or Smelly Starter
A symptom-based approach is more useful than guessing.
| Symptom | Likely issue | What to do |
|---|---|---|
| Not rising much | Too cool, too young, or underfed | Keep feeding daily and move to a warmer spot |
| Early bubbles, then quiet | Normal transition phase | Keep going; don’t restart too soon |
| Very watery | Too much water or weak structure | Cut water by about 10% to 20% in the next feeding, or make the next mix a little thicker |
| Very stiff | Too little water | Add water in small amounts until it becomes a thick paste, or increase hydration by about 10% |
| Vinegary smell | Active fermentation, often normal | Continue feeding and monitor the aroma |
| Rotten or putrid smell | Possible spoilage | Discard and restart |
| Mold or fuzz | Contamination | Discard immediately |
If your starter seems weak, try a flour blend with some whole wheat or rye. A good adjustment is replacing about 25% to 50% of the all-purpose flour with whole wheat or rye for a few feedings.
If the starter is slow to rise, feed it more often for a short stretch. Instead of once a day, try every 12 hours for a couple of days if it is at room temperature, or keep it warmer in a safe spot around normal room temperature rather than near direct heat.
If you see liquid on top, that can be a sign the starter is hungry. In some cases it’s normal hooch, especially if the starter has gone too long without feeding. Stir it in or pour it off, then feed the starter. If the smell is truly off, though, don’t keep trying to rescue it.
Practical Scenarios You May Run Into
Scenario 1: The starter bubbles on day 2, then goes flat
This is common. Keep feeding on schedule. A quiet phase does not automatically mean failure.
Scenario 2: The starter is active, but it looks too thin
That starter may be too wet to hold gas well. Reduce the water in the next feeding by about 10% to 20%, or use more whole wheat or rye for better absorption.
Scenario 3: The starter smells sharp but not rotten
A tangy smell can be normal during fermentation. If there’s no mold and the starter is otherwise active, continue.
Scenario 4: The starter hasn’t improved after repeated feedings
If several days pass with no meaningful bubbles, no rise, and no improvement after adjusting temperature or flour, restart with fresh ingredients. Sometimes the easiest answer is to begin again with a cleaner jar and a more stable environment.
When to Adjust, Restart, or Discard the Starter
Use this decision rule:
- Adjust if the starter is slow, thin, thick, or inconsistent but still shows bubbles and smells fermentation-like.
- Keep going if it has an early burst followed by a quiet stretch, especially in the first week.
- Restart if you suspect the temperature or flour choice is working against you and the starter has not stabilized after several feedings.
- Discard immediately if you see mold, fuzz, or a clearly rotten smell.
When in doubt, safety comes first. A healthy starter should smell pleasantly sour, look lively, and rise with some regularity.
Final Thoughts
Learning how to make sourdough starter is less about perfect technique and more about reading the culture in front of you. Once you understand the rise-and-fall cycle, the smell changes, and the difference between normal quiet periods and real problems, the process becomes much less intimidating.
If you want to keep building your bread skills after the starter is ready, it helps to understand the dough itself too. You may also find it useful to read how to make bread dough from scratch for beginners and how to make baguettes at home when you’re ready to put your starter to work.