
How to Organize Tupperware in a Cabinet Without the Clutter

If your food storage cabinet has become a jumble of lids, half-used containers, and mystery bottoms, the fix is not a bigger cabinet. It is a simpler system.
The goal is to make every container easy to find, easy to put away, and easy to match with its lid. That matters most in busy kitchens, where leftovers, meal prep, and packed lunches happen every day. A cabinet that works well should save time during cleanup, reduce duplicate containers, and stop you from buying replacements for lids that were already in the house.
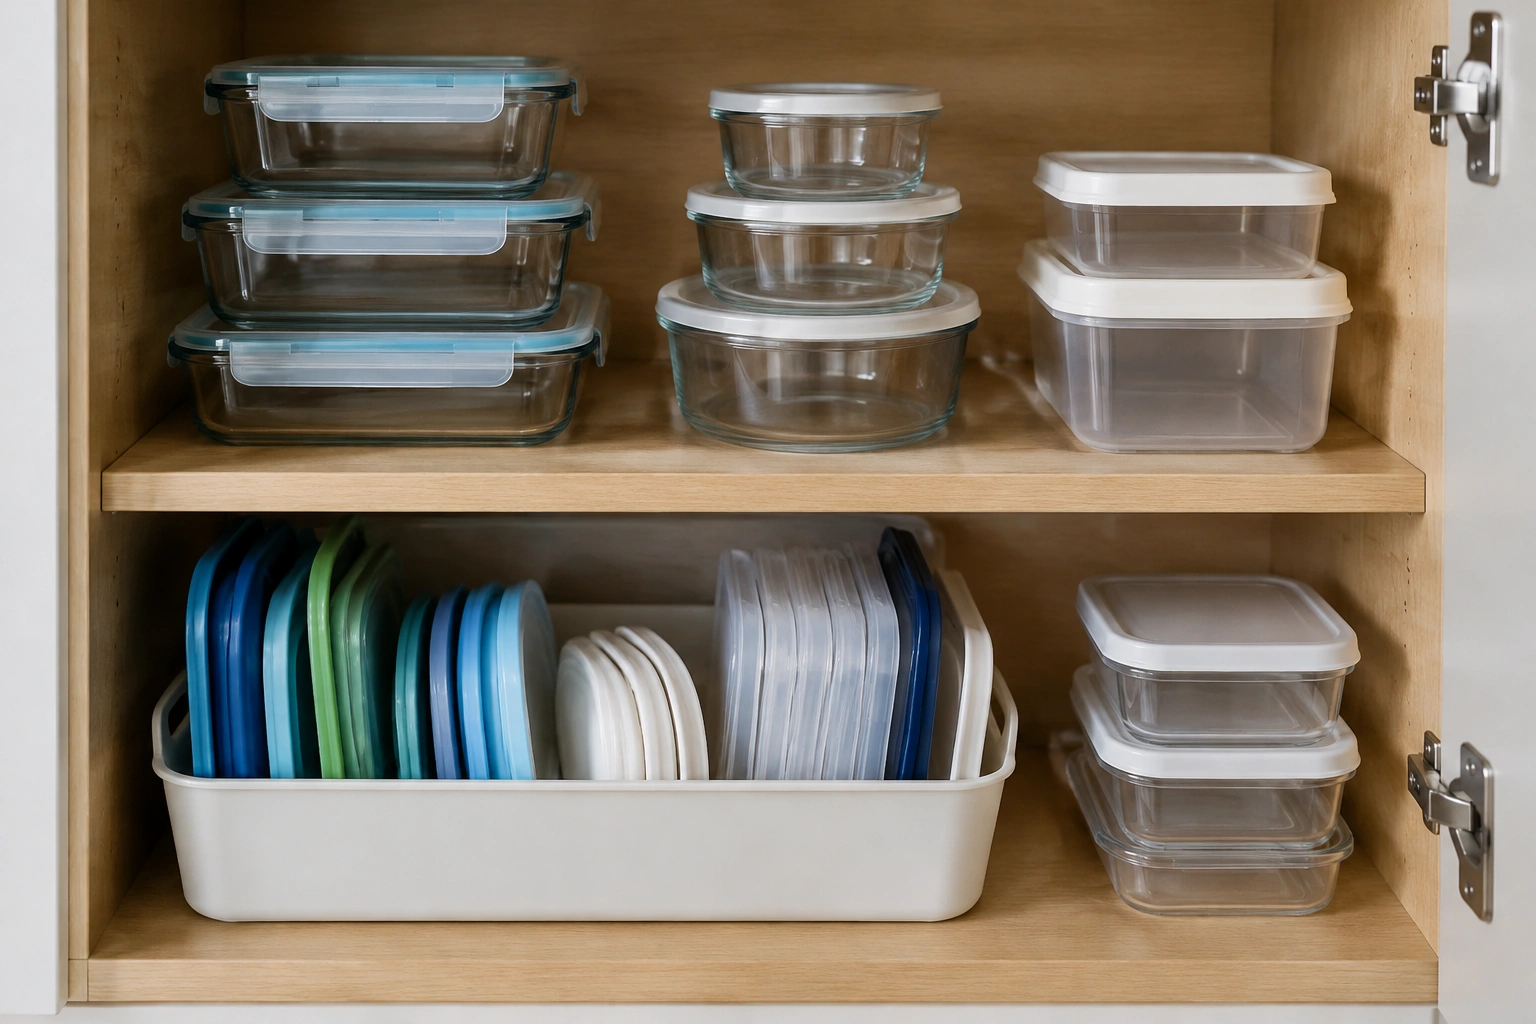
This guide walks through a practical way to sort, store, and maintain food storage containers in a cabinet, with options for small kitchens, mixed container collections, and families that use a lot of Tupperware.
What You’ll Need Before You Start
You do not need a full closet of organizers to get this under control. In most kitchens, the job can be done with a trash bag, a donation box, and a few simple tools.
Gather these basics first:
- All food storage containers and lids from the cabinet
- A clean towel or cloth
- A measuring tape
- A shallow bin or basket, if you already have one
- Optional: drawer dividers, shelf risers, or cabinet bins
- Optional: cabinet liner if the shelf is dirty, sticky, or sliding items are a problem
Taking everything out first gives you a full picture of what you own. That is the point where you can see how many lids are missing, which containers are cracked, and whether the cabinet layout is helping or hurting you. If the shelf is dusty or sticky, wipe it out before you put anything back. Adding liner is optional, but it can be useful if the cabinet surface is slick or you want to keep the space easier to wipe later.
If you are working with a very small cabinet, measure width, depth, and height before buying anything. Many storage problems come from choosing a bin that is too deep or a divider that blocks the door.
Decide What to Keep, Donate, or Toss
The fastest way to reduce cabinet chaos is to be strict about what stays.
Sort into four groups:
- Complete sets with a container and matching lid
- Containers that are useful but need a lid match
- Broken, cracked, warped, or unusable pieces
- Extras you no longer need
A practical rule: keep containers you actually use for leftovers, lunch packing, freezing, or meal prep. Let go of pieces that no longer fit the way your household cooks. If a container has no lid and no realistic match in the cabinet, it is usually taking up space better used by a complete set.
Mismatched pieces can be repurposed if they are still in good condition. Some people use them for small items in a playroom or hardware in a garage instead of keeping them in the kitchen cabinet forever. That said, only repurpose what you will truly use. Otherwise, the clutter just moves to another room.
If you use both plastic and glass containers, sort them separately at this stage. Glass pieces are often heavier, and keeping them grouped makes it easier to place them where the cabinet can support the weight.
Choose the Best Cabinet Storage Method
There is no single layout that works for every kitchen. The best method depends on cabinet depth, how often you use the containers, and whether you care more about maximum space use or fastest access.
A simple decision rule:
- Small cabinets: choose nesting or a shallow bin system so the footprint stays compact.
- Deep cabinets: choose bins, shelf risers, or pull-out shelves so items in the back do not disappear.
- High-use households: choose the fastest grab-and-go setup, usually short stacks for containers and a shallow, easy-to-scan lid bin.
Here is a simple comparison to help you choose:
| Method | Best for | Trade-off | Visibility | Cost |
|---|---|---|---|---|
| Nesting containers | Matching sets and limited cabinet space | Can become messy if sizes are mixed | Medium | Low |
| Stacking containers | Quick access to a few favorite pieces | Stacks can topple if overfilled | Medium | Low |
| Bins or baskets | Mixed container collections and shared kitchens | Deep bins can hide items in the back | High if shallow | Low to medium |
| Drawer dividers | Lids or shallow cabinet storage | Needs a drawer or drawer-like cabinet space | High | Low to medium |
| Shelf risers | Deep cabinets with vertical space | May reduce clearance for tall containers | High | Low to medium |
Nesting vs. stacking
Nesting works well when you have matching containers that fit neatly inside one another. It saves space and keeps sets together. The downside is that if you mix too many sizes, you spend time pulling out several pieces to reach the one you want.
Stacking is faster for grab-and-go use, especially for a few everyday containers. But if you stack too high, the pile becomes unstable and annoying to use. A good rule is to stack only what you can lift without unbalancing the rest.
Bins vs. dividers vs. shelf risers
Bins are flexible and easy to move. They are helpful if your cabinet is shared by several people or if your container collection changes often.
Dividers create more structure. They are useful for lids or for keeping container shapes separated, but they work best when you already know where each category belongs.
Shelf risers add a second level in a deep cabinet. That can be very helpful if you have vertical space going unused. The trade-off is clearance: if your containers are tall, a riser may make the space less practical.
Cabinet vs. drawer
A cabinet gives you more height and usually more room for nesting or bins. A drawer can make lids easier to see at a glance, especially if you use dividers. If your cabinet is deep and awkward, a drawer-like setup or pull-out shelf can make access easier. One organizing idea used by some homeowners is installing pull-out shelves so you do not have to reach blindly into the back.
How to Organize Tupperware in a Cabinet Step by Step
This is the part that turns the pile into a system.
1. Group containers by type
Put like with like: round with round, square with square, plastic with plastic, glass with glass. Do not sort by brand name; sort by how the pieces actually fit and how you use them.
If your household uses a few sizes constantly, separate those from the occasional oversized containers. Everyday pieces deserve the easiest access.
2. Match each lid to its container
Pair every container with the lid that fits correctly. If the fit is loose, warped, or questionable, move that piece out of your main storage set. A cabinet full of almost-matches is not efficient.
3. Choose your “daily use” zone
Place the containers you reach for most often in the easiest spot, usually front and center at eye level or in the most accessible part of the cabinet. Less-used pieces can go higher, lower, or farther back.
This one step makes cleanup easier because you are not digging through a stack of rarely used pieces to put away leftovers after dinner.
4. Nest or stack by family
Once the sets are sorted, nest containers by size within each shape family. If nesting is awkward, stack the most-used ones in short piles. Keep the piles low enough that one container can be removed without the rest collapsing.
5. Give lids their own home
Lids should not live loose at the bottom of the cabinet unless you enjoy sorting through a flat plastic pile every time you need one.
A shallow bin is the simplest default setup for most readers. It is low-cost, easy to set up, and works well if you want lids contained without overthinking the system. If you want a more visual setup, store lids upright in a divider or file them vertically in a separate section of the cabinet.
6. Put everything back by category
Return containers first, then lids. If you use bins, label them only if the system is shared by multiple people or if you have many similar pieces. Labels are most useful when they reduce guesswork, not when they add visual clutter.
How to Store Lids So They Don’t Get Lost
Lids are usually the part that turns a neat cabinet into a mess.
For most kitchens, the best simple setup is a shallow bin or basket placed near the containers it matches. Lids can stand or lie flat without sliding all over the shelf, and the bin is easy to reset after cleanup. If you want the lowest-effort, low-cost method, start there.
Vertical storage can be better if you have many lids and want to flip through them like files. Some people use drawer dividers or other DIY-style upright organizers to keep lids separated. These ideas are especially helpful when the lids are thin and tend to stack into a slippery pile.
If you want the fastest visual scan, separate lids by shape or size. For example, keep square lids in one section and round lids in another. That makes matching much quicker when you are cleaning up after dinner.
A practical rule: if you keep opening the lid bin and creating a pile, the bin is too deep or too full. Switch to a shallower container or split the lids into two groups.
How to Make the System Work in a Small Cabinet
Small cabinets need a stricter system, not a more complicated one.
Use vertical space first. Shelf risers can create a second level for smaller items, and upright lid storage can free up room that would otherwise be wasted by flat stacks.
Keep the front row for the pieces you use every week. If a container only comes out once in a while, it should not occupy the easiest spot.
For shallow cabinets, nesting is usually more efficient than stacking because it keeps the footprint compact. For deep cabinets, bins or pull-out shelves can help prevent the back row from becoming a hidden storage zone.
If the cabinet is crowded, limit it to food storage only. Mixing in extra kitchen tools, plastic wrap, or random takeout containers usually breaks the system fast.
Common Mistakes to Avoid
A few habits cause most container clutter:
- Keeping too many containers “just in case”
- Saving lidless pieces for months
- Mixing every shape and size together
- Using a deep bin that hides items in the back
- Buying organizers before measuring the cabinet
- Stacking too high, then knocking the pile over during cleanup
The biggest mistake is keeping pieces that do not support the way your household actually cooks. If you only use three container sizes, there is no reason to store twelve.
Another problem is overloading the cabinet with heavy glass containers on a weak shelf. Put heavier items lower and make sure the shelf can support the load safely.
Troubleshooting Mismatched Containers, Odd Lids, and Overflow
Real kitchens do not always have neat sets. Here is how to handle the leftovers.
If you have odd lids with no match
Make one short decision: match, repurpose, or remove. If a lid has no clear home, it should not stay in the main cabinet forever. Keep only the odd pieces that truly serve a purpose.
If you have too many containers
Reduce the set until the cabinet can hold everything without crowding. A full cabinet that is hard to close is not organized. It is just packed.
If you mix plastic and glass
Either separate them by material or separate them by use. For example, keep glass on a lower shelf for heavier storage and plastic on an upper shelf for lighter lunch containers. The right choice is the one that keeps the cabinet easy to use and safe to reach.
If your family keeps putting things back wrong
The system may be too complicated. Simplify it. Fewer categories are easier for everyone to follow. A cabinet with three clear zones is often better than one with ten tiny labels.
How to Keep the Cabinet Organized Long Term
A good cabinet does not stay neat by accident. It stays neat because the reset is easy.
Use a simple routine after unloading dishes or emptying the dishwasher:
- Put lids back in their section first
- Nest or stack containers by family
- Remove any piece that no longer has a match
- Return only the sizes you actually use
If one container type starts to pile up, that is your cue to reassess. Maybe you need fewer snack containers and more leftover containers, or maybe the cabinet needs a different bin shape.
For households with multiple people, the easiest maintenance system is one that does not require memory. Open bin, clear categories, obvious place for each item. That is what keeps the cabinet functional after a busy week.
Practical Examples of Cabinet Setups
For a busy family
Use one deep cabinet for all food storage containers, a shallow bin for lids, and a front row for the most common sizes. Larger containers can go farther back or lower down. This setup works when speed matters more than picture-perfect symmetry.
For a small apartment kitchen
Use one clear bin for lids and one bin for nesting containers by shape. Keep only the sizes you use most often. If space is tight, this is where reducing the set makes the biggest difference.
For meal preppers
Separate glass containers from plastic lunch containers. Put the most-used meal prep pieces in the easiest spot and keep specialty sizes in the back. That way, the cabinet supports your weekly routine instead of slowing it down.
When to Ask a Food Safety Expert
If you are unsure whether a cracked, warped, or damaged container should still be used for food storage, ask a food safety expert or follow the manufacturer’s guidance. Storage organization is one thing; deciding whether a container is still suitable for food contact is another.
For general food handling and storage guidance, the USDA’s food safety resources and FoodSafety.gov are reliable places to start.
Final Takeaway
A well-organized Tupperware cabinet is not about owning matching containers. It is about keeping only the pieces you use, giving lids a clear home, and arranging everything so cleanup is quick instead of frustrating. If the system is simple enough to maintain on a busy night, it will actually last.
