
Where to Put a Meat Thermometer in Chicken for a Safe, Juicy Result

If you want one fast rule, use this: insert the thermometer into the thickest part of the chicken, keep it away from bone and the pan, and look for 165°F in the spot you’re checking. That simple habit prevents the two most common problems in home kitchens: pulling chicken too early or overcooking it while you wait for guesswork to feel “safe.”
The exact placement changes a little depending on the cut. A whole bird needs more than one check. Thin breasts need the probe from the side so the sensing area reaches the center. Bone-in pieces need careful placement so the probe reads the meat, not the bone. Once you know the correct spot for each cut, checking chicken becomes quick, calm, and reliable.
Quick answer: the safest place to check chicken
For most chicken pieces, aim for the center of the thickest part. That is where heat usually lags behind the edges, so it gives you the most useful reading.
A few practical rules make the reading trustworthy:
- Do not touch bone.
- Do not let the probe touch the pan, rack, or baking dish. That can make chicken seem hotter than it is.
- For thin pieces, insert from the side. USDA guidance says the sensing area needs to reach the center of the food, especially with thin chicken breast. USDA FSIS food thermometer guidance
- Check the thickest spot, not the prettiest spot. Evenly browned skin does not tell you what the center is doing.
If you remember only one thing, remember this: the thermometer should measure meat, not metal, bone, or air.
Where to place it in a whole chicken
A whole chicken is the one case where a single check is not enough. The bird cooks unevenly, so the breast and thigh may finish at different times. A practical approach is to check two places: the thickest part of the breast and the inner thigh near the bone.
Here is how to do it cleanly:
- Check the breast first. Insert the probe into the thickest part of the breast, aiming toward the center of the meat.
- Then check the inner thigh. Slide the probe into the meatiest area of the thigh, close to the bone but not touching it.
- Avoid the cavity, skin, and bone. Those spots do not tell you whether the densest meat is done.
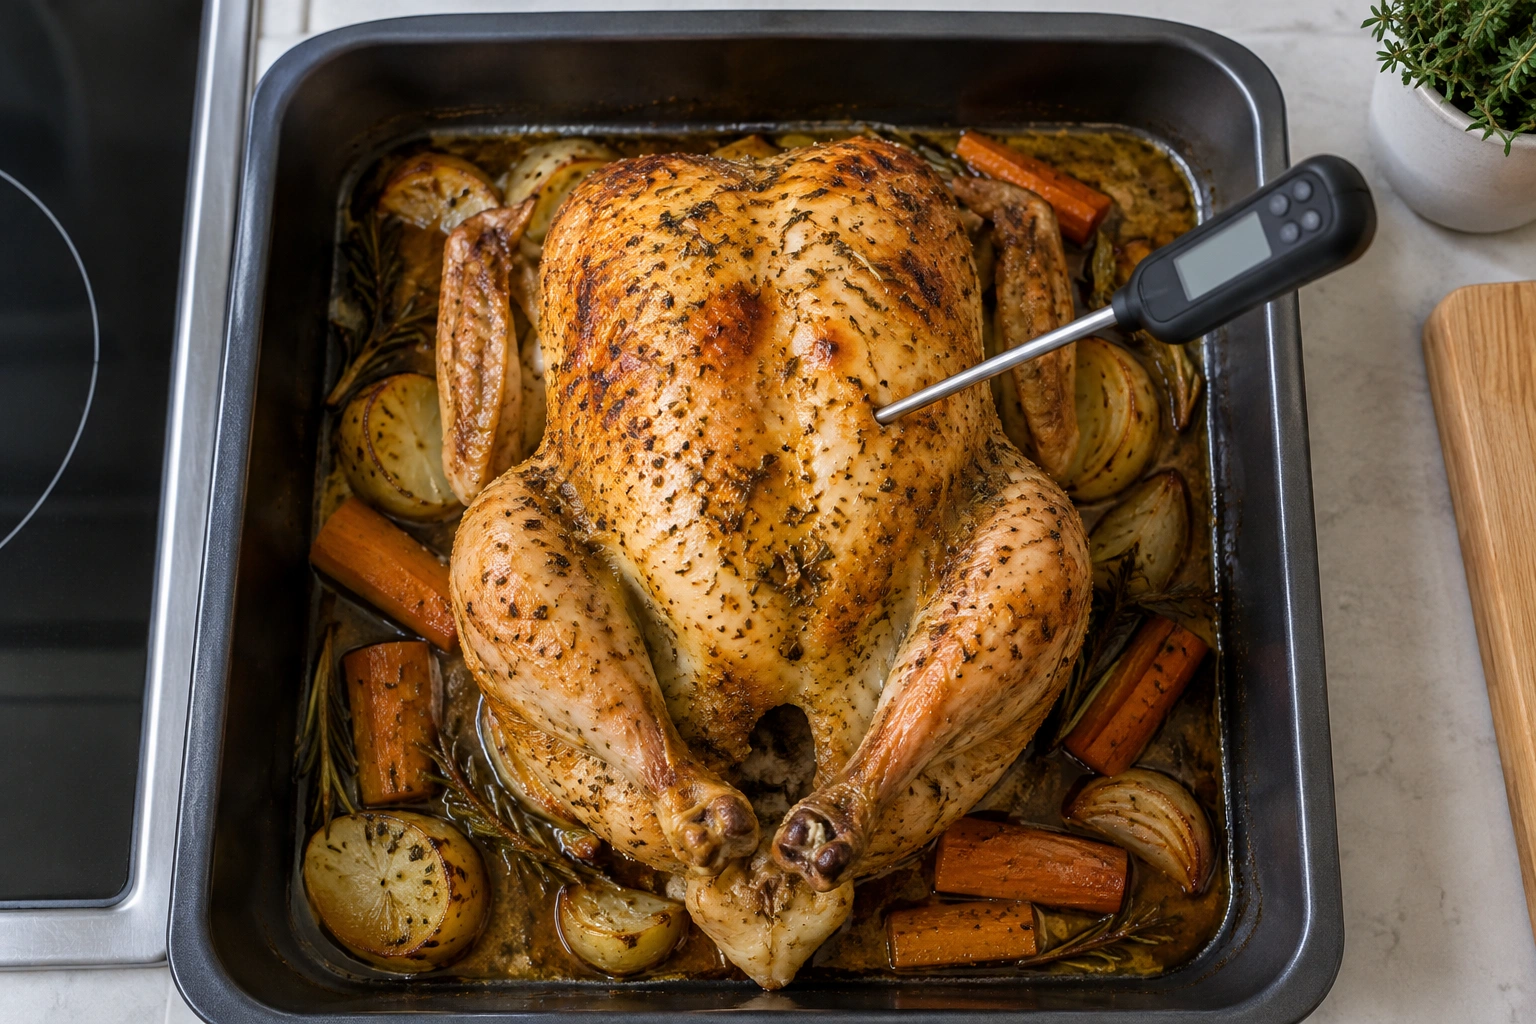
Why check both? Because the breast can reach temperature before the thigh, or the other way around depending on the size and position of the bird. If you only check one area, you can miss the coldest part and end up with undercooked chicken somewhere on the bird.
A practical rule for whole birds
If the breast reads 165°F but the thigh is still below that, keep cooking and recheck later. The reverse is also true: if the thigh is ready but the breast is still cool, the bird is not done yet.
Where to insert the thermometer in chicken breast, thighs, drumsticks, and wings
Different cuts need slightly different placement. This table gives the short version you can use in a real kitchen.
| Chicken cut | Best insertion point | What to avoid |
|---|---|---|
| Whole chicken | Thickest part of the breast and inner thigh near the bone | Bone, cavity, pan, rack |
| Boneless chicken breast | Center of the thickest part; for thin breasts, insert from the side | Surface layer, pan, cutting board |
| Bone-in chicken breast | Thickest meaty section, aiming for the center | Bone and skin only |
| Thigh | Thickest meaty area near the bone, without touching it | Hitting the bone directly |
| Drumstick | Thickest part of the meaty section, usually near the center of the leg | Bone, joint hardware, pan |
| Wing | Meatiest section, usually near the joint | Thin tip of the wing, bone contact |
Chicken breast
For a boneless breast, the best reading comes from the center of the thickest part. If the breast is thin, USDA says to insert the thermometer through the side so the sensing area reaches the center of the food. That matters because a surface reading can look finished while the middle is still undercooked.
For a bone-in breast, aim for the meatiest part and keep the probe away from the bone.
Chicken thighs
Thighs are forgiving in the oven, but they still need the probe in the right place. Insert it into the thickest meaty area near the bone, but do not touch the bone itself. That gives you a better view of the part that usually finishes last.
If the thigh is very compact, angle the probe so the sensing area sits in the center of the meat rather than just skimming the edge.
Drumsticks
With drumsticks, the safest approach is the same: find the thickest part of the meat, not the narrow end. The probe should sit in the fleshiest section of the leg, usually around the center of the drumstick, while avoiding direct bone contact.
A common mistake is checking near the skinny end because it is easier to reach. That spot often runs hotter than the dense meat above it.
Wings
Wings are small, so placement is less forgiving. Check the meatiest section, usually near the joint. Avoid the thin tip, which can read done before the rest of the wing is ready.
For wings, a quick instant-read check works better than leaving a probe in place, because the pieces are small and cook fast.
How deep the probe should go, and what not to touch
The goal is not just to poke the chicken anywhere. The probe has to reach the center of the meat so the sensor can read the actual internal temperature.
That means:
- Deep enough to reach the middle
- Not so deep that it hits bone
- Not resting against the pan or rack
- Not sitting in a pocket of fat or air
For thin chicken breast, the USDA specifically says to insert the thermometer through the side so the sensing area reaches the center. That is the clearest way to avoid a false reading on thin pieces.
What can go wrong
- Touching bone: can give a misleading reading
- Touching the pan or rack: metal can make the temperature seem higher than the meat really is
- Stopping too close to the surface: the outer layer cooks first, so the reading may look done too soon
- Pulling the probe out too fast: some thermometers need a moment to stabilize
A useful habit is to pause for a second after insertion. If the number is still moving, wait for it to settle before you decide the chicken is done.
What temperature means chicken is done
For chicken, the safe minimum internal temperature is 165°F. FoodSafety.gov says to always use a food thermometer to check whether meat has reached a safe minimum internal temperature, and it also notes that some meats need rest time after cooking because it helps the innermost parts and juices become fully and safely cooked. FoodSafety.gov safe minimum internal temperatures
That gives you a simple decision rule:
- 165°F in the thickest relevant spot: chicken is done
- Below 165°F: keep cooking and check again
Do not rely on color alone. Chicken can look white and still be undercooked, especially near the bone or in thicker pieces. The thermometer is the only practical way to know what the center is doing.
How to check stuffed or unevenly shaped chicken
Stuffed chicken needs extra attention because you are cooking two things at once: the meat and the stuffing. For a stuffed whole chicken, insert the thermometer into the thickest part of the meat surrounding the stuffing cavity, not into the stuffing pocket itself. If the recipe includes stuffing, the stuffing should also reach a safe temperature before you stop cooking.
Unevenly shaped pieces can be just as tricky. A breast with a thick end and a thin end may read done in one section and underdone in another. In that case, check the thickest area first, then verify any larger or denser section that looks like it might lag behind.
A practical example
If you roast a stuffed whole chicken and the breast reads 165°F, do not stop there if the stuffing is still below a safe temperature or the thigh is cool. The coldest part controls the decision, not the first spot that happened to reach the target.
Instant-read vs. leave-in probe thermometers
Both tools can work well. The better choice depends on how you cook.
Instant-read thermometer
This is the best tool for quick spot checks. You insert it, wait for the reading, and pull it out. It is especially useful for:
- Thin chicken breasts
- Boneless cutlets
- Small pieces like wings
- Checking multiple pieces in a meal-prep tray
The trade-off is that you open the oven or grill each time you check.
Leave-in probe thermometer
A leave-in probe stays in the chicken while it cooks. That is helpful when you want to monitor temperature without opening the oven repeatedly. It works well for:
- Whole chickens
- Larger bone-in pieces
- Bone-in roasts or other larger cuts
- Longer roasting sessions
The trade-off is that the probe has to be placed correctly before cooking starts, and it needs room to stay in the meat without touching bone or the pan.
If you want speed and flexibility, use an instant-read. If you want continuous monitoring on a larger piece, a leave-in probe is more convenient.
Common mistakes that give false readings
Most thermometer problems come from placement, not from the thermometer itself.
1. Checking the wrong spot on a whole chicken
A whole bird is not evenly cooked. If you only test the breast, you can miss a cold thigh. If you only test the thigh, you can miss a breast that is still underdone.
2. Hitting bone
Keep the probe in the meat.
3. Touching the pan or rack
This is one of the easiest ways to get a falsely high temperature. The probe should be surrounded by chicken, not metal.
4. Measuring too close to the surface
The outer layer heats first. If the probe is shallow, the reading can look safe before the center is ready.
5. Assuming all chicken pieces finish together
A tray of mixed pieces is rarely done at the same time. Breasts, thighs, drumsticks, and wings all behave differently because of size and shape.
A simple kitchen decision framework
When you are checking chicken, use this quick sequence:
- Identify the cut: whole bird, breast, thigh, drumstick, or wing
- Find the thickest part: that is usually the coldest part
- Place the probe correctly: avoid bone, pan, and skin-only contact
- Wait for a stable reading
- Use 165°F as the finish line
- If one area is lower, keep cooking and recheck
That framework works whether you are cooking dinner for tonight or portioning chicken for meal prep tomorrow.
When to ask a food safety expert
If you are handling unusually large birds, commercial-style equipment, or a situation where the chicken is cooking unevenly and you are unsure how to verify the temperature safely, a local extension office or food safety educator can help you interpret safe cooking guidance for your setup.
For most home kitchens, though, the answer stays the same: put the probe in the thickest part of the meat, keep it off the bone and the pan, and cook until the center reaches 165°F.