
Bread Raw in the Middle: How to Diagnose, Fix, and Prevent a Doughy Center

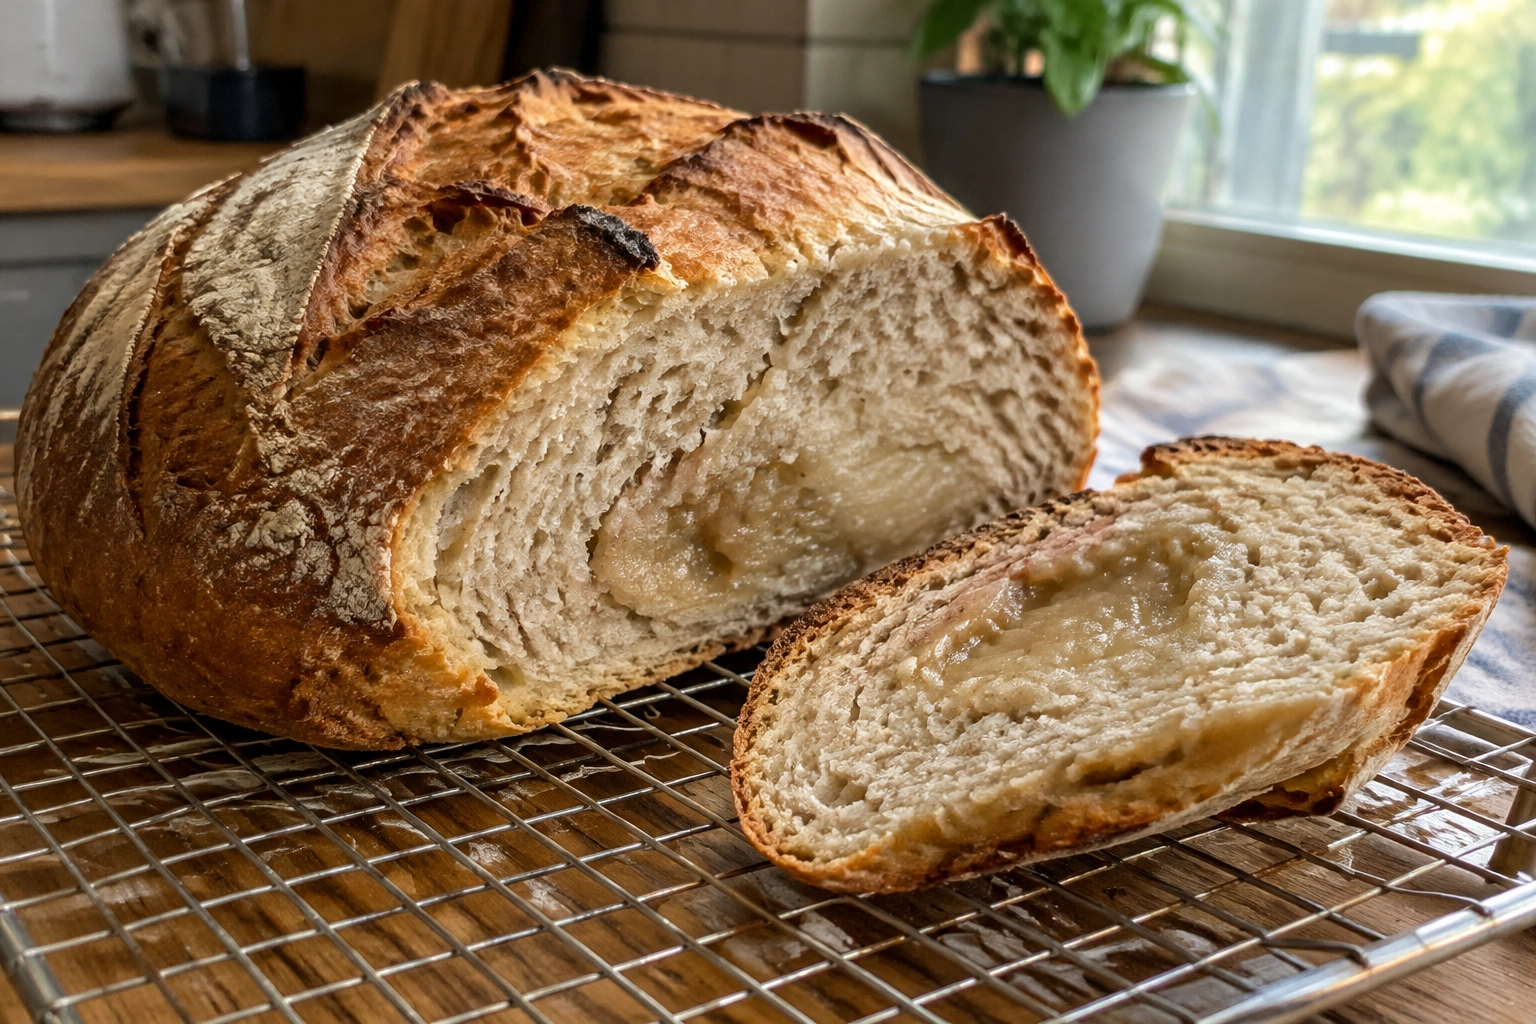
Few things are more frustrating than pulling a loaf from the oven, admiring that deep golden crust, and then slicing into bread raw in the middle. On the outside, everything looks promising. Inside, though, you find a gummy line, a sticky pocket, or a center that still behaves like dough.
Before you guess at the cause, use this quick check:
- Raw dough? The center looks glossy, sticky, and pasty, and it smears on the knife.
- Gummy but baked? The crumb is set but tacky or dense, often after cooling.
- Underproofed? The loaf sprang hard in the oven and has a tight crumb or a dense band.
- Overproofed? The loaf spread or collapsed and baked into a weak, gummy structure.
- Oven issue? The crust browns too fast, one side overcolors, or the oven runs hotter or cooler than the dial suggests.
That mismatch usually comes from one of four places: the loaf needed more baking, the dough structure was weak, the proofing was off, or the oven wasn’t doing what you thought it was doing. The trick is not guessing. It’s learning how to read the loaf and decide whether it needs more time, a different temperature strategy, or a recipe correction next round.
Why Bread Can Look Done Outside but Still Be Raw Inside
Bread browns from the outside in. The crust can color quickly while the center is still catching up, especially in larger loaves, enriched doughs, or breads baked in a very hot oven. That’s why a loaf can look finished long before it actually is.
A browned crust is useful information, but it is not proof of doneness by itself. One helpful visual cue from baking educators is that a loaf with a nice, even brown crust is usually done, while a darker, crustier loaf can still be perfectly fine on the inside unless it was baked very close to the heating element. In other words: color matters, but position in the oven matters too. Bread doneness cues from a baking educator
The center also needs time for the proteins to set and the crumb structure to firm up. ThermoWorks explains that bread is “done” when the proteins have coagulated enough to lose the doughy texture and enough gases have expanded to build the crumb. That’s why a loaf can feel misleadingly firm on the outside and still be underdone in the middle. ThermoWorks on bread doneness and internal temperature
How to Tell Raw Dough from a Gummy but Baked Crumb
This distinction matters more than most bakers realize.
Raw dough is wet, sticky, and elastic in a bad way. It may smear on the knife, cling to your fingers, or look glossy and pasty. If you press it, it feels like uncooked dough because that’s what it is. For example, a raw center might leave a shiny smear on your blade and feel almost batter-like in the middle.
A gummy crumb is different. It is baked, but the structure is still too moist, too compressed, or not fully set. It may feel tacky, dense, or slightly paste-like in the center, but it won’t have the same wet, stretchy behavior as raw dough. For example, a fully baked but gummy loaf may slice cleanly, hold its shape, and still feel sticky or slightly custardy in the middle after it has cooled.
Here’s the practical decision rule I use:
- Sticky and dough-like? Treat it as underbaked.
- Set but tacky, especially while still warm? It may only need cooling time.
- Dense and heavy with a wet line near the bottom? Think structure or proofing problem, not just bake time.
Cooling matters here. Bread continues to set as it cools, so slicing too early can make a properly baked loaf seem underdone. If the crumb is merely moist and the loaf is still hot, give it more time before deciding it failed.
Tools and Materials You’ll Need to Diagnose Doneness
You do not need a lot of gear, but two tools make this problem much easier to solve.
Essential tools
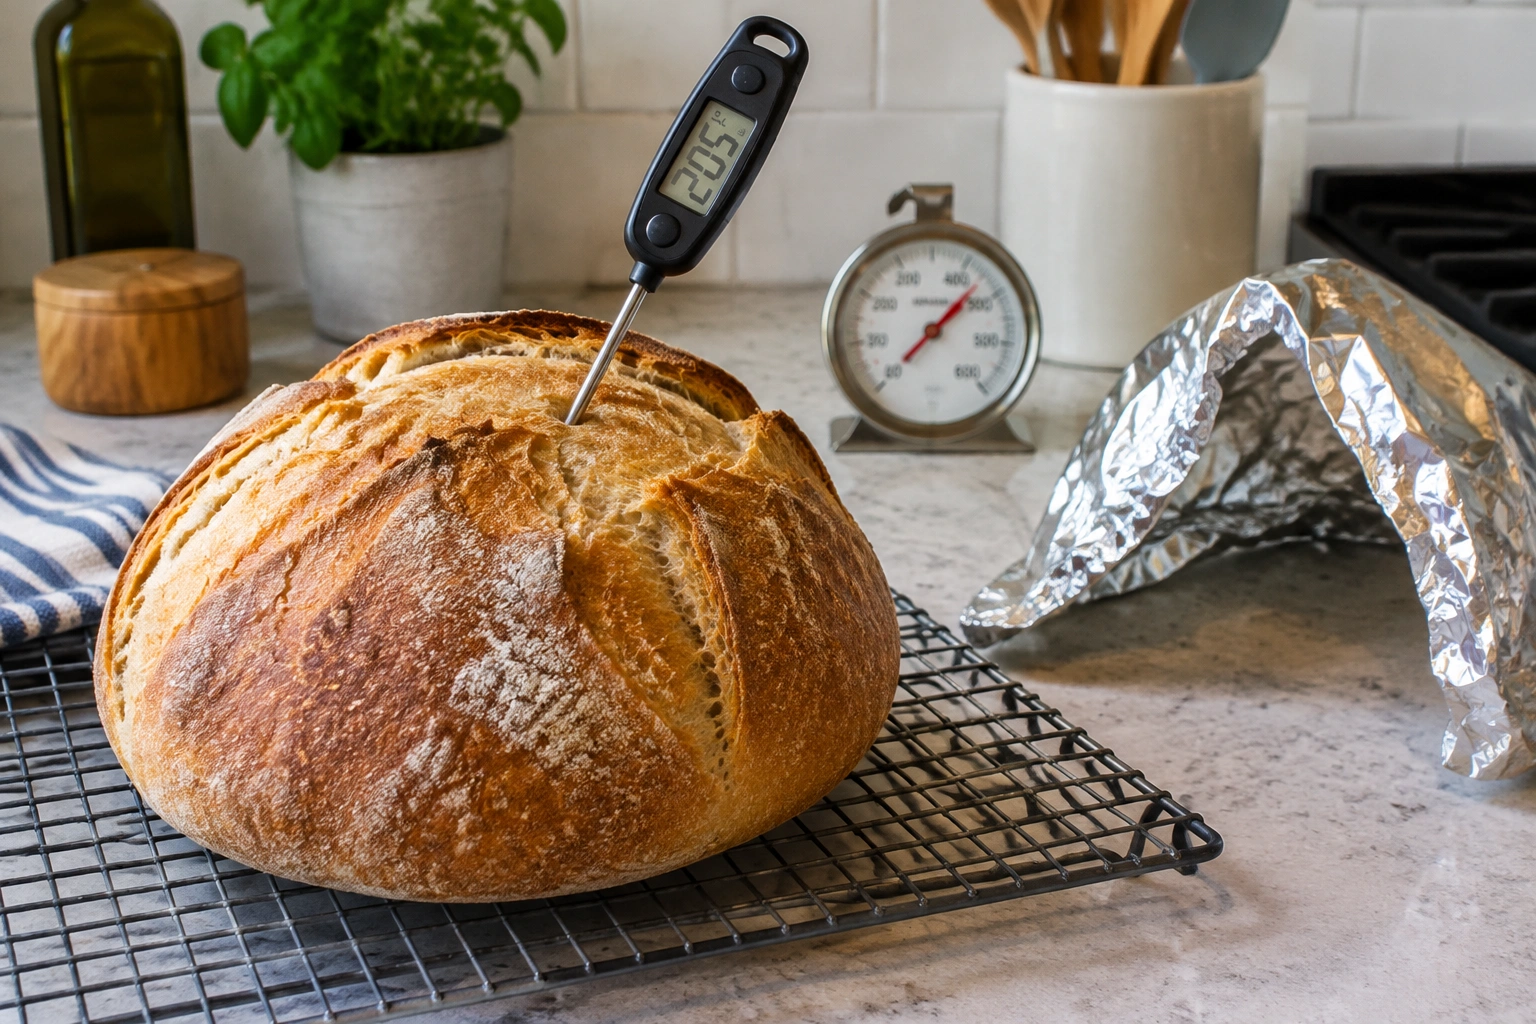
- Instant-read thermometer — the most reliable way to check the center
- Oven thermometer — confirms whether your oven dial is telling the truth
Helpful extras
- Foil — for tenting the loaf if the crust browns too fast
- Cooling rack — helps steam escape after baking
- Sharp bread knife — cleaner slices for diagnosis
- Timer or notes app — useful if you’re troubleshooting repeat failures
If you bake often, an oven thermometer is one of the cheapest ways to catch a hidden problem. Ovens can drift from the set temperature, and that drift is enough to affect whether a loaf finishes properly in the middle.
Quick Doneness Checks That Actually Work
When bread seems questionable, check it in this order.
1) Internal temperature
This is the most dependable test. Insert the thermometer into the center of the loaf, not near the pan or crust. If the temperature is below the target range for that bread type, it likely needs more time.
2) Loaf feel
A finished loaf usually feels lighter for its size and sounds hollow-ish when tapped on the bottom. That said, this test is better as a backup than as your main decision tool.
3) Crust color
Even browning all over is a strong sign, especially for free-form loaves. But a very dark crust does not automatically mean the loaf is overdone inside, and a pale crust does not guarantee the center is cooked. The oven rack position can change how useful this cue is.
4) Cooling cues
If the loaf feels gummy right after baking, wait. Some breads firm up as steam redistributes and the crumb sets. If the texture is still wet after cooling, then you have a true doneness issue.
What Internal Temperature Bread Should Reach
Different breads finish at different temperatures, and the target depends on the style of bread.
- Lean breads like sandwich loaves and crusty hearth loaves often finish in the higher range for their style.
- Enriched breads with butter, milk, eggs, or sugar may bake to a slightly lower target than lean artisan loaves, but they often need more time because enrichment slows the setting of the crumb.
- Very moist doughs may need to be judged by both temperature and texture, because hydration and structure can make the crumb seem set later than the crust suggests.
Here’s a practical reference table:
| Bread type | Typical target internal temperature | Notes |
|---|---|---|
| Lean sandwich bread | about 190–200°F | Good for standard pan loaves |
| Rich doughs with butter, milk, or eggs | about 190–200°F | Often need more time because enrichment slows setting |
| Lean artisan loaves | about 205–210°F | Common target for crusty hearth breads |
| Very large loaves | same target as the bread type, but longer bake time | Bigger loaf, same style-based finish range |
| Small rolls or buns | same target as the bread type, but shorter bake time | Smaller mass cooks faster |
If you want one simple rule for mixed bread styles, aim for the recipe’s specific target first. If none is given, the ranges above are a sensible starting point.
Common Reasons Bread Is Raw in the Middle
When a loaf is underdone, people often blame the recipe immediately. Sometimes that’s fair. Often it isn’t. Here’s how to sort the main causes.
The oven ran cooler than you thought
This is one of the most common issues. Many ovens drift from the dial setting, and some have hot spots that brown one side too fast. If your bread keeps coming out raw in the center while the crust looks finished, check the oven with a thermometer before changing the recipe.
The loaf was too large or too thick
A tall loaf or a very dense pan loaf takes longer for heat to reach the center. If the outside is browning before the middle is done, the shape may be the problem, not the formula.
The dough had too much hydration for the bake method
High-hydration dough can produce a beautiful crumb, but it also needs more structure and often more bake time. If the dough is very wet and the loaf is not fully set, the center can stay gummy even when the crust looks strong.
The shaping was too tight or too uneven
Poor shaping can trap dense layers or create a thick, undercooked band near the bottom. That’s especially common when the outer skin is tight but the interior is compressed.
The dough was underproofed
Underproofed dough can spring aggressively in the oven, but it often bakes with a tight, uneven crumb. King Arthur Baking notes that if an indentation remains and does not spring back or fill in, the dough is well risen and ready for the oven. If it springs back quickly, it likely needed more proofing time. Proofing cue from King Arthur Baking
The dough was overproofed
Overproofed bread can collapse or bake with a weak structure. Sometimes it looks done on top but turns out dense or gummy because the dough lost strength before it hit the oven.
Step-by-Step: How to Rescue an Underbaked Loaf
If the loaf is already baked and still doughy in the center, you may be able to save it.
If it’s still whole
- Preheat the oven again to the original baking temperature, or slightly lower if the crust is already dark.
- If the crust is pale or only lightly colored, keep the original temperature. If the top is already getting too dark, lower the oven temperature first.
- Place the loaf back in the oven on a middle or lower rack.
- Tent with foil if the crust is getting too dark while the center finishes.
- Bake in short intervals, checking the center temperature each time.
Short intervals matter because once the crust is already browned, the goal is to finish the center without turning the outside into toast.
If the loaf has been sliced
You can still try to rescue it, but the exposed crumb will dry out faster. Put the slices or the cut loaf back on a baking sheet and warm them in a moderate oven. This works best when the bread is only slightly underbaked, not when the center is truly raw and wet.
When not to keep rescuing
If the loaf is collapsing, leaking wet dough, or still reads very low in the center after repeated baking, the problem may be structural rather than just timing. At that point, more oven time won’t fully fix the crumb.
How to Adjust Baking Time and Temperature Without Burning the Crust
This is where a lot of bakers get stuck: the crust looks ready, but the center is not.
Lower the temperature and extend the bake
If the top is browning too quickly, lowering the oven temperature by a modest amount and baking longer often helps the heat reach the middle more evenly. This is especially useful for larger loaves and enriched doughs.
Use foil strategically
A loose foil tent slows surface browning while the interior finishes baking. Use it when the crust is already getting too dark but the loaf still needs time in the oven. Don’t seal it tightly; you want to protect the crust, not steam the loaf into softness.
Move the loaf lower in the oven
If the top is coloring too fast, a lower rack can reduce direct top heat. Just avoid placing the loaf so close to the element that the crust browns before the center is done.
Give thick loaves more time than the recipe says
Recipe times are guides, not laws. A loaf that is slightly larger, wetter, or baked in a different pan may need extra minutes even if the formula is correct.
Troubleshooting by Symptom
Use the symptom to narrow the cause.
| Symptom | Most likely cause | Best next move |
|---|---|---|
| Pale crust, gummy center | Underbaked loaf or oven too cool | Check oven temperature and bake longer |
| Dark crust, raw center | Oven too hot or loaf too close to heat | Lower temperature, tent with foil, extend bake |
| Dense line at the bottom | Poor shaping, underproofing, or insufficient bake time | Improve shaping and proofing; verify doneness with a thermometer |
| Collapsed loaf with sticky center | Overproofing or weak structure | Shorten proof next time and strengthen dough handling |
| Knife comes out sticky but loaf feels set | Possibly still cooling, or slight underbake | Wait until fully cool, then reassess |
How Pan Size, Dough Hydration, and Loaf Shape Affect the Center
A loaf pan and a Dutch oven do not behave the same way.
Loaf pan breads
Pan loaves often bake more evenly in shape, but they can trap moisture. That means the center may need longer than the crust suggests, especially if the dough is enriched.
Dutch oven loaves
A Dutch oven traps steam early, which helps oven spring and crust development. The trade-off is that the crust can look finished before the center is fully set, especially in a round, thick loaf.
Free-form loaves
These usually brown faster on the outside because more surface area is exposed. That can be helpful for crust, but it also means you need to watch the timing carefully so the outside does not outrun the inside.
If you’re using a wetter dough, remember this: more hydration can improve texture, but it also raises the stakes on shaping and baking time. If you want to dig deeper into that balance, our guide on bread dough hydration explains how water affects crumb, handling, and structure.
How Proofing Problems Can Look Like Underbaking
Underproofed and overproofed dough can both masquerade as a baking problem.
Underproofed dough
This dough hasn’t had enough time to expand. It may burst in the oven, form a tight crumb, and leave you with a loaf that seems underdone even if it baked long enough. A loaf that springs back quickly when pressed is usually not ready.
Overproofed dough
This dough has gone too far. It may deflate, spread, or bake into a weak structure with a gummy center. The crumb can look irregular, but the real issue started before the bake.
The important distinction is this: if the dough’s structure was wrong before it entered the oven, more baking time alone may not fix the crumb. That’s why proofing cues matter as much as oven cues.
How to Prevent a Raw Middle in Future Loaves
Use this workflow on your next bake.
- Preheat fully. Give the oven enough time to stabilize, not just warm the air.
- Verify the oven temperature. Use an oven thermometer if the loaf keeps baking unevenly.
- Match the pan or vessel to the dough. Thick loaves need more time than thin ones.
- Shape with even density. Avoid compacting the bottom or trapping a thick seam.
- Proof to readiness, not the clock. Watch the dough, not just the timer.
- Check doneness with a thermometer. Don’t rely on crust color alone.
- Adjust one variable at a time. Change temperature, time, or hydration separately so you can learn what actually fixed the issue.
That last point is the one many bakers skip. If you change the flour, the water, the proofing time, and the oven temperature all at once, you won’t know what solved the problem.
Common Mistakes to Avoid
A few habits cause repeated disappointment:
- Trusting crust color alone
- Slicing before the loaf has cooled
- Assuming every gummy crumb means the same thing
- Ignoring oven calibration
- Using recipe time as a hard rule
- Baking a tall loaf the same way as a small one
- Changing five variables after one bad loaf
The good news is that most of these are fixable with better measurement and a calmer diagnosis.
Practical Examples of Fixing Different Bread Types
Sandwich loaf in a 9×5 pan
The top turns golden, but the center reads below target temperature. In this case, the loaf probably needs more time, not a different formula. Tent with foil and keep baking until the center reaches the proper range.
High-hydration artisan loaf in a Dutch oven
The crust is dark and crisp, but the middle is sticky. Here, the issue may be a combination of high hydration and too much top heat. Lower the temperature next time, extend the bake, and make sure the loaf is fully proofed before it goes in.
Loaf sliced too early
The crumb seems gummy within minutes of coming out of the oven. If the internal temperature was already in range, this may be cooling, not underbaking. Let the remaining loaf cool fully before judging it. If the center still seems wet after cooling, then it truly needed more bake time.
When to Consult a Master Baker
If your bread keeps coming out raw in the middle even after you’ve checked oven temperature, proofing, shaping, and bake time, it may be worth getting a second set of eyes from a master baker or culinary instructor. Repeating the same failure across several bakes usually means there’s a consistent process issue, not bad luck.
A good baker can often spot the problem quickly: a tight seam, a proofing misread, a pan that’s too small, or an oven that runs hot on one side.
FAQ
Why is my bread raw in the middle but browned on top?
Usually because the outside browned faster than the inside finished cooking. That can happen with a hot oven, a thick loaf, an inaccurate oven setting, or a dough that needed more time.
How can I tell if bread is fully baked?
Use an instant-read thermometer first. Then confirm with crust color, loaf feel, and cooling time. A browned crust helps, but it is not enough on its own.
Can I put bread back in the oven if the center is raw?
Yes, if it’s still reasonably fresh from baking. Return it to the oven, tent with foil if needed, and check the center temperature again.
Is gummy bread always underbaked?
Not always. A gummy crumb can also come from excess hydration, weak shaping, underproofing, overproofing, or slicing too early.
Should I lower the oven temperature or bake longer?
If the crust is dark before the center finishes, lowering the temperature and extending the bake is often the better move. If the crust is still pale, keep baking at the original temperature first.
What if my oven temperature is wrong?
Then your recipe timing may never be reliable. An oven thermometer can show whether the oven is running hot or cool so you can adjust with confidence.
Bread is forgiving, but it does ask for a little precision. Once you learn to separate raw dough from a moist crumb, and once you trust the thermometer more than the crust alone, this problem gets much easier to solve.