
Bread Dough Hydration: How to Calculate It, Read It, and Adjust It for Better Bread

If bread baking sometimes feels like guesswork, hydration is one of the first numbers that can turn mystery into control. Once you understand how much water your flour is actually holding, you can predict whether a dough will feel firm, slack, elastic, sticky, or easy to shape—and you can choose the right formula for the bread you want.
Bread dough hydration is not just a technical term. It is a practical tool. A dough at 60% hydration will behave very differently from one at 80%, even if the ingredients are otherwise similar. That difference shows up in mixing, shaping, oven spring, and the final crumb. In other words: hydration is one of the clearest ways to connect formula to outcome.
What Bread Dough Hydration Means
In bread baking, hydration means the ratio of water to flour, expressed as a percentage. Bakers calculate it by dividing the total weight of water by the total weight of flour, then multiplying by 100. King Arthur Baking explains this clearly and also notes that water-containing liquids such as milk, juice, tea, or even alcohol can count toward hydration in the formula, but they are not interchangeable with plain water because fats, sugars, proteins, and alcohol can change dough performance. King Arthur Baking’s hydration guide is a helpful reference if you want the definition straight from a long-trusted baking source.
Think of flour as the baseline. In baker’s percentages, flour is always 100%, and every other ingredient is measured relative to it. So if your recipe has 500 grams of flour and 350 grams of water, the hydration is 70%.
For beginners, the easiest way to read any formula is this: set flour to 100%, then express everything else as a percentage of that flour weight. In the example above, 500 g flour is 100%, and 350 g water is 70%. If a recipe also has 10 g salt, that salt is 2% of the flour weight. Once you can convert ingredients this way, you can compare recipes quickly and see how wet or dry a dough is meant to be.
That number matters because it tells you how much moisture the dough has available for gluten development, fermentation, and shaping. It also helps you compare recipes fairly. Two loaves may both be called “artisan bread,” but one may be much wetter and more open-crumbed than the other.
Why hydration is so useful
Hydration gives you a language for dough behavior:
- Lower hydration usually means firmer dough and easier shaping.
- Higher hydration usually means a softer, stickier dough and a more open crumb.
- The same flour can behave differently at different hydration levels.
That is why experienced bakers often look at hydration before they even look at the rest of the recipe.
Tools, Ingredients, and Prerequisites
You do not need special equipment, but you do need accurate measurement. Hydration only works as a formula if you weigh ingredients.
What you need
- A digital kitchen scale
- Flour and water measured in grams
- A bowl and spoon or dough scraper
- A notebook or calculator
- A basic understanding of baker’s percentages
If you are still measuring flour with cups, hydration becomes fuzzy fast. Flour settles, scoops differently, and can vary enough to make a recipe feel inconsistent from one bake to the next. Weight removes most of that uncertainty.
A useful habit before you mix
Before adding water, identify every liquid ingredient in the formula. Milk, juice, tea, beer, eggs, and preferments all contribute to hydration, but they do not behave exactly like plain water. If you ignore them, your hydration calculation may look neat on paper but fail in the bowl.
How to Calculate Bread Dough Hydration
The formula is simple:

Hydration % = (total water weight ÷ total flour weight) × 100
Example 1: A basic dough
- Flour: 500 g
- Water: 350 g
Calculation:
350 ÷ 500 = 0.70
0.70 × 100 = 70% hydration
That is a moderate hydration dough, often comfortable for many home bakers.
Example 2: A stiffer dough
- Flour: 1000 g
- Water: 600 g
Calculation:
600 ÷ 1000 = 0.60
0.60 × 100 = 60% hydration
This is a firmer dough that will usually feel easier to shape and less sticky.
Example 3: A wetter dough
- Flour: 1000 g
- Water: 780 g
Calculation:
780 ÷ 1000 = 0.78
0.78 × 100 = 78% hydration
That dough will likely feel slack and sticky, but it may also bake with a more open crumb if handled well.
A key rule about flour weight
Use all flour in the recipe in the denominator. That includes flour in preferments, levains, poolish, biga, or any other pre-fermented component. If you leave some flour out of the calculation, the hydration number becomes misleading.
Typical Hydration Ranges for Common Bread Styles
There is no single ideal hydration for all bread. The best number depends on the bread style, flour, and handling method. Still, a practical range helps when you are choosing a target.
| Bread style | Typical hydration range | Start here | What it should look and feel like |
|---|---|---|---|
| Bagels | 55%–65% | Start around 58%–60% | Dough should feel firm, smooth, and easy to shape without spreading |
| Sandwich loaf | about 60%–70% | Start around 62%–65% | Dough should be soft but cohesive, with only slight tackiness after rest |
| Everyday artisan bread | about 65%–75% | Start around 68%–72% | Dough should feel supple and elastic, with light stickiness that improves after resting |
| Ciabatta-style bread | often 75%+ | Start around 75% | Dough should remain loose and wet, but still hold together after folds |
These are working ranges, not rules carved in stone. The Perfect Loaf notes that bread doughs are generally in the 60% to 80% range, though they can fall outside it, and that there is no single ideal hydration because flour and final bread goals matter. That is a useful mindset to keep: hydration is a tool, not a score.
How to choose a target
- Want a softer sandwich loaf with easy shaping? Aim lower.
- Want a more open crumb and a lighter, airy interior? Move higher.
- Want a dough that you can shape confidently as a beginner? Stay in the middle.
[Image: bowl of mixed bread dough with visible texture]
How Hydration Changes Dough Feel and Final Bread
Hydration affects more than stickiness. It changes how the dough stretches, how it develops gluten, and how the loaf bakes.
Low hydration: firmer and easier to shape
A lower-hydration dough usually feels more compact and less sticky. That can make it easier to knead, divide, and shape. It often holds its form well, which is useful for sandwich loaves, bagels, and certain enriched breads.
Trade-off: the crumb may be tighter and less open.
High hydration: softer and more extensible
Higher hydration usually makes dough softer, more elastic in a loose sense, and more extensible. Caputo notes that higher hydration dough is typically stickier and softer, and can produce a less dense crumb with more holes or air pockets. It can also be harder to work with, so folding is often preferred over heavy kneading.
Trade-off: better potential openness, but more handling difficulty.
What changes in the oven
Hydration influences:
- Oven spring: wetter doughs often have more expansion potential if the structure is strong enough
- Crumb structure: higher hydration can support larger holes and a lighter interior
- Crust: wetter doughs often bake with a thinner, more delicate crust, while firmer doughs can bake denser and chewier
Hydration alone does not guarantee any of these outcomes. Fermentation, gluten strength, shaping, and oven temperature all matter too. But hydration sets the stage.
How Flour Type Affects Hydration Needs
Not all flour absorbs water the same way. That is one reason a recipe can feel perfect with one flour and too dry or too wet with another.
Bread flour vs. all-purpose flour
Bread flour usually has stronger gluten potential than all-purpose flour, so it often handles higher hydration more comfortably. That does not mean it always needs more water, but it often tolerates it better.
All-purpose flour can still make excellent bread, but the dough may feel softer or less structured at the same hydration level. If you switch from bread flour to all-purpose flour without adjusting, you may notice the dough feels looser.
White flour vs. whole wheat flour
Whole wheat flour usually absorbs more water than white flour because of the bran and germ. That means a dough with whole wheat often needs more hydration to feel equally supple.
There is a catch: even with added water, whole wheat dough may still feel denser than a white-flour dough. Bran interferes with gluten formation, so more water helps, but it does not make whole wheat behave exactly like white flour.
Practical adjustment rule
If you are using whole wheat flour, start by increasing hydration slightly, then hold back about 5% to 10% of the water and add it gradually after the flour has hydrated. The dough may seem dry at first and then relax noticeably after 15 to 30 minutes. If it still feels stiff after that rest, add a little more water before deciding the formula needs a bigger change.
Step-by-Step: Adjust Hydration During Mixing
Once flour and water are combined, you can still fine-tune the dough. The key is to make small changes.
1. Mix the dough until the flour is hydrated
Do not judge the dough too early. Dry bits can disappear after a short rest, and a shaggy dough can become smoother once the flour has absorbed water.
2. Pause and assess the feel
Ask three questions:
- Does the dough feel tight and resistant?
- Does it smear and cling excessively to your hands?
- Does it hold together, or does it tear and crumble?
3. Add water in small amounts if needed
If the dough feels too stiff, add water in small increments, such as a teaspoon at a time for a small batch or a tablespoon at a time for a larger one. Mix thoroughly after each addition.
This is safer than dumping in a large splash. Once you go too far, correcting a wet dough is harder than nudging a dry dough.
4. Add flour only if necessary
If the dough is clearly too wet and cannot hold shape, a small flour addition can help. But resist the urge to keep dusting in flour during shaping. That often creates a dry outer layer while the inside stays sticky.
5. Stop when the dough matches the bread style
For a sandwich loaf, you may want a dough that is smooth and moderately soft. For ciabatta, the dough may remain quite loose and sticky even when it is correct.
Step-by-Step: Use Rest and Autolyse to Improve Dough
Rest changes how dough feels. Sometimes the “problem” is not the hydration level at all—it is that the flour has not had time to absorb water.
Why rest helps
After mixing, flour continues absorbing moisture. Gluten also begins organizing itself as the dough rests. This can make a dough feel less sticky and more extensible without adding any extra flour.
How to use autolyse
Autolyse is a rest period after flour and water are mixed, before salt and sometimes yeast are added. It can improve hydration perception and make the dough easier to develop.
A practical approach:
- Mix flour and water until no dry flour remains.
- Rest the dough for 20 to 40 minutes.
- Reassess the texture.
- Add salt and proceed with mixing or folding.
If the dough felt too dry at first, autolyse may solve the problem. If it felt too wet, the rest may reveal that it was actually just underdeveloped.
Common Mistakes to Avoid
A few habits cause most hydration confusion.
Measuring by volume instead of weight
Cups are convenient, but they are not precise enough for reliable hydration calculations.
Ignoring liquid ingredients
Milk, eggs, and preferments all affect dough moisture. If you count only plain water, your hydration number may be off.
Adding too much flour to fix stickiness
This is one of the fastest ways to end up with dense bread. Sticky does not always mean wrong. Some doughs are supposed to feel loose, especially higher-hydration artisan styles.
Assuming every dough should feel the same
A bagel dough and a ciabatta dough are not supposed to behave alike. If you expect them to feel identical, you will overcorrect.
Troubleshooting Sticky, Dry, or Difficult Dough
Here is a practical decision guide.
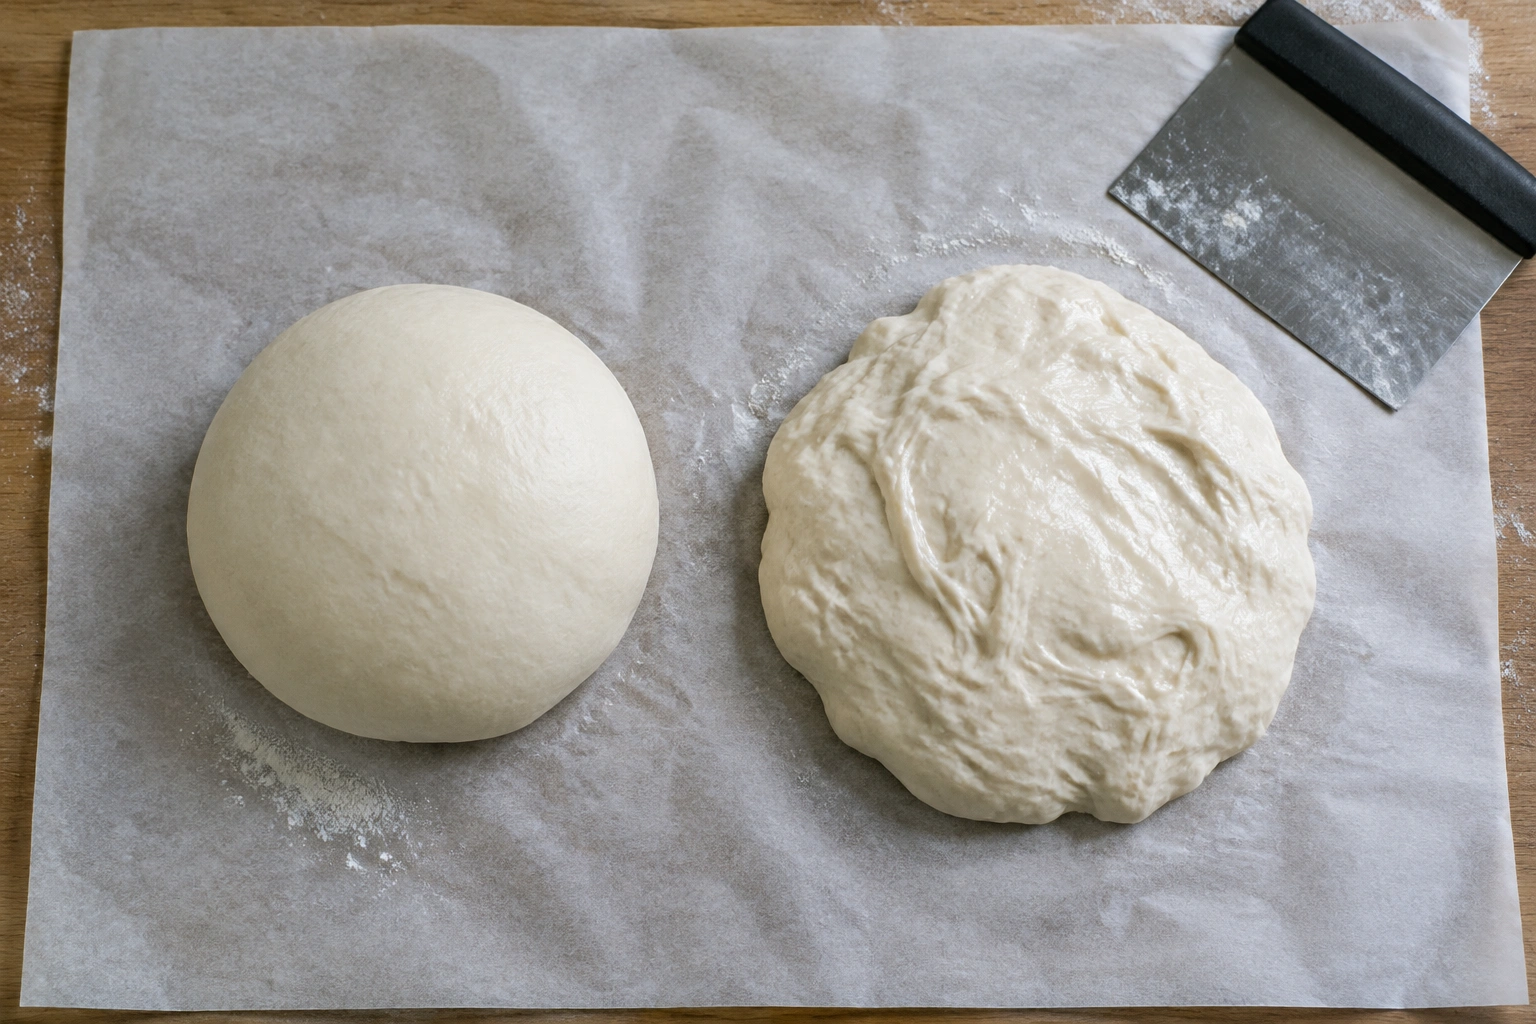
If the dough is too sticky
First, give it time. Rest the dough 15 to 30 minutes, then reassess. If it still feels overly slack for the style you are making, use folds rather than immediately adding flour. Folding can strengthen the dough without drying it out.
If the dough is still unmanageable after rest and folds, add a very small amount of flour only if the style allows it. For ciabatta or other high-hydration doughs, some stickiness is normal, so stop adding flour as soon as the dough holds together and can be handled with wet or lightly oiled hands.
If the dough is too dry
A dry dough usually feels stiff, tears easily, and resists stretching. Add water in small amounts and mix thoroughly. Let it rest again before deciding whether more water is needed. Stop adding water once the dough becomes cohesive and begins to relax after a short rest.
If the dough tears when shaped
That can mean it is underhydrated, under-rested, or underdeveloped. Check all three before changing the formula.
If the dough spreads too much
That may point to excess hydration, weak gluten, or overproofing. Water is only one part of the picture. Sometimes the fix is stronger gluten development rather than less water.
Practical Examples and Recipe Conversions
Example: turning a recipe into hydration
A recipe uses:
- 400 g bread flour
- 100 g whole wheat flour
- 350 g water
Total flour = 500 g
Hydration = 350 ÷ 500 × 100 = 70%
Even though the flour is split between two types, you still use the total flour weight.
Example: adjusting for a softer loaf
Suppose a sandwich bread formula at 62% hydration feels too stiff with your flour. You might raise the water slightly next time and move closer to 65% or 66%, then evaluate the dough after mixing and resting.
That small shift can make shaping easier and the crumb softer without turning the dough into a wet, hard-to-handle mass.
Example: adapting to whole wheat
If a white-flour loaf works well at 68% hydration, a version with a meaningful amount of whole wheat may need a bit more water. Start with a modest increase, hold some water back, and add it after the flour has hydrated if the dough still feels tight.
Quick Reference Checklist for Better Hydration Control
Use this when you are mixing bread:
- Weigh flour and water in grams
- Include all flour in the hydration calculation
- Count liquid ingredients that affect moisture
- Match hydration to the bread style you want
- Let the dough rest before making final decisions
- Add water in small increments, not big splashes
- Avoid adding extra flour too quickly
- Judge the dough by both numbers and feel
- Expect whole wheat to need more water than white flour
- Remember that flour brand and protein level can change absorption
When to Consult a Master Baker
If you are repeatedly getting the same problem despite careful weighing—especially with high-hydration doughs, whole wheat formulas, or recipes that use preferments—it can help to work with a master baker or an experienced bread instructor. A trained eye can often spot whether the issue is hydration, gluten development, fermentation, shaping, or all three.
That kind of feedback is especially valuable for culinary students who want to understand not just what to change, but why the dough is behaving the way it does.
Final Thoughts
Bread dough hydration is one of the most useful numbers in baking because it translates directly into dough behavior. Once you can calculate it, you can compare formulas, adjust for flour type, and choose a texture goal with much more confidence. Start with the target hydration for the bread style you want, then adjust by feel after the dough has rested. The real skill is not memorizing one perfect percentage—it is learning how to read the dough and use hydration as a deliberate choice.