
How to Tell If Yeast Is Dead Before You Bake

If you’re wondering how to tell if yeast is dead, the fastest answer is this: mix it with warm water and a little sugar. If the yeast is healthy, it should show visible activity — bubbles, foam, and some expansion. If it does nothing after the right temperature and a reasonable wait, treat it as inactive and replace it.
Quick reference: Use about 1/2 cup of warm water at roughly 100 to 110°F (38 to 43°C), add 1 teaspoon of sugar, and wait about 5 to 10 minutes. Foam, bubbles, or a little expansion suggest the yeast is active; no foam or bubbling by 10 minutes in properly warmed water means the yeast is questionable and should usually be replaced.
That simple test saves a lot of bread heartbreak. Yeast is one of those ingredients that can look fine on the shelf and still fail in the bowl. Sometimes it’s old. Sometimes it was stored badly. Sometimes the water was too hot and killed it before it had a chance. The goal here is not just to test yeast, but to read the result correctly so you know whether to keep going or start over.
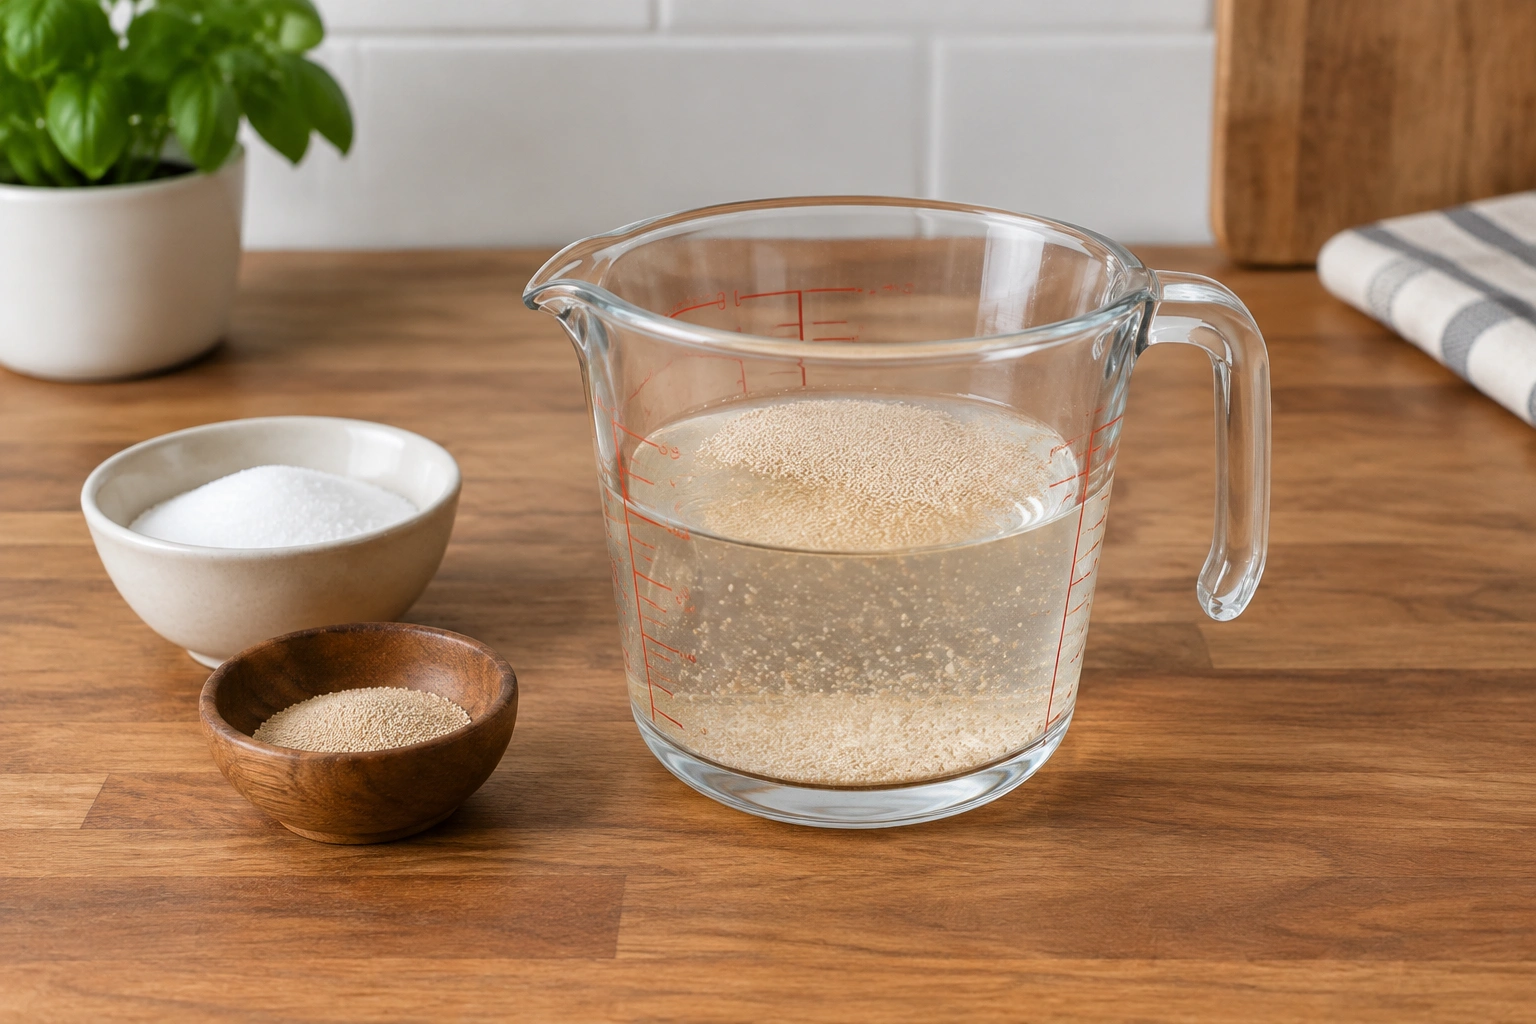
Quick Answer: How to Tell If Yeast Is Dead
Think of yeast viability in three buckets:
- Active yeast: foams, bubbles, and expands in warm water with sugar.
- Weak or aging yeast: shows only a little activity, maybe a thin layer of foam or a few bubbles.
- Dead yeast: shows no visible activity at all after a proper test.
The key phrase there is proper test. A yeast test only means something if the water was warm, not hot, and you gave it enough time. If the water was too cool, yeast may simply sit there. If it was too hot, you may have killed it yourself.
A failed test is usually enough reason to replace the yeast before baking. That is especially true if you’re making an enriched dough, a lean sandwich loaf, or anything where you need a dependable rise.
What You Need to Test Yeast
You do not need special equipment, but a few basics make the test more reliable:
- 1/2 cup warm water
- 1 teaspoon white granulated sugar
- The yeast you want to check
- A small bowl or measuring cup
- A spoon
- Ideally, a thermometer
A thermometer helps because “warm” is easy to misjudge by touch. If you do not have one, use water that feels warm but not hot to the touch. Red Star’s yeast activity test
How the Yeast Proof Test Works
Yeast feeds on sugar and uses moisture to get moving. In a proof test, warm water wakes the yeast up, and the sugar gives it something easy to consume. If the yeast is alive and reasonably active, you’ll usually see gas production fairly quickly. That gas is what creates the bubbles and foam.
This test is not about proving your bread will rise perfectly. It only answers a narrower question: is the yeast alive enough to do its job? That matters because dough can fail for many reasons, but dead yeast is the easiest one to rule out before you waste flour, time, and patience.
One helpful thing to remember: the test is a sign of viability, not a laboratory measurement. A little activity is encouraging. No activity after the right conditions is a warning sign.
Step-by-Step: Test Yeast With Warm Water and Sugar
Here’s the home-kitchen method I recommend.
1) Measure the water
Use about 1/2 cup of warm water.
A widely used testing range is around 100 to 110°F (38 to 43°C). That range is warm enough to encourage activity without pushing the yeast into danger. Bread Dad notes that yeast will not grow if the water is too cold and can die if the water is too hot, which is exactly why temperature matters here. How to Test Yeast (Dead or Alive?) – Bread Dad
2) Add the sugar
Stir in 1 teaspoon of white granulated sugar.
You are not trying to make sweet water. You just want a small, simple food source that helps show whether the yeast is alive.
3) Add the yeast
Stir in the yeast and mix gently.
If you are testing dry yeast, break up any clumps so the granules contact the water evenly. If you are testing fresh yeast, crumble it into the water so it disperses.
4) Wait and watch
Leave it alone in a warm spot and watch for foam or bubbles.
A few bubbles may appear first, and a foamy layer on top is also common. Some yeast tests look dramatic, while others are modest. What matters is whether the yeast clearly begins to activate.
5) Judge the result
After the wait, decide whether the yeast looks active, weak, or dead.
If you see clear foaming and bubbling, the yeast is usable. If you see nothing, and the water temperature was right, replace it.
Bob’s Red Mill says that if you see bubbles, it is a good sign that the yeast is still alive, but that does not guarantee strong performance in dough; if no bubbles form, you may have dead yeast and should get a fresh stash before baking for best results. How to Proof Yeast | Bob’s Red Mill Natural Foods
What Active Yeast Should Look Like
Healthy yeast usually gives you some combination of these signs:
- bubbles rising through the liquid
- a foamy layer on top
- a slightly expanded mixture
- a yeasty smell
The foam is the easiest visual cue. It does not need to look like a beer head or overflow the cup to count. Even a modest layer of foam can be enough to show life.
The smell can help, but it should not be your only test. A yeasty aroma supports the result, yet bubbles and foam are more reliable because you can see them. If the mixture smells normal but stays flat, I would not trust it.
How Long to Wait Before Judging the Result
Give the test enough time before you decide the yeast failed.
A practical window is about 5 to 10 minutes for visible activity to begin, though some yeast may take a little longer depending on age, storage, and room temperature. If you check too early, you can misread healthy but sluggish yeast as dead.
Here is the decision rule I use:
- Within a few minutes: some bubbling is a good sign.
- By about 10 minutes: clear foam or steady bubbling is a strong sign of life.
- After about 10 minutes in properly warmed water with no foam or bubbling: treat the yeast as questionable and usually replace it.
Very old yeast may take longer to show anything, but that also makes it less reliable for baking.
If the yeast is only mildly active, that does not mean it is useless. It may simply be old or weakened. But weak yeast can lead to a slow rise, uneven texture, or a dough that never quite gets where you want it.
How to Read Borderline Results
Borderline results are where many bakers get tripped up.
Minimal foam
A thin ring of foam or a few scattered bubbles suggests the yeast may still be alive, but not especially strong. That yeast might work in a dough with a long fermentation, but it is a riskier choice for a same-day bake.
Slow bubbling
If the yeast starts moving only after a long delay, I would call it weak rather than healthy. It may still be usable, but expect a slower rise and a less predictable outcome.
Some expansion, but not much
A little rise is better than none, yet it still raises a question: is this yeast merely surviving, or is it actually strong enough to raise bread well? For an important bake, I would replace it.
This is where trade-offs matter. Using borderline yeast may save a packet, but it can cost you the loaf. If you’re baking for class, service, or a special meal, reliability usually wins.
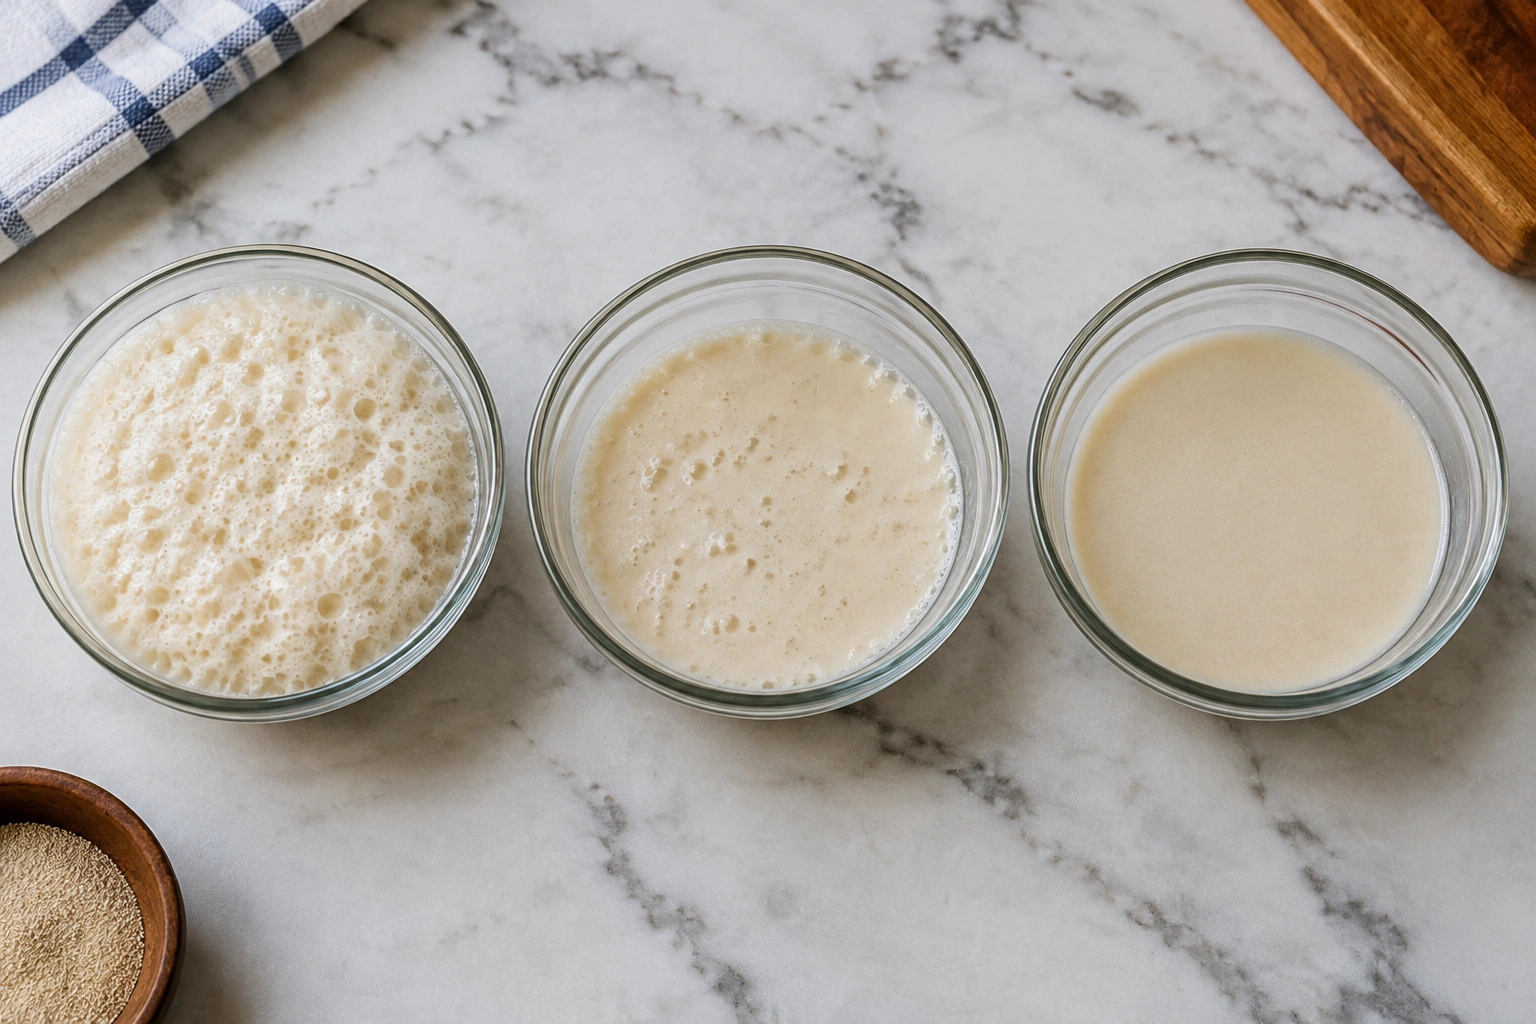
Dead Yeast vs Weak Yeast vs Expired Yeast
These terms are not the same.
| Yeast condition | What you’ll see in the test | What it means | Best next step |
|---|---|---|---|
| Dead yeast | No bubbles, no foam, no visible change | Yeast is inactive | Discard and replace |
| Weak yeast | Small amount of foam or slow bubbling | Yeast may still work, but poorly | Use only if you can accept a slower, less certain rise |
| Expired yeast | Can be active, weak, or dead | Date alone does not tell the full story | Test it before baking |
Expiration date matters, but storage matters just as much. A packet that is technically within date can still fail if it was exposed to heat or moisture. On the other hand, yeast that is past its date may still show enough activity to work in a pinch.
The safest rule is simple: trust the test more than the date.
Active Dry, Instant, and Fresh Yeast: What Changes in Testing
Different yeast types can behave differently, even though the basic test is similar.
Active dry yeast
This is the yeast most home bakers think of when they hear “proof the yeast.” It is often tested in warm water because the granules need time to hydrate and wake up. A clear foam layer or steady bubbling is a good sign that it is still usable.
Instant yeast
Instant yeast can be tested the same way in warm water if you want to check viability. It is designed to work quickly in dough, so it may not always look as dramatic as active dry yeast in a proof test. A modest foam or a few bubbles can still count as a positive sign, but a weak result is more concerning if the yeast is old or poorly stored.
Fresh yeast
Fresh yeast is moist and perishable, so it has a shorter shelf life than dry yeast. It should still show signs of activity when tested properly, but it can age out faster in storage. If it barely bubbles, that is a warning sign that it may be weakening.
If you want a deeper comparison of how these two behave in baking, I cover that in Active Dry Yeast vs Instant Yeast: How to Choose, Swap, and Bake with Confidence.
Common Reasons Yeast Fails the Test
A failed test does not always mean the yeast was born dead. More often, one of these issues is to blame:
- Water too hot: can kill the yeast
- Water too cold: can make yeast seem inactive
- Old yeast: potency drops over time
- Poor storage: heat, moisture, and repeated opening shorten viability
- Wrong waiting time: checking too early can create a false negative
- Yeast clumps: some yeast never fully hydrates if it is not stirred well
Storage is a big one. Yeast that has spent months in a warm cupboard or a humid kitchen may deteriorate long before the package date suggests trouble.
Troubleshooting a Yeast Test That Didn’t Foam
If the test looked flat, work through this checklist before you blame the yeast outright:
Check the water temperature
If you do not know the temperature, ask yourself whether the water felt merely warm or noticeably hot. If it felt hot to the touch, the yeast may have been damaged. If it felt cool, the test may have been too cold to show activity clearly.
Check the waiting time
Did you give it long enough? A rushed judgment is one of the most common mistakes I see.
Check the sugar
If you skipped the sugar, the test can still work, but the result may be less obvious. The sugar helps make activity easier to observe.
Check the yeast itself
If the yeast has been open for a long time, stored near heat, or kept in a damp environment, the problem may be the yeast rather than the test.
Repeat with fresh conditions
If you suspect the first test was flawed, repeat it once with correctly warmed water and a clean measuring cup. If it still shows no activity, replace the yeast.
Can You Still Use Questionable Yeast?
Yes, but only in certain situations.
Here is the decision rule I use:
- Clear foam and bubbles: use it.
- A little activity, but not much: usable if you can accept a slower rise and a less certain result.
- No activity after a proper test: replace it.
Can I Save the Dough?
If the dough is already mixed and the yeast test was weak, you may still be able to salvage it, but the next move depends on how far along it is.
- If the dough has not risen yet: give it more time in a warm place and watch for any sign of expansion.
- If it has barely moved after a reasonable proof period: move it to a warmer spot and extend the rise once, but do not keep waiting forever.
- If there is still no rise and the yeast test was essentially flat: it is usually better to restart with fresh yeast than to keep hoping.
If you are trying to decide whether to keep going with a dough that has already stalled, it may help to step back and compare the yeast question with the bigger baking process. Sometimes the dough itself is fine, and the problem is simply that the yeast was not viable enough to begin with.
How to Store Yeast So It Stays Viable
Good storage extends yeast life more than most bakers realize.
- Keep unopened yeast in a cool, dry place.
- After opening, seal it tightly.
- Store dry yeast in the refrigerator or freezer if you do not use it often.
- Keep fresh yeast refrigerated and use it quickly.
- Avoid moisture, which can damage yeast long before you notice it.
The main idea is to protect yeast from heat, humidity, and air. Those are the conditions that quietly shorten its useful life.
If you want to avoid future guesswork, label the container with the date you opened it. That simple habit makes it easier to tell whether the yeast is old, just aging, or still in good shape.
Common Mistakes to Avoid
A few errors cause most yeast-testing headaches:
- using water that is too hot
- judging the test before enough time has passed
- assuming expiration date alone tells the full story
- ignoring storage conditions
- treating weak yeast as if it were fully reliable
- mixing up a bad test with a bad dough formula
The biggest trap is this: a test that fails because of temperature can look exactly like dead yeast if you do not know what happened. That is why the procedure matters as much as the result.
Examples of Real-World Test Results
Here are a few realistic scenarios.
Example 1: Fast foam in warm water
You mix active dry yeast with 1/2 cup of warm water and 1 teaspoon of sugar. Within about 10 minutes, the top is foamy and the mixture looks lively. That yeast is ready to use.
Example 2: A few bubbles, but not much else
An opened jar of instant yeast past its date gives you a small ring of foam and a few bubbles. It may still work, but it is weak. I would use it only if I were comfortable with a slower rise and not trying to hit a strict baking schedule.
Example 3: No activity at all
You test yeast in water that feels warm, not hot, and wait long enough. Nothing happens. In that case, the yeast is probably inactive, and replacing it is the smart move.
Example 4: Flat test after hot water
You used water that was too hot, and the yeast showed nothing. That result does not tell you much about the yeast itself; it may simply have been killed in the test. Repeat with correctly warmed water before you discard it.
When to Consult a Master Baker
If your yeast test is borderline and the bake really matters, a master baker would usually tell you to choose reliability over optimism. That means replacing questionable yeast rather than trying to rescue a loaf on hope alone.
It is also worth asking for a second opinion if you keep getting failed rises even with fresh yeast. At that point, the issue may not be yeast viability at all. Mixing, salt contact, dough temperature, or proofing conditions may be interfering with fermentation.
Final Decision: Use It, Replace It, or Retest
Here is the simplest way to decide:
- Foam, bubbles, and expansion: use the yeast.
- Weak, slow activity: use it only if you can tolerate a riskier rise.
- No activity after proper testing: replace it.
That is the practical answer to how to tell if yeast is dead. The test is simple, but the judgment is what saves your bake. Once you know how to read the result, you can move forward with much more confidence — and with far fewer flat loaves.