The baking soda volcano science fair project is still one of the easiest ways to impress judges fast with a clear, visible reaction. Build it neatly, test it first, and explain the science in simple terms for the strongest result.
A baking soda volcano science fair project still works because it is simple, visual, and easy to explain. If you build it neatly and test it a few times first, it can look polished fast without becoming complicated.
- Best fit: Great for fast, visual science fair presentations with simple chemistry.
- Science focus: Baking soda and vinegar make carbon dioxide gas that creates the eruption.
- Winning factor: A neat build, clear hypothesis, and one tested variable matter most.
- Safety first: Use a tray, supervise children, and keep the demo away from eyes.
- Smart upgrade: Add a small data table or timing note to look more scientific.
Why a Baking Soda Volcano Science Fair Project Still Wins in 2026
The baking soda volcano science fair project remains popular because it gives judges something they can see right away. The reaction is fast, the setup is familiar, and students can explain the science in clear, age-appropriate language.
It also fits the reality of busy science fair schedules. When a project needs to look strong on display day, this one offers a good balance of visual impact and manageable prep.
What judges look for: clear hypothesis, visible reaction, and student explanation
Judges usually want more than a big eruption. They want a student who can explain what was tested, what changed, and what happened in the reaction.
A clear hypothesis might be as simple as predicting that more vinegar will create a larger eruption, or that adding dish soap will make the foam last longer. The best version is not just dramatic; it shows a student understands cause and effect.
Why this classic project fits elementary, middle school, and homeschool science fairs
This project works across age groups because the science can be adjusted. Younger students can focus on observation and vocabulary, while older students can test variables and record results.
It is also practical for homeschool science fairs because the materials are easy to find and the experiment can be repeated at home. For families building a broader kitchen-science unit, it pairs naturally with other baking chemistry topics like how heat changes food texture and simple ingredient reactions.
How the Baking Soda and Vinegar Reaction Works
The reaction is a basic acid-base reaction. Baking soda is sodium bicarbonate, and vinegar contains acetic acid; when they mix, they produce carbon dioxide gas.
That gas is what pushes the foam upward and out of the volcano. The eruption looks exciting because the gas forms quickly and gets trapped in the liquid mixture.
The roles of baking soda, vinegar, and carbon dioxide gas
Baking soda provides the base. Vinegar provides the acid. When the two combine, they react and release carbon dioxide, along with water and a salt.
Students do not need to memorize every chemical detail to explain the project well. They only need to know that the ingredients react, gas forms, and the gas causes the eruption.
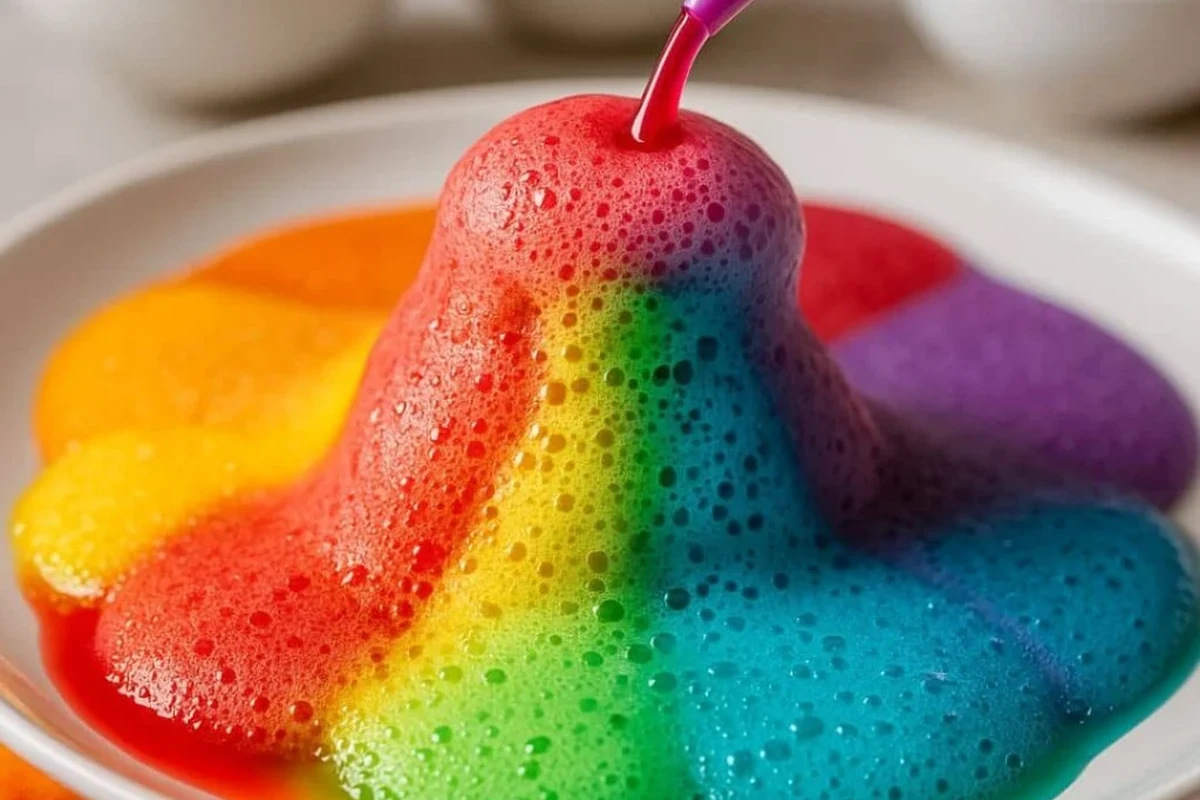
Why foam, fizz, and pressure make the eruption look dramatic
The foam appears because dish soap traps the gas bubbles. That makes the reaction look bigger than a plain fizzing liquid.
Pressure also matters. As gas forms inside the volcano, it needs somewhere to go, so it moves upward through the opening and spills out in a visible flow.
Dish soap does not create the reaction, but it helps trap bubbles so the eruption looks fuller and lasts a little longer.
Simple science terms students can use without sounding memorized
Good student-friendly terms include acid, base, reaction, gas, bubbles, foam, pressure, and variable. These words are accurate without being overly technical.
A strong explanation sounds natural: “The vinegar and baking soda reacted and made carbon dioxide gas, which pushed the foam out of the volcano.” That is usually better than a long speech full of jargon.
Materials, Tools, and Safe Setup for a Clean Volcano Build
The best volcano is sturdy, centered, and easy to clean up. A good setup keeps the eruption visible and avoids a messy spill across the display table.
Best base materials: plastic bottle, cardboard, clay, paper mache, or recycled containers
A small plastic bottle is often the easiest center chamber because it is stable and easy to refill. A cardboard base or tray underneath helps catch overflow and keeps the display neat.
Clay and paper mache can make the volcano look more realistic, but they should not block the opening. Recycled containers can work too, as long as they are secure and wide enough to hold the reaction.
Measuring cups, funnels, trays, food coloring, dish soap, and optional glitter substitutes
Measuring tools make the project look more scientific and help with repeat testing. A funnel helps get baking soda into a narrow opening without spilling powder over the model.
Food coloring improves visibility, and dish soap adds foam. If a teacher discourages glitter, colored paper confetti or extra food coloring is a cleaner substitute.
Safety basics for indoor, classroom, and outdoor science fair displays
Set the project on a tray or plastic table cover, especially indoors. Vinegar can drip, and the foam can spread farther than expected.
For classroom or public displays, keep the reaction away from eyes and do not let younger students taste or handle the ingredients casually. If the project is done in a kitchen or home learning space, basic food-safety habits still matter, including clean hands and clean measuring tools.
This is a science demo, not food. Keep the materials separate from baking ingredients you plan to eat, and supervise younger children around vinegar, bottles, and scissors.
Step-by-Step Project Structure That Looks Polished on Display Day
A neat volcano often scores better than a messy one, even if the science is simple. Judges notice whether the setup is centered, labeled, and easy to understand.
How to build the volcano shape so the eruption stays centered
Place the bottle or cup in the middle of the base before adding the outer volcano shape. That keeps the opening aligned with the top crater.
Build the slope so it rises evenly around the center. If the sides lean too much or the opening is off-center, the foam can flow sideways and lose its impact.
Place the bottle or reaction cup on a tray and secure it so it does not tip.
Use clay, paper mache, or another cover to form a mountain around the bottle, leaving the opening clear.
Make sure the crater is wide enough for a funnel and easy pouring.
How to label the experiment board with purpose, materials, procedure, and results
A simple board works best when it is easy to read from a few feet away. Use clear headings like Purpose, Hypothesis, Materials, Procedure, Observations, and Conclusion.
Keep the text short and clean. The project should look like science, not like a crowded poster with too many decorations.
How to stage multiple test eruptions before the final presentation
Always test the reaction before science fair day. Small adjustments in bottle size, soap amount, or vinegar quantity can change how the eruption behaves.
Testing also helps students practice their explanation. A confident presentation sounds better when the student has seen the reaction several times and knows what to expect.
- Test the volcano at least once before display day
- Check that the opening is centered and clear
- Prepare a tray or cover for cleanup
- Write the hypothesis in one simple sentence
Measurement Ratios, Eruption Strength, and Variables to Test
There is no single perfect ratio because container size, vinegar strength, and soap amount can all affect the result. Start small and adjust after a test run.
Common starting ratios for baking soda and vinegar
A common starting point is a spoonful of baking soda with a measured amount of vinegar, but the exact amount depends on the size of the bottle and how strong you want the eruption to look. Smaller setups need less liquid to avoid overflow.
For a fair test, use the same measuring method each time. That makes it easier to compare one trial with another.
How changing liquid amount, acid strength, or soap affects eruption height
More vinegar usually means more reaction, up to a point. Too much liquid can turn the eruption into a spill instead of a foam burst.
Dish soap changes the look, not the chemistry. Stronger vinegar or different container sizes can also change how fast the foam rises and how long it lasts.
If you are testing variables, change only one thing at a time. That is the easiest way to show a real scientific difference instead of a random outcome.
Easy controlled-variable ideas for a stronger science fair experiment
Good variables include amount of vinegar, amount of baking soda, amount of dish soap, or bottle opening size. Keep everything else the same so the result is easier to compare.
A simple chart can show trial number, ingredient amounts, and eruption height or foam duration. Even basic notes can make the project look more thoughtful.
Common Mistakes That Make the Project Look Weak or Messy
Most weak volcano projects fail for presentation reasons, not because the science is wrong. The reaction may work fine, but the display looks rushed or hard to understand.
Using too much liquid and losing the eruption effect
Too much vinegar can make the mixture overflow before the foam builds properly. That creates a puddle instead of a controlled eruption.
Start with a smaller amount and increase only if needed. A cleaner eruption is usually more impressive than a huge messy spill.
The eruption runs over the tray and looks sloppy.
Reduce the liquid amount, use a deeper tray, and make sure the crater is centered and narrow enough to direct the foam upward.
Building a volcano that blocks the reaction or collapses during judging
If the outer shell covers the opening, the gas cannot escape cleanly. If the structure is too thin or wet, it can collapse before the demonstration.
Use a sturdy base and leave the crater open. Dry the structure fully before the fair if you use paper mache or another damp material.
Overcomplicating the experiment instead of showing one clear scientific idea
It is easy to add too many decorations, too many variables, or too much text. That can make the project harder to explain and harder for judges to follow.
The strongest version is usually the simplest: one reaction, one question, one clear explanation. For a fast-win project, clarity matters more than complexity.
- Keep the model neat and centered
- Use one simple hypothesis
- Record a few clear observations
- Adding too many variables at once
- Letting the model look unfinished
- Using a board that is hard to read
How to Make the Project More Impressive Without Making It Harder
A few small upgrades can make the volcano look more polished without adding much work. The goal is to improve presentation, not complicate the science.
Using color contrast, neat labels, and a clean eruption tray
High contrast helps the project stand out. Darker volcano sides can make bright foam or colored vinegar easier to see.
Use neat labels with enough spacing, and keep the tray clean between tests. A tidy display often looks more confident than a flashy one.
Adding a short data table, observation notes, or timing results
Even a small data table can elevate the project. You can record how long the foam lasted, how high it rose, or which mixture looked strongest.
That kind of simple data shows that the student did more than just make a fun reaction. It demonstrates observation, comparison, and basic scientific method.
Presenting the science in student-friendly language during judging
Students should practice a short explanation they can say naturally. A good script sounds like a conversation, not a memorized speech.
For example: “I tested how changing the vinegar amount affected the eruption. The baking soda and vinegar made carbon dioxide gas, and the gas pushed the foam out of the volcano.”
Use caution when pouring and mixing. Vinegar can sting eyes, and the bottle or tray may get slippery after repeated eruptions.
Final Verdict: Is the Baking Soda Volcano the Best Fast-Win Science Fair Project?
For many students, yes. The baking soda volcano science fair project is one of the fastest ways to create a clear, visual, judge-friendly display with a strong science explanation.
When this project is the right choice for limited time and strong visual impact
Choose this project when you need something reliable, affordable, and easy to demonstrate live. It is especially useful when the science fair rubric values presentation, explanation, and a visible reaction.
If you want a project that looks exciting quickly, this one is hard to beat. It gives students a simple way to show scientific thinking without needing special equipment.
When to choose a different experiment if the rubric rewards deeper data collection
If the judge’s rubric emphasizes detailed measurements, multiple trials, or advanced analysis, another experiment may fit better. A volcano can still work, but it may need a stronger variable test to stand out.
In that case, focus on one measurable change, such as vinegar amount or soap amount, and collect neat results. That keeps the project from becoming just a showpiece.
Recap of the fastest path to a neat, exciting, judge-friendly volcano
Use a stable base, keep the crater centered, test the reaction before the fair, and explain the science in plain language. Add one clean data element, and the project will look more polished without becoming harder.
If your goal is a fast, visual win, this classic project still delivers. It is simple enough for beginners, flexible enough for different grade levels, and strong enough to make a good impression when it is built carefully.
The baking soda volcano is a smart choice when you need a quick, visual science fair project that still teaches real chemistry. Keep it neat, test it first, and use one clear variable for the best chance at a strong presentation.
Frequently Asked Questions
There is no single best ratio because the right amount depends on the bottle size and how dramatic you want the eruption to look. Start small, test once, and keep the measuring method the same for every trial.
You can test other acids, but the result may change a lot, so it is best to keep one ingredient constant if you are comparing trials. If you change the acid, note the difference clearly on your board.
Dish soap helps trap bubbles, which makes the foam look larger. A centered opening, a clean tray, and the right amount of liquid also help the eruption look stronger.
Use simple sections like Purpose, Hypothesis, Materials, Procedure, Observations, and Conclusion. Keep the text short and readable so judges can follow the project quickly.
Change only one thing at a time, such as the amount of vinegar or dish soap. Keep the container, baking soda amount, and setup the same so the results are easier to compare.
It is usually safe with adult supervision, but the ingredients should not be tasted and the reaction should be kept away from eyes. Use a tray, handle the bottle carefully, and clean spills right away.
