
Why You Get a Big Hole Under the Bread Crust — and How to Stop It

A loaf that looks fine on the outside and then reveals a hollow band just under the crust can be frustrating. You slice into it expecting a nice, even crumb, and instead you find a tunnel or cavern running along the top. The good news: this is usually a fixable bread defect, not a mystery.
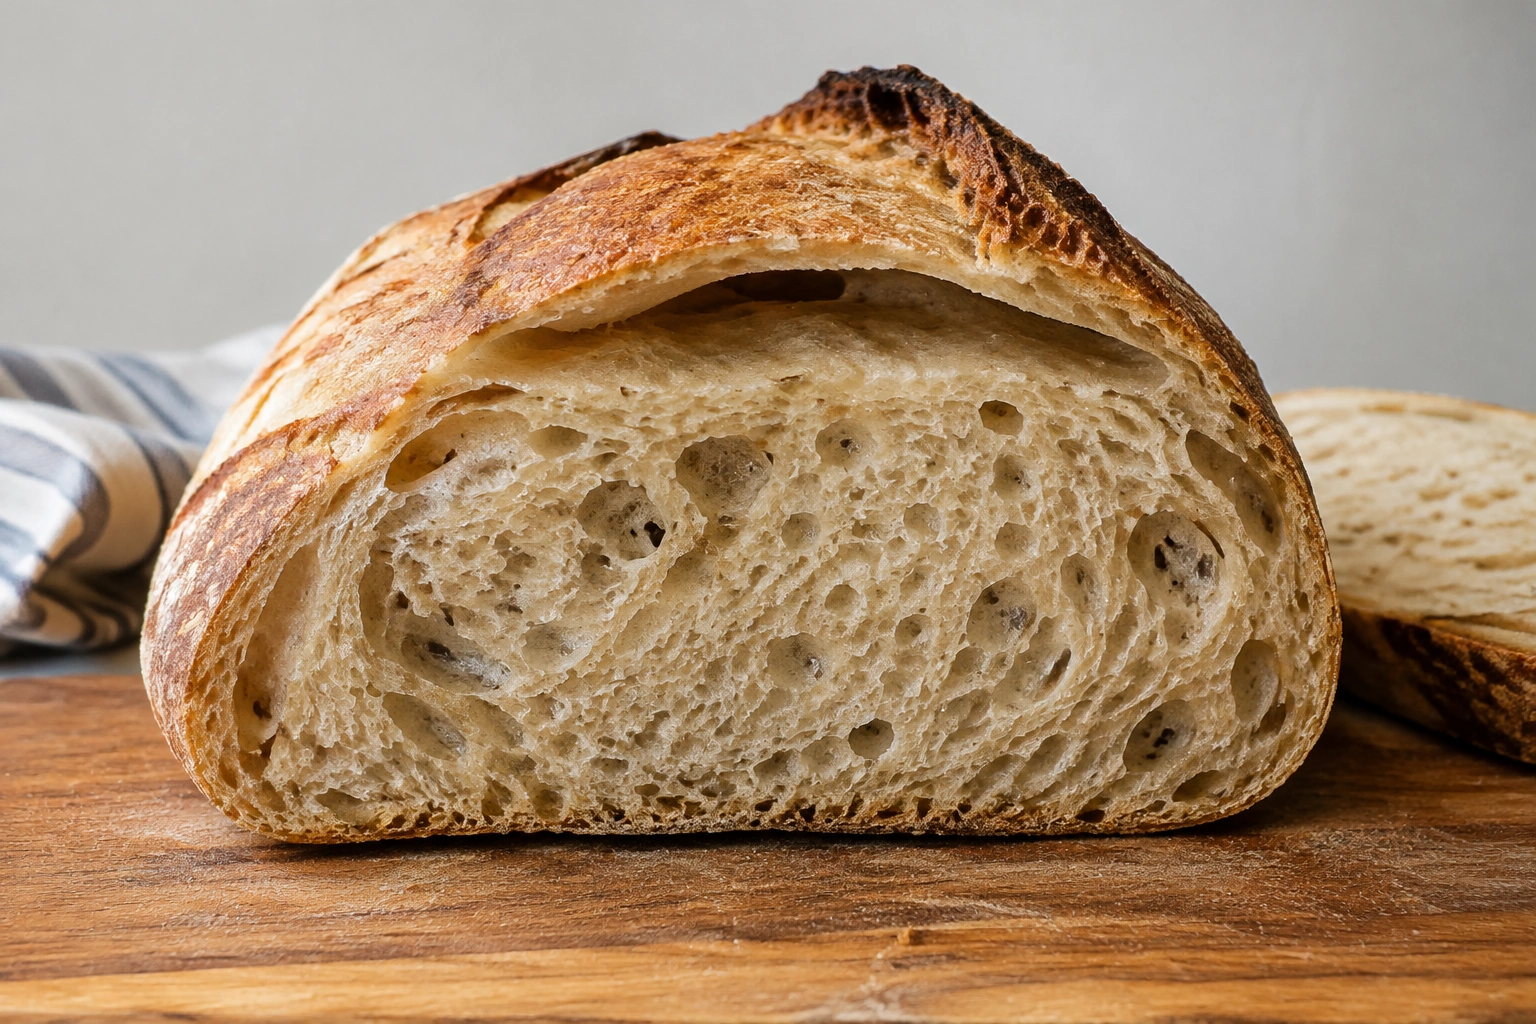
In artisan baking, a little openness in the crumb can be desirable. But a big hole under the bread crust is different from a naturally open crumb. An open crumb has holes distributed fairly evenly through the loaf. A defect cavity sits in one area—often just below the top crust—while the rest of the bread may be dense, tight, or uneven. King Arthur Baking describes the ideal loaf as having holes that are consistently dispersed, not scattered giant voids and dense patches King Arthur Baking.
If you want the short version: this problem usually comes from one of three places:
- Proofing went off target
- Shaping trapped gas or left a weak seam
- Baking conditions exaggerated the loaf’s expansion
Let’s diagnose it properly.
What a big hole under the crust actually means
Think of the loaf as a balloon made of gluten. During fermentation, gas is produced and held inside that gluten network. If the dough is balanced, the gas spreads into many small pockets. If something goes wrong, gas collects in one larger pocket near the top.
That top cavity is often called a tunnel, void, or cavern. It is not the same as a normal open crumb. A normal open crumb has structure throughout the slice. A tunnel under the crust usually means the loaf expanded unevenly before the crumb set.
When it is a defect vs. when it is normal
- Normal open crumb: holes are varied but fairly even across the slice
- Defect cavity: one large pocket sits under the top crust, often with tighter crumb below it
- Severe defect: a detached top layer or a long horizontal tunnel running across the loaf
If you are baking a rustic artisan loaf, some irregularity is expected. But a large isolated pocket usually means the dough structure or handling needs adjustment.
Is the bread still safe to eat or salvage?
In most cases, yes—if the loaf is fully baked and there is no mold or off smell. A hollow space under the crust is usually a texture problem, not a safety problem.
Use this quick rule:
- Safe and usable: fully baked, smells normal, no mold, no gummy raw center
- Salvageable but not ideal: hollow band under crust, but the crumb is cooked through
- Discard: mold, sour/off odor, or center that is still underbaked
If the loaf is safe, repurpose it:
– Toast it for breakfast
– Use it for croutons
– Turn it into bread pudding or strata
– Slice it thinner for sandwiches if the cavity is small
A loaf with a top tunnel can still taste great. The issue is structure, not necessarily flavor.
Fast diagnosis: the most likely cause based on what you see
Use this order: look at the loaf first, then check dough feel, then review proofing and bake conditions. That sequence is the fastest way to narrow down the cause.
1) Inspect the loaf shape and crumb
- Top tunnel with otherwise decent crumb: shaping is a strong suspect
- Tight crumb with a sudden burst near the top: underproofing is more likely
- Soft, fragile loaf with weak structure: overproofing is more likely
- Split or lifted top layer: baking conditions may have amplified the problem
2) Check how the dough felt before baking
- Tight, springy, resistant dough: likely underproofed
- Slack, fragile, overexpanded dough: likely overproofed
- Dough that seemed smooth but had a hidden bubble: shaping likely trapped air
3) Review proofing, shaping, and bake settings in that order
- Proofing: Was the dough ready, or did it go in too early or too late?
- Shaping: Did you trap a large bubble or leave a weak seam?
- Bake settings: Did strong heat, steam, or the baking surface exaggerate the rise?
That order matters because proofing and shaping usually create the defect, while bake settings often make it more obvious.
Common causes of a hollow band under the crust
A top cavity usually comes from a combination of factors, not one single mistake.
1) Trapped air during shaping
If you shape a boule or batard loosely, you can trap a large air pocket under the outer skin. During baking, that pocket expands and stays near the top.
This is especially common when:
– The dough is handled gently but not firmly enough
– The surface tension is weak
– The seam is not sealed well
– A roll or shaped loaf is folded with a bubble still inside
2) Uneven gas distribution
Fermentation should create many small gas cells. If the dough is not folded, shaped, or degassed evenly, gas can concentrate in one band. That is how you get a tunnel instead of a balanced crumb.
3) Underproofing
Underproofed dough still has plenty of spring left. In the oven, it can expand too aggressively before the crumb sets. That sudden push can separate the top layer from the crumb below.
4) Overproofing
Overproofed dough loses strength. The gluten can’t hold gas evenly, so the loaf may collapse slightly or bake with weak layers and internal gaps. The top crust can separate from the crumb because the dough no longer has enough structure to rise in a controlled way.
5) Weak gluten development
If the gluten network is underdeveloped, gas escapes or migrates unevenly. The loaf may rise, but not in a controlled way. That makes big voids more likely, especially in wetter doughs.
6) Baking conditions that exaggerate expansion
Strong oven spring is not bad by itself. In fact, it is desirable when controlled. But if the dough is already weak, underproofed, or poorly shaped, a hot oven and lots of steam can magnify the defect.
Underproofing vs. overproofing: how to tell the difference
These two are easy to confuse because both can create a bad crumb. The clues are different, though.
| Clue | Underproofed dough | Overproofed dough |
|---|---|---|
| Dough feel before baking | Tight, elastic, springy | Soft, fragile, slack, overexpanded |
| Poke test | Springs back quickly | Fills in slowly or barely at all |
| Oven behavior | Strong burst of oven spring | Weak rise, possible collapse |
| Crumb pattern | Tight crumb with random large holes | Uneven crumb, weak structure, possible large voids |
| Crust | Often thicker or tougher in underproofed loaves | Can be thin but structure may be weak |
| Likely result | Tunnel from aggressive expansion | Hollowing from weakness and collapse |
The poke test, interpreted carefully
Press the dough gently with a fingertip:
– Bounces back fast: likely underproofed
– Leaves an indentation that returns slowly: closer to ready
– Stays dented or deflates easily: likely overproofed
The poke test is helpful, but it is not perfect. Dough temperature, hydration, and flour type all affect the feel. Use it with visual cues, not alone.
Shaping mistakes that trap air or create a tunnel
This is where many home bakers accidentally create the problem.
Loose shaping
If the outer skin is not tightened enough, the loaf lacks tension. Gas can collect under the surface instead of being distributed through the dough. That often shows up as a cavity just under the crust.
Too much degassing in the wrong way
There is a trade-off here. If you press too hard, you can create a tight, uniform crumb that loses artisan openness. But if you barely degas at all, you may leave one big bubble behind.
The goal is not to flatten the dough completely. It is to break up large pockets while preserving the smaller gas cells that give bread a good crumb.
Poor seam placement
If the seam is weak or poorly sealed, the loaf may open along that line in the oven. That can create a top gap, especially in shaped batards and boules.
Example: boule vs. batard vs. pan loaf
- Boule: a loose round can hide a bubble under the top skin
- Batard: an uneven roll or weak seam often creates a long tunnel
- Pan loaf: poor degassing can leave a detached top layer or a hollow band under the crown
If you want a more even crumb, shaping should be firm enough to organize the dough but not so aggressive that it crushes all the gas.
Proofing, fermentation, and gluten development: the setup before baking
The cavity you see at the end often starts long before the oven.
Hydration matters
Higher-hydration dough can produce a more open crumb, but it also needs better shaping control. Virtuous Bread notes that wet dough is part of getting those open holes in artisan bread, along with stretch and fold during the first rise.
That’s the trade-off:
– More hydration: potentially lighter, more open crumb
– Less hydration: easier to shape and more forgiving, but usually less open
If your shaping is inconsistent, high hydration can make a top tunnel more likely.
Gluten strength matters
A strong gluten network holds gas more evenly. If your dough is under-kneaded or underdeveloped, the gas cells won’t be organized well. That is one reason a loaf may have one huge void and a dense area right beside it.
If you want to improve this foundation, it helps to review gluten development separately. A weak dough cannot compensate for a perfect bake.
Fermentation timing matters
Too short, and the dough is underproofed. Too long, and it may lose strength. The sweet spot is when the dough has expanded enough to be airy but still holds shape and tension.
That balance is what gives you a loaf that rises in the oven without tearing itself apart.
Scoring, steam, and oven spring: how baking can worsen the defect
Baking does not usually create the hole from nothing, but it can make a small problem much larger.
Scoring directs expansion
Score too shallowly and the loaf may burst where it wants to. Score too deeply and you may weaken the structure too much. The goal is to give the loaf a controlled release point so oven spring happens where you want it.
Steam delays crust setting
Steam keeps the crust flexible early in the bake, which helps the loaf expand. That is useful—up to a point. If the dough is underproofed or poorly shaped, the extra expansion can exaggerate the top cavity before the crumb sets.
Oven spring is not the enemy
A strong oven spring is normally a good thing. The problem appears when the dough is not balanced enough to handle it. Then the top layer may lift away from the crumb below.
Baking surface and vessel matter
A hot stone or steel can improve bottom heat and overall oven spring, while a Dutch oven or covered pan can trap steam and support the initial rise. If the loaf is already weak, though, stronger heat or too much steam can intensify the separation. The bake should support the dough, not rescue a poorly proofed loaf.
How to prevent the problem on your next loaf
Use this sequence in order. It is more effective than changing everything at once.
1) Fix the dough structure first
Make sure the dough is developed enough to hold gas. If it tears easily or feels weak during shaping, the crumb will be harder to control.
2) Shape with enough tension
Tighten the outer skin without squeezing all the gas out. Your goal is a smooth, taut surface with no obvious large bubble trapped under it.
3) Seal seams carefully
A weak seam is an easy place for the loaf to split. Pinch it closed firmly enough that it stays shut through proofing and baking.
4) Watch proofing, not the clock alone
Room temperature, flour type, and dough strength all change timing. Use the poke test and the look of the dough together. If it still springs back quickly, it likely needs more time.
5) Score with purpose
Give the dough a controlled path for expansion. That reduces the chance of a random burst under the crust.
6) Match steam and bake setup to dough strength
Steam helps many artisan loaves, but it should fit the dough. If your loaf is already fragile, too much steam, heat, or pan support can amplify the defect.
7) Keep notes
Write down hydration, bulk time, shaping style, proof time, and oven setup. When the same hollow band keeps showing up, your notes will reveal the pattern faster than memory will.
Troubleshooting by bread style: artisan loaves, pan loaves, and no-knead bread
Artisan loaves
These are the most likely to show a top tunnel because they rely heavily on shaping, fermentation, and oven spring. If you are baking a boule or batard, the main suspects are shaping, proofing, and scoring.
Pan loaves
Pan loaves are more constrained, so a large void often points to poor degassing or uneven proofing. If the top crust separates from the crumb, the dough may have been shaped too loosely before it went into the pan.
No-knead bread
No-knead dough can be beautiful, but it is sensitive to handling and baking setup. A practical first check is whether the dough had enough proof time and whether the baking vessel gave it enough support and heat retention. In practice, that means the dough may need a longer proof, or the bake may need better support from a Dutch oven, baking stone, or pan support.
No-knead bread is especially likely to show uneven structure if:
– The dough was not fermented long enough
– The shaping was minimal
– The baking vessel did not support a strong, even rise
Practical examples: what went wrong and how to fix it
Example 1: The loaf burst high on one side
This often means the dough was underproofed or scored poorly. Next time, proof a bit longer and make a more confident score so the expansion has a controlled outlet.
Example 2: The loaf looks puffy but feels fragile before baking
That points toward overproofing. Shorten the final proof, or reduce bulk fermentation slightly if the dough is already very expanded before shaping.
Example 3: A batard has a long tunnel just under the top crust
That is classic shaping trouble. Tighten the shaping, remove obvious large bubbles, and seal the seam more carefully.
Example 4: A no-knead loaf has a huge top cavity but a decent bottom crumb
That suggests the dough may have needed longer proofing or a better baking vessel. Improve fermentation time first, then check whether your Dutch oven, baking stone, or pan support is helping the loaf hold its shape.
Common mistakes bakers make when chasing a perfect crumb
The biggest mistake is assuming every big hole means the same thing. It doesn’t.
Here are the traps:
– Blaming overproofing for everything when the real issue is shaping
– Degassing too aggressively and ending up with a tight, heavy loaf
– Leaving too much air in the dough because you are afraid of crushing the crumb
– Changing hydration, proofing, and scoring all at once, which makes the true cause impossible to identify
– Judging readiness by time alone instead of dough behavior
A good loaf is a balance of gas retention, structure, and timing. When one of those is off, the crumb often shows it first under the crust.
Final checklist: what to do after you slice into a loaf
If you see a big hole under the crust, use this quick decision tree:
- Is the loaf fully baked and free of mold or off smells?
- Yes: it is usually safe to eat or repurpose
-
No: discard it
-
Does the loaf feel tight and springy, with a strong burst in the oven?
- Yes: underproofing is a likely cause
-
No: move on
-
Does the loaf feel fragile, slack, or overexpanded before baking?
- Yes: overproofing is a likely cause
-
No: move on
-
Does the cavity look like a trapped pocket or seam issue?
- Yes: adjust shaping and seam sealing
-
No: move on
-
Did the bake use strong heat, heavy steam, or a very hot baking surface?
- Yes: reduce the bake intensity if the dough is already weak
- No: review proofing and shaping again
If you keep seeing the same defect, change one variable at a time: proofing first, shaping second, bake setup third. That gives you a clear path to a more even crumb.
FAQs
Why is there a big hole under the bread crust?
Usually because gas collected unevenly near the top of the loaf. The most common causes are proofing errors, trapped air during shaping, or baking conditions that exaggerated oven spring.
Is a hollow space under the crust always a problem?
No. Some artisan breads are supposed to have an open crumb. It becomes a defect when the hole is isolated, unusually large, and separated from the rest of the crumb.
Can underproofing cause a large hole?
Yes. Underproofed dough can spring too aggressively in the oven, creating a void near the crust.
Can overproofing cause it too?
Yes. Overproofed dough can lose strength and bake with weak, uneven structure that leaves gaps.
Can I still eat the bread?
Usually yes, if it is fully baked and there is no mold or off smell. The issue is usually texture, not safety.
How do I stop trapping air during shaping?
Shape with enough tension to organize the dough, but press out obvious large bubbles before the final shape. Seal the seam well so it does not open during baking.

Does steam cause the hole?
Steam does not usually create the hole by itself, but it can make the problem worse if the dough is already weak, underproofed, or poorly shaped.
What if I want an open crumb without the tunnel?
Aim for even gas distribution, good gluten development, and controlled shaping. Open crumb should look balanced, not hollow at the top and dense below.
Why does this happen more with artisan loaves?
Artisan loaves rely more on fermentation balance, shaping, and oven spring, so any weakness in those areas shows up more clearly.
What should I change first if this keeps happening?
Start with proofing, then shaping, then bake setup. That order usually reveals the cause faster than changing everything at once.
Can a Dutch oven help prevent a top tunnel?
It can help support oven spring and steam retention, but it will not fix poor proofing or shaping on its own.
Should I adjust hydration to fix it?
Not first. Hydration affects crumb openness, but proofing and shaping are usually the more direct causes of a hollow band under the crust.
How do I know if the seam was the problem?
If the loaf opens along one line or the top layer looks detached, a weak or poorly sealed seam is a strong possibility.
Why does the crumb look dense below the hole?
That pattern often means the loaf expanded unevenly before the crumb set, leaving one large pocket above a tighter section.
Is this more common in no-knead bread?
It can be, especially if the dough was underproofed or the baking vessel did not give the loaf enough support.