
How to Make Focaccia at Home: A Clear, Reliable Guide for Better Bread

If you want to learn how to make focaccia with confidence, the good news is that this bread is far more forgiving than it looks. Focaccia rewards patience, a generous hand with olive oil, and a dough that is handled gently rather than aggressively. Once you understand what the dough should feel like and why each step matters, the process becomes repeatable.

I’m Ethan Baker, and I like focaccia because it teaches a useful bread lesson: great texture comes from restraint. You’re not chasing a tight, perfectly smooth dough. You’re building strength through rest, folding, and proper fermentation so the bread can rise into those signature airy pockets.
What You Need to Make Focaccia
A straightforward focaccia starts with a short ingredient list, but each item has a job to do.
Essential ingredients
For one standard 9×13-inch pan or a similar rimmed sheet pan, use:
– Flour: 500 g all-purpose flour
– Water: 400 to 425 g lukewarm water
– Yeast: 1 teaspoon instant yeast or 1 1/4 teaspoons active dry yeast
– Salt: 10 g fine salt, about 1 3/4 teaspoons
– Olive oil: 30 to 45 g in the dough, plus more for the pan and topping
– Optional sugar or honey: 1 teaspoon, if you want a small boost for yeast activity
Tools and pan options
You do not need special equipment, but a few tools make the process smoother:
– Large mixing bowl
– Rubber spatula or Danish whisk
– Measuring cups and spoons or a kitchen scale
– Rimmed baking sheet or a shallow rectangular pan
– Parchment paper, if you want easier cleanup
– Small bowl for water or oil to keep your hands from sticking
For pans, a sheet pan gives a thinner, crisper focaccia, while a deeper pan gives a thicker loaf with a softer interior. If you want the classic dinner-table style with a crisp bottom and lighter crumb, a rimmed sheet pan is usually the easiest place to begin.
Quick comparison: which setup to choose
| Choice | Best for | Trade-off |
|---|---|---|
| All-purpose flour | Tender, accessible home version | Slightly less chew than bread flour |
| Bread flour | More structure and chew | Can feel a bit firmer |
| Instant yeast | Fast, simple mixing | Less need for a separate proofing step |
| Active dry yeast | What you already have in the pantry | May need extra time or proofing |
| Same-day method | Quick baking | Less flavor development |
| Overnight method | Better scheduling and deeper flavor | Requires planning ahead |
| Sheet pan | Crisp edges and thinner loaf | Less tall, less pillowy |
| Deeper pan | Softer, thicker focaccia | Usually less crisp at the bottom |
If you want a broader bread foundation before tackling focaccia, this guide on how to make bread dough from scratch for beginners is a useful companion.
Quick Recipe Flow
Here is the basic process at a glance:
- Mix the dough: Combine 500 g flour, 400 to 425 g water, 1 teaspoon instant yeast, 10 g salt, and 30 to 45 g olive oil. Mix until no dry flour remains, about 3 to 5 minutes.
- Rest and fold: Let the dough rest 30 minutes, then do 1 set of 4 stretch-and-folds. Repeat for 2 to 3 total folds at 30-minute intervals.
- Bulk ferment: Let the dough rise until it looks puffy and bubbly, usually 2 to 4 hours at room temperature, or refrigerate for an overnight method.
- Pan and proof: Oil the pan generously, transfer the dough gently, and let it proof until jiggly and airy, about 1 to 2 hours at room temperature, or longer if the dough is cold.
- Dimple and top: Press deep dimples into the dough, add toppings, and bake.
- Bake: Bake at 425°F until deeply golden and crisp, usually 20 to 25 minutes.
How Focaccia Dough Should Look and Feel
Focaccia dough should be soft, sticky, and loose, not firm like sandwich bread dough. It should still be a cohesive dough, though, not a pourable batter. When you lift it with a spatula or wet hand, it should stretch and cling before slowly settling back into the bowl.
The dough should:
– Hold together as a rough mass
– Stick to the bowl a little
– Feel tacky, not dry
– Relax and spread slowly rather than springing back tightly
What it should not feel like:
– Dry and stiff
– Smooth and elastic like pizza dough right after kneading
– So wet that it pours like batter
If you add too much flour early on, the bread can bake up dense and dry. Resist the urge to “fix” stickiness with extra flour. Focaccia’s texture comes from hydration and time, not from making the dough easy to handle.
Choose Your Method: Same-Day or Overnight Focaccia
Both methods work. The better one depends on your schedule and what you want from the bread.
Same-day focaccia
Choose this when:
– You need bread the same day
– You want a straightforward baking session
– You are comfortable watching the dough closely
For same-day focaccia, let the dough bulk ferment at room temperature until it looks noticeably puffy, jiggly, and dotted with bubbles. After that, move it to the prepared pan, let it proof again until it looks airy and relaxed, then bake.
Overnight focaccia
Choose this when:
– You want a more flexible schedule
– You like deeper flavor
– You want the dough to be easier to handle the next day
For an overnight method, refrigerate the dough after the initial mixing and first round of folds, once it has started to rise a little but before it is fully proofed. Cold-proof it for about 12 to 24 hours. The next day, let it sit at room temperature until it is no longer cold and has relaxed enough to spread in the pan, usually about 1 to 2 hours depending on kitchen temperature.
A cold rest in the refrigerator gives the dough more time to develop flavor and can make the final shaping easier. It is also practical if you want to mix the dough in the evening and bake the next day.
If your kitchen is warm or your schedule is tight, a longer rise can also be easier to manage than trying to judge a quick room-temperature proof. For more timing help, see how to make dough rise faster without ruining the texture.
Step 1: Mix the Dough
There are a few valid ways to mix focaccia dough, but the goal is the same: combine everything until no dry flour remains.
A simple mixing method
- In a large bowl, whisk together the flour, salt, and yeast.
- Add the water and 30 g of the olive oil.
- Mix with a rubber spatula or Danish whisk until the dough comes together into a sticky mass.
- Scrape the sides and bottom of the bowl so no dry flour remains.
Mixing usually takes about 3 to 5 minutes. The dough should look shaggy at first, then turn into a rough, sticky ball or mass.
Instant yeast vs active dry yeast
- Instant yeast can go straight into the flour.
- Active dry yeast is often mixed with warm water first if you want to give it a head start.
If you proof active dry yeast in water, you are looking for foam or visible activity. If it does not show activity after a reasonable rest, it is safest to replace it with fresh yeast.
A practical water note
Use water that feels warm, not hot. Hot water can damage yeast; lukewarm water is the safer range for home baking. If the dough feels too stiff after mixing, add a small splash more water rather than a handful of flour.
Step 2: Build Strength Without Heavy Kneading
Focaccia dough does not need the kind of vigorous kneading you would use for a lean sandwich loaf. Because the dough is high in water, heavy kneading can be awkward and unnecessary.
Instead, use rest and folds.
Why this works
When dough rests, the flour hydrates fully and gluten begins to organize on its own. A few gentle folds then align that structure without squeezing out all the gas you want to keep.
A simple stretch-and-fold approach
- Let the dough rest for about 30 minutes after mixing.
- Wet your hand so the dough does not cling.
- Reach under one side of the dough, stretch it up gently, and fold it over the center.
- Turn the bowl a quarter-turn and repeat.
- Continue until you have done 4 folds total around the dough.
- Cover and rest for 30 minutes.
- Repeat the same 4-fold sequence 1 to 2 more times, for a total of 2 to 3 sets.
That means a beginner can follow this pattern: rest 30 minutes, fold 4 times, rest 30 minutes, fold 4 times, rest 30 minutes, and fold 4 times again if the dough still feels slack.
This is the kind of trade-off that matters here: a little extra time and care can improve the final crumb without making the process difficult.
If you are a visual learner, think of this stage as “organizing” the dough, not forcing it into shape.
Step 3: Let the Dough Rise
This is where focaccia starts to become itself. The dough should expand, relax, and look airy.
What to watch for
A properly proofed focaccia dough often looks:
– Puffy and expanded
– Jiggly when the bowl is gently moved
– Full of visible bubbles near the surface or sides
– Softer and more elastic than it was after mixing
For bulk fermentation, look for a dough that has increased in volume by roughly 50 to 75 percent, not necessarily doubled. It should look aerated and domed, with bubbles along the edges and a smoother, more relaxed surface.
Timing guide
- Same-day rise: usually about 2 to 4 hours at room temperature, including the fold rests, depending on room temperature and yeast activity
- Overnight rise: refrigerate after the first rise has started, then cold-proof for 12 to 24 hours
- Final proof after pan transfer: usually about 1 to 2 hours at room temperature, or until the dough looks airy and spreads toward the corners
A dough that is ready to pan usually looks noticeably aerated and relaxed rather than tight and newly mixed. If it still feels dense and resistant, it needs more time.
Step 4: Prepare the Pan and Transfer the Dough
This step matters more than many beginners expect. Olive oil in the pan is not just for flavor; it helps prevent sticking and encourages a crisp, bronzed crust.
How to oil the pan
Use about 2 to 3 tablespoons of olive oil for a standard 9×13-inch pan, or enough to coat the bottom generously and lightly cover the sides. You want the dough to sit in oil, not dry metal. That layer helps the bread release cleanly and contributes to the finished crust.
For the dough itself, 2 to 3 tablespoons is a practical range. For the pan and top, plan on another 2 to 4 tablespoons, depending on how rich and crisp you want the crust. You want enough oil to help the bread fry lightly at the edges and brown well, but not so much that the surface looks slick or greasy.
Parchment paper or not?
Parchment paper can make removal easier, especially if you are nervous about sticking. But if you want a more direct crisping effect, a well-oiled pan can work beautifully on its own. Either way, do not skimp on the oil.
Transferring the dough
Gently ease the dough into the pan with oiled or wet hands. If it resists, lift it slowly from underneath rather than pulling from the top. Focaccia dough should be handled like something fragile and alive, not like a stiff ball that needs to be tugged into place.
If the dough does not reach the corners immediately, that is normal. Cover it and let it rest for 15 to 20 minutes, then try again. The rest gives the gluten time to relax so the dough spreads with less force and less deflation.
Step 5: Shape, Dimple, and Top the Focaccia
This is the signature focaccia moment.
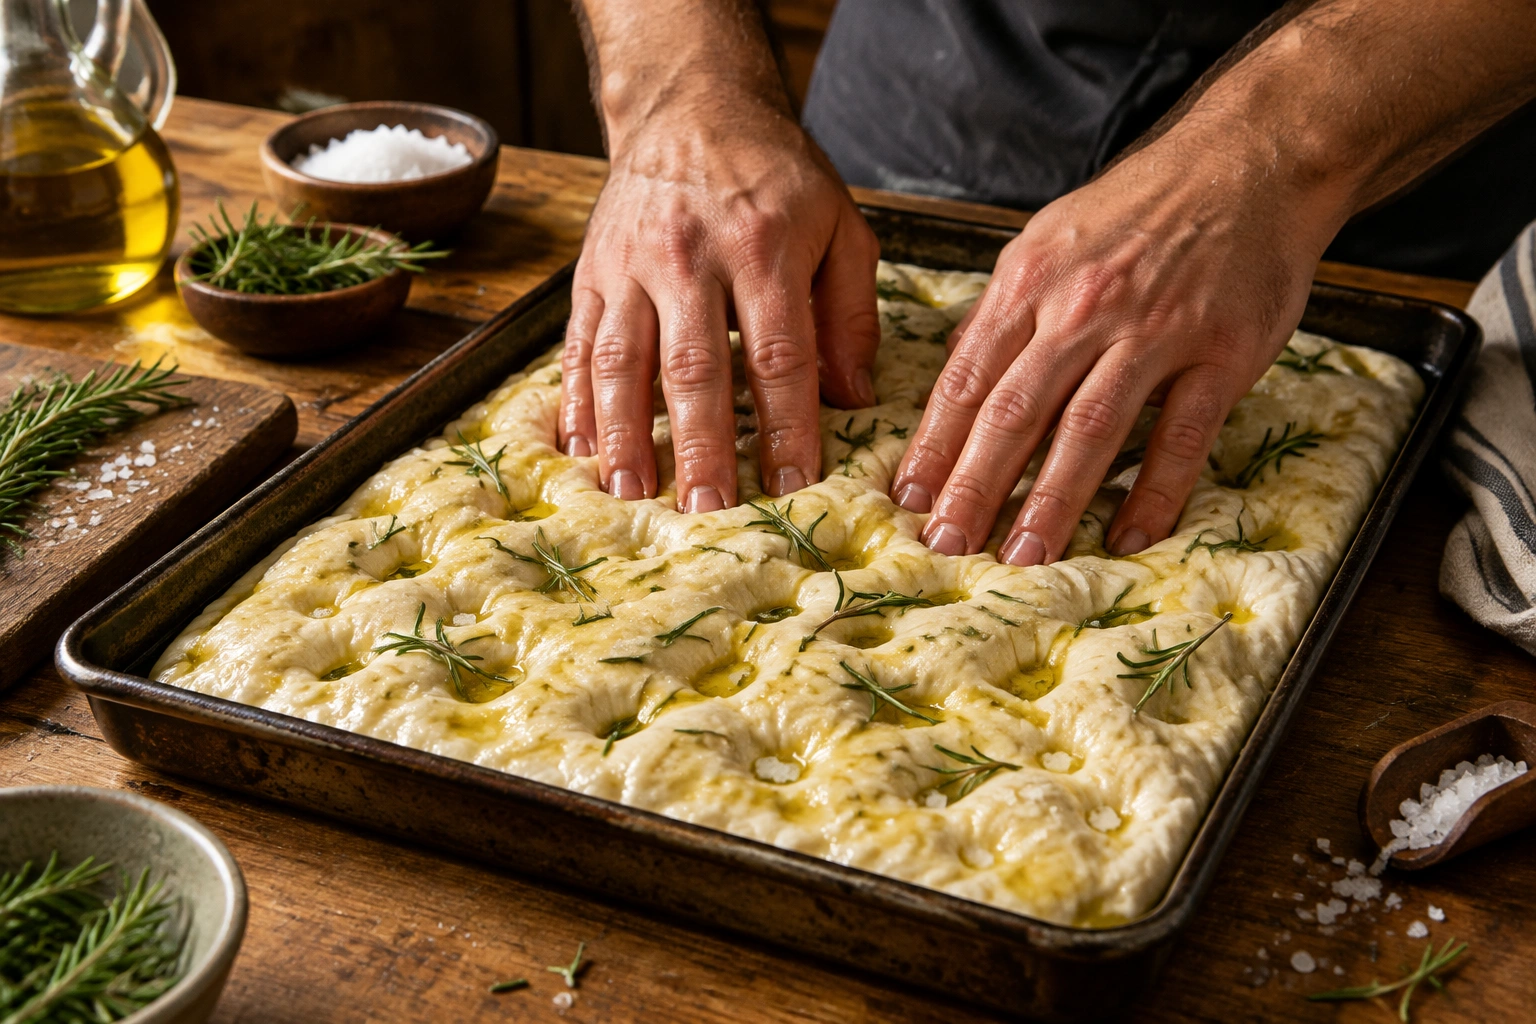
How to dimple the dough
Use oiled or wet fingertips and press straight down into the dough, making deep dimples across the surface. The aim is to create those characteristic wells without flattening the loaf completely.
Dimpling does two things:
– It helps the dough spread evenly in the pan
– It catches olive oil and toppings so they stay put
Press confidently, but not so hard that you force all the gas out. Think of it as making a landscape of small pockets, not punching the bread flat.
Toppings that work well
Classic choices include:
– Flaky sea salt
– Rosemary
– Olive oil
– Sliced olives
– Thinly sliced onions
– Cherry tomatoes
– Herbs such as thyme
Dry, sturdy toppings are the easiest. Wet toppings can work too, but they need more care. If you use juicy tomatoes, onions, or other moist toppings, keep the layer light and spread them evenly so they do not trap excess moisture. For very wet toppings, it can help to use smaller amounts or pre-cook them slightly first so they do not make the surface soggy.
When to add toppings
Add most toppings after dimpling and before baking. If a topping is especially wet, place it with intention so it doesn’t create soggy patches. Wet toppings should go on sparingly and, when possible, after any excess moisture has been reduced.
Step 6: Bake Until Golden and Crisp
Focaccia usually bakes in a hot oven so the structure sets quickly and the top browns well.
Baking guidance
For most home ovens, I recommend starting at 425°F. That gives the bread enough heat to rise, brown, and crisp without lingering too long in the oven. Bake until the top is deeply golden and the bottom is crisp.
How to tell it is done
Look for:
– A golden-brown top
– Crisp edges
– A bottom that sounds and feels firm rather than soft and damp
– Toppings that look set, not wet and raw
– A center that feels cooked through when gently pressed, not squishy or gummy
If you are baking in a deeper pan or with a thicker layer of dough, expect the bake time to run longer than with a thin sheet-pan version.
Cooling
Let the focaccia cool on a rack before removing it from the pan if possible. That helps steam escape from the bottom instead of turning it soft.
Common Mistakes and How to Fix Them
Dense crumb
Likely causes:
– Not enough rise time
– Too much flour added during mixing or shaping
– Dough was handled too roughly
Fix:
Give the dough more time and handle it more gently. Keep the dough sticky rather than trying to make it neat.
Pale crust
Likely causes:
– Oven not hot enough
– Bread removed too early
– Too little surface oil
Fix:
Bake until the top is deeply golden, not just lightly colored.
Soggy bottom
Likely causes:
– Too much moisture from toppings
– Underbaking
– Not enough oil or poor pan choice
– Dough too thick for the pan
Fix:
Use a hot oven, bake fully, and choose a pan that matches the thickness you want. If the toppings are wet, reduce the amount or pre-cook them a little first.
Gummy center or underbaked interior
Likely causes:
– Dough was too thick for the pan
– Oven temperature ran low
– Bake time was too short
– The bread was cut too soon
Fix:
Bake a little longer at the same temperature, or lower the rack if the top is browning too quickly. Let the bread cool for at least 10 to 15 minutes before slicing so the center can finish setting.
Oily surface
Likely causes:
– Too much oil added before baking
– Oil pooled in the dimples
– Toppings already carried a lot of oil
Fix:
Use a lighter hand with the final oil drizzle. You want a glossy surface, not a slick one. If the bread looks shiny but not greasy, you are in the right range.
Dry focaccia
Likely causes:
– Too much flour
– Too little oil
– Overbaking
Fix:
Weigh or measure flour carefully, use enough oil, and check the bread a few minutes earlier next time.
Sticking in the pan
Likely causes:
– Insufficient oil
– Bread cooled too long in the pan
– Pan not prepared well
Fix:
Oil the pan generously and move the bread out once it has cooled enough to handle safely.
Practical Variations and Topping Ideas
If you want a thinner, crispier focaccia, use a rimmed sheet pan and spread the dough more widely after the first rest. If you want a thicker, softer loaf, use a deeper pan and give the dough more room to rise upward. Just remember that thicker dough usually needs a longer bake to avoid a gummy center.
A few reliable topping combinations:
– Rosemary and flaky salt
– Olive oil, garlic, and thyme
– Cherry tomatoes and sea salt
– Caramelized onions and rosemary
– Olives and herbs
For beginners, rosemary and salt is the easiest place to start because it adds flavor without introducing extra moisture.
Storage, Reheating, and Make-Ahead Tips
Focaccia is at its best the day it is baked, but leftovers can still be useful.
Best storage approach
- Wrap tightly once fully cooled
- Store at room temperature for short-term keeping
- Reheat briefly in a warm oven if you want to restore some crispness
Make-ahead strategy
If you want fresher bread for dinner, the overnight method is often the easiest path. Mix the dough the day before, refrigerate it, then bring it back to room temperature, pan it, proof it, dimple it, and bake when you are ready.
When to Consult a Master Baker
If your focaccia keeps baking up dense, collapsing in the pan, or turning out pale despite careful timing, it may be worth checking your flour, yeast freshness, oven temperature, and pan choice before changing the recipe itself. Repeated failures usually point to a process issue rather than bad luck.
FAQs
How wet should focaccia dough be?
Very soft and sticky. It should hold together in a rough mass but still feel loose and tacky.
Do I need to knead focaccia dough?
Not heavily. Resting and gentle folds usually do the job better for this style of dough.
Can I make focaccia the same day?
Yes. Same-day focaccia works well if you watch the dough closely and give it enough time to rise.
Is overnight focaccia better?
It often gives you better flavor and easier scheduling, though it does require planning ahead.
What pan should I use?
A rimmed sheet pan gives a thinner, crispier result. A deeper pan makes a thicker, softer loaf.
Why is my focaccia dense?
Most often because it needed more proofing time, was overfloured, or was handled too aggressively.
How do I know when it is done baking?
Look for a uniformly golden top and a crisp bottom. If the bread still looks pale, it likely needs more time.
What toppings are best?
Rosemary, flaky salt, olives, onions, and cherry tomatoes are all strong choices. Dry toppings are easiest for beginners.
Can I store leftovers?
Yes. Wrap them tightly and keep them at room temperature for a short time, then reheat briefly if needed.
For more bread technique support, you may also like our guide to can you make bread without yeast if you want to compare yeast and yeast-free methods.