
How to Make Soft Pretzels at Home: A Baker’s Step-by-Step Guide

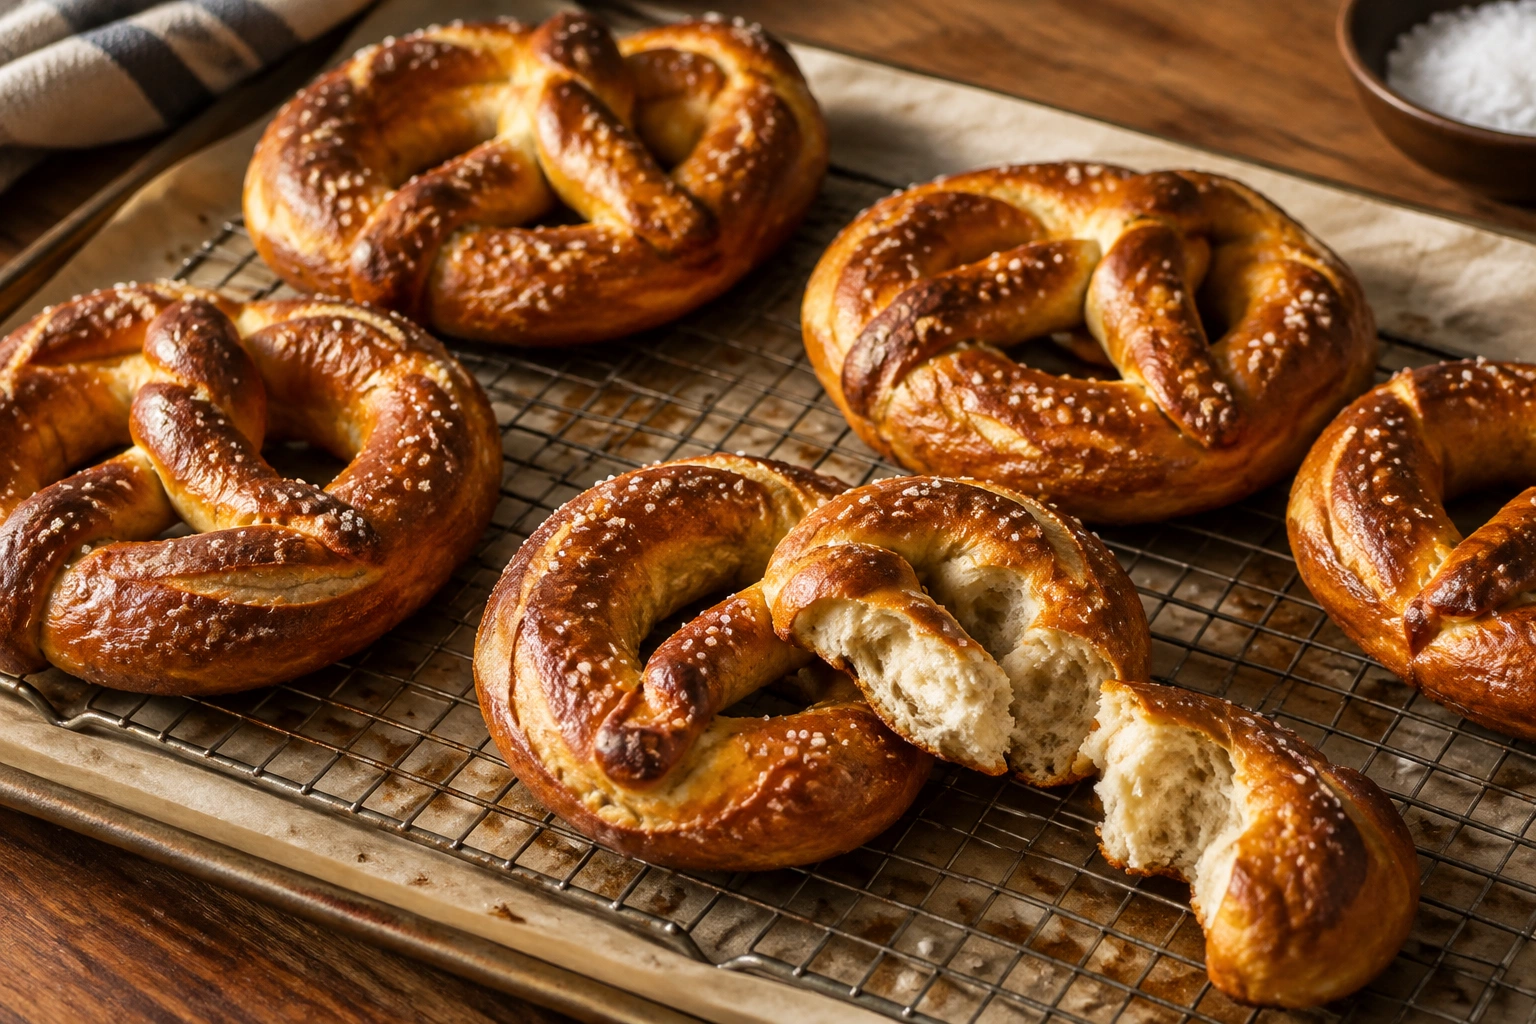
Soft pretzels look simple, but they reward attention to a few key details: dough texture, shaping, and the alkaline bath before baking. Get those right and you’ll have a pretzel with a glossy brown crust, a chewy exterior, and a soft, bread-like center.
The good news is that this is a very manageable dough for home bakers. You do not need special equipment beyond a bowl, a baking sheet, and either your hands or a mixer. What matters most is understanding what each step is doing and why.
Soft Pretzels at a Glance
Here’s the big picture before you start.
- Dough style: a simple enriched yeast dough
- Best finish: baking soda bath for a home-friendly method, or lye bath for a more traditional crust
- Typical bake temperature: 450°F
- Typical bake time: 10 to 12 minutes
- Expected texture: deeply browned outside, soft and chewy inside
- Common shapes: twists, sticks, or bites
A practical workflow looks like this: mix the dough, knead until smooth, let it rise, shape, dip briefly in an alkaline bath, top, and bake. The whole process can fit into an afternoon, though make-ahead options make it even easier.
If you want to compare this dough with other enriched breads, my guide to soft sandwich bread is a helpful companion piece.
Ingredients and Tools You’ll Need
Before you begin, gather everything. Pretzel dough moves quickly once mixed, and it’s easier when you’re not hunting for salt halfway through shaping.
Recipe card
Soft Pretzels
Yield: 12 pretzels
Prep time: about 25 minutes
Rise time: about 1 hour
Bake time: 10 to 12 minutes
Oven temperature: 450°F
Ingredients
- 1 1/2 cups warm water, about 110°F
- 1 tablespoon granulated sugar
- 2 1/4 teaspoons instant yeast or active dry yeast
- 4 1/2 cups all-purpose flour, plus more for dusting
- 1 1/2 teaspoons fine salt
- 2 tablespoons unsalted butter, melted
- 1 large egg, beaten with 1 tablespoon water, for egg wash
- Pretzel salt or coarse salt, for topping
Baking soda bath
- 9 cups water
- 1/2 cup baking soda
Optional lye bath
- Food-grade lye and water, prepared according to the manufacturer’s instructions only
Equipment
- Large bowl or stand mixer
- Baking sheet
- Parchment paper
- Large pot for the bath
- Slotted spatula or spider
- Cooling rack
Ingredient roles
A classic homemade soft pretzel dough usually includes:
- Flour: the structure of the dough. All-purpose flour gives a softer bite; bread flour gives more chew and strength.
- Yeast: the leavening that makes the dough rise.
- Water: hydrates the flour and activates the yeast.
- Sugar: feeds the yeast a little and helps with browning.
- Salt: strengthens the dough and keeps the flavor from tasting flat.
- Butter: adds tenderness and a richer flavor.
- Baking soda or food-grade lye: creates the pretzel crust and deep color in the bath.
- Egg wash: helps the surface shine and helps salt or toppings adhere.
Tools that help
Helpful:
– Stand mixer with dough hook
– Kitchen scale
– Large pot for the bath
– Slotted spatula or spider
– Parchment-lined baking sheets
– Cooling rack
Optional but useful:
– Bench scraper
– Pastry brush
– Gloves if you use lye
Flour, yeast, and bath choices at a glance
| Decision | Best for | Trade-off |
|---|---|---|
| All-purpose flour | Softer, more beginner-friendly pretzels | Slightly less chew than bread flour |
| Bread flour | Chewier texture and stronger structure | Can feel a little firmer |
| Instant yeast | Faster mixing, fewer steps | Less visual proofing drama, which some bakers like to see |
| Active dry yeast | Good if that’s what you have on hand | Often benefits from blooming first |
| Baking soda bath | Safer and easier for home kitchens | Less dark and less “classic” than lye |
| Lye bath | Deep color and more authentic pretzel flavor | Requires careful handling and food-grade lye only |
If you are choosing between flour types, think texture first. Bread flour leans chewier and a bit firmer. All-purpose flour is the safer choice if you want a softer, more familiar snack-shop style pretzel.
Choose Your Pretzel Method: Baking Soda Bath or Lye Bath
This decision shapes both flavor and crust.
A baking soda bath is the most approachable option for home bakers. It gives you the classic pretzel look and a pleasantly chewy exterior without requiring special handling procedures. Many home recipes use this method successfully, and it is the one I’d recommend if this is your first batch.
A food-grade lye bath creates a darker, more authentic pretzel crust and a deeper pretzel flavor. That happens because a more alkaline surface browns faster in the oven and develops a stronger pretzel taste. The chemistry is simple: alkalinity helps the dough surface brown more deeply and changes the flavor in that familiar pretzel direction. That comes with extra caution: use only food-grade lye, follow safe handling practices, and never substitute household drain cleaner.
There is also a middle ground some bakers use: a baked baking-soda method, where baking soda is heated first to make it more alkaline. It can work, but for most home bakers, a straightforward soda bath is easier to manage.
If you want the safest path with excellent results, choose baking soda. If you already know how to handle lye safely and want the most traditional crust, lye is the more advanced option.
Make the Dough
A good pretzel dough should feel smooth, elastic, and firm, not slack and sticky. That texture matters because pretzels hold their shape better than many other yeasted doughs.
Mixing method
If you’re using active dry yeast, combine warm water, sugar, and salt, then stir in the yeast and let it sit until foamy, about 5 minutes. If you’re using instant yeast, you can usually mix it directly with the dry ingredients and proceed.
Add the flour and butter, then mix until a shaggy dough forms. At this stage, don’t chase perfect smoothness yet. You’re just getting everything hydrated.
What the shaggy stage should look like
The dough may look rough, with dry flour still clinging in spots and a few sticky patches elsewhere. That’s normal. It should come together in a loose mass, but it does not need to look polished yet.
If there is a little flour at the bottom of the bowl, keep mixing before adding more liquid. If the dough looks dry and breaks apart into crumbs, add water a teaspoon at a time. If it looks wet enough to smear on the bowl sides, dust in a small amount of flour.
What the dough should feel like
Pretzel dough should be:
– cohesive
– slightly tacky, but not wet
– firm enough to shape later without slumping
If it feels sticky enough to coat your fingers heavily, add flour in small amounts. If it feels dry and rough, add water a teaspoon at a time. The goal is a dough that can become smooth with kneading, not one that already feels stiff and finished.
Knead the Dough Until It’s Ready
Kneading develops gluten, which gives pretzels their structure and chew. Skip this step or rush it, and the pretzels tend to bake up pale, dense, and bready.
By hand
Turn the dough onto a lightly floured surface and knead with the heel of your hand, folding and pressing for several minutes. You’re looking for a dough that becomes noticeably smoother and more elastic.
With a stand mixer
Use the dough hook on low to medium speed. Mixer kneading is faster and more consistent, especially if you’re making pretzels often or teaching students who want repeatable results.
How to know it’s ready
The dough should:
– look smooth rather than ragged
– spring back slowly when pressed
– feel elastic when stretched
– hold together cleanly instead of tearing immediately
You do not need a full windowpane test here the way you might for sandwich bread. Pretzel dough is sturdier and slightly firmer by design. If the dough is still rough, torn-looking, or sticky in a way that makes shaping difficult, knead a little longer. If it becomes very tight and resists stretching, let it rest for a few minutes before continuing.
Let the Dough Rise
Cover the dough and let it rise until puffy. In many home recipes, that takes about 1 hour, though temperature matters. A warm kitchen speeds things up; a cool one slows them down.
You’re not aiming for dramatic triple volume. Pretzel dough should rise enough to relax and become airy, but not so much that it turns fragile. A practical sign is that the dough looks visibly fuller and feels lighter when you poke it.
A good target is roughly doubled in size, or at least clearly expanded and aerated. When you press it gently with a fingertip, the indentation should spring back slowly rather than snap back immediately. If it feels tight and dense, it likely needs more time. If it looks wrinkled, fragile, or overly puffy, it may be overproofed.
If you let it overproof, the dough may become too soft and the shaped pretzels can lose definition. Underproofed dough, on the other hand, may resist stretching and bake up dense.
How to Shape Soft Pretzels
Shaping is the part that intimidates many first-time bakers, but it’s easier than it looks once you divide the dough evenly.
Classic twist method
- Divide the dough into equal portions. Many recipes use 12 pieces, which gives manageable pretzel-sized portions.
- Roll one piece into a rope. A common target is roughly 50 to 60 cm long.
- Hold the rope in a shallow U shape.
- Cross the ends over each other once.
- Twist the crossed ends again.
- Fold the twisted ends down toward the bottom of the U and press lightly to seal.
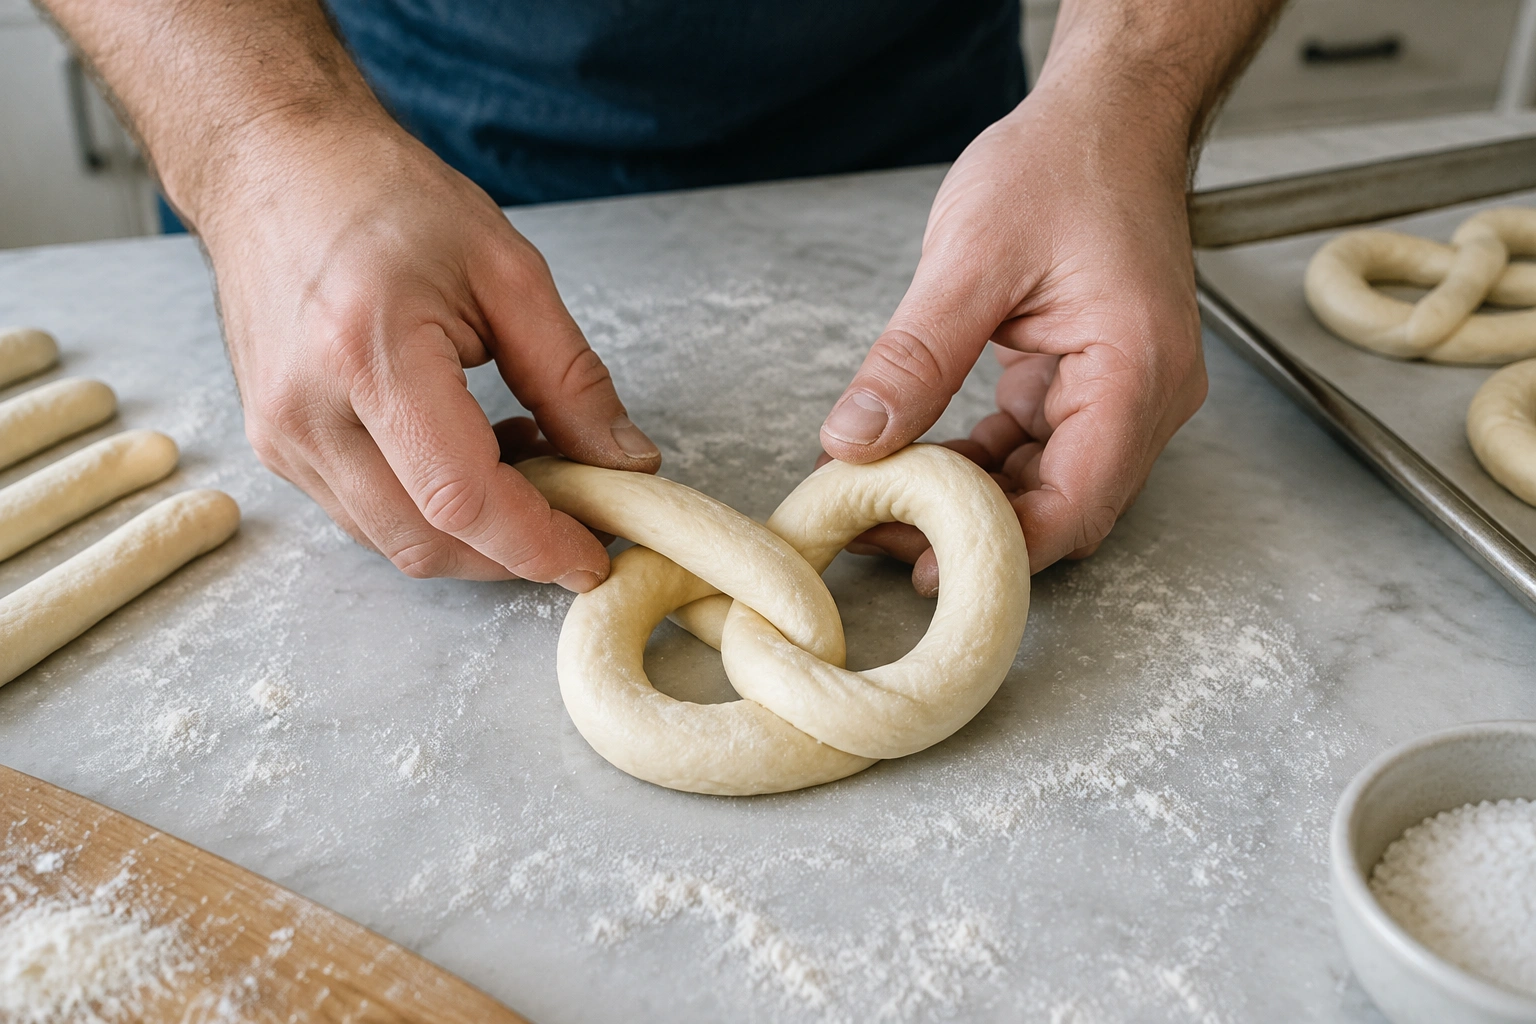
If the rope keeps shrinking back, let it rest for a few minutes. That’s a gluten issue, not a failure. A short rest relaxes the dough and makes shaping easier.
Easy fallback if twisting feels awkward
If the classic twist feels fussy, make a simple loop-and-fold shape instead: form a rope into a loose loop, cross the ends once, then fold them down and press lightly. It will not look identical to a bakery pretzel, but it will still bake well. Imperfect shapes are part of homemade pretzels, and they often taste just as good.
If you want sticks or bites
- Sticks: roll the dough into shorter ropes and leave them straight.
- Bites: cut the dough into small pieces after shaping ropes or simply portion smaller pieces from the start.
Sticks and bites are useful if you want faster shaping or a snack-style batch for dipping.
Do shaped pretzels need to rest before the bath?
A short rest is helpful if the dough keeps springing back while you shape. Let the shaped pretzels sit for a few minutes, uncovered or lightly covered, just long enough for the gluten to relax. They do not need a long second rise before the bath. In fact, you want them to stay fairly firm so they keep their shape.
Prepare the Alkaline Bath
This is the step that makes pretzels taste like pretzels.
The alkaline bath changes the dough surface so it browns more deeply in the oven and develops that distinctive pretzel flavor. Without it, the dough bakes more like a soft roll.
Baking soda bath
For a home method, bring water and baking soda to a boil, then dip the pretzels briefly. One tested approach uses 9 cups of water and 1/2 cup of baking soda, with a 20 to 30 second dip. That short window matters. Go too long and the pretzels can pick up an unpleasant metallic note.
Lye bath
If you use food-grade lye, follow the product instructions carefully and use proper safety precautions:
– Wear gloves and eye protection.
– Use food-grade lye only; never use drain cleaner or any nonfood chemical.
– Add lye to water exactly as directed by the manufacturer, and avoid splashing.
– Keep children and pets away from the area.
– Use nonreactive equipment and clean up carefully after dipping.
– Dispose of the bath according to the product instructions and local guidance.
The bath should be brief, and the pretzels should be handled with care. Lye gives a darker crust, but it is not necessary for a very good homemade pretzel.
A practical rule
Use a short dip, not a soak. The bath should coat the surface and change it, not turn the dough waterlogged.
Finish with Egg Wash and Toppings
After the bath, place the pretzels on a parchment-lined baking sheet. If your recipe uses egg wash, brush it on now. That gives the pretzels shine and helps toppings stick.
Salt timing matters
Use pretzel salt or another coarse salt while the dough is still wet from the wash. Fine table salt tends to dissolve and can make the surface patchy or overly salty. Coarse salt stays visible and gives the classic finish.
If you want cinnamon sugar or another sweet topping, brush with melted butter after baking, then add the topping. That keeps the sugar from dissolving in the oven and gives you a better coating.
Bake Until Deep Golden Brown
Bake at 450°F for about 10 to 12 minutes, or until the pretzels are deeply golden brown.
Watch for these doneness cues:
– the tops are richly browned, not just lightly tinted
– the edges look set and dry
– the pretzels feel light when lifted
– the bottoms are firm, not doughy
If they look pale, they probably need another minute or two. If they become too dark too quickly, your oven may run hot, so check them early next time.
A hot oven matters because it helps the surface set quickly and encourages browning before the interior dries out.
Should pretzels bake immediately after the bath?
Yes. Once the pretzels come out of the bath, transfer them to the prepared baking sheet, add salt or other toppings, and bake them right away. If they sit too long, the surface can dry unevenly or lose the best oven spring.
Cool, Serve, and Store
Transfer the pretzels to a cooling rack as soon as they come out of the oven. Cooling on the baking sheet traps steam, which can soften the bottoms.
Serve them warm if you can. That’s when the crust and interior contrast is at its best.
Storage
- Room temperature: best for same-day eating
- Refrigeration: useful for dough or baked leftovers, though the texture becomes less fresh
- Freezing: good for make-ahead planning
For baked pretzels, reheating in a hot oven or toaster oven brings back some of the original texture better than the microwave.
Common Mistakes and How to Fix Them
Pale pretzels
Usually caused by skipping the bath or baking at too low a temperature. Use the alkaline dip and make sure the oven is fully preheated.
Metallic or bitter flavor
Most often from leaving the pretzels in the baking soda bath too long. Keep the dip brief.
Dense, bread-like texture
Usually a sign of underkneading, too much flour, or underproofing. Aim for smooth, elastic dough and a proper rise.
Lopsided shapes
Uneven rope thickness is the usual culprit. Roll from the center outward and keep the rope even all the way through.
Soggy bottoms
Usually caused by cooling on the pan. Move the pretzels to a rack right away.
Weak rise
Old yeast, cool dough, or a rushed proof can all slow fermentation. If the yeast doesn’t foam when expected, replace it.
Bready flavor or not enough pretzel flavor
This usually means the dough was underseasoned, underbrowned, or the bath was too mild. Make sure the dough includes enough salt, don’t skip the alkaline bath, and bake until the pretzels are truly deep golden brown.
Flavor Variations and Serving Ideas
Once you’ve mastered the base dough, small changes can make the batch feel new without changing the technique.
- Classic salted: the most straightforward version and the best place to learn the method
- Cinnamon sugar: brush with butter after baking, then coat
- Cheese-topped: add shredded cheese near the end of baking so it melts without burning
- Dipping sauces: mustard, beer cheese, or honey mustard all work well with the salty crust
For a first batch, I’d keep at least half the pretzels plain and salted. That makes it easier to judge the dough and bath without extra flavors getting in the way.
Make-Ahead, Freezing, and Reheating Tips
If you want fresh pretzels without doing the whole process in one stretch, you have two good options.
Make ahead: unbaked shaped pretzels
Shape the pretzels, then place them on a parchment-lined tray and freeze until firm. Once frozen, transfer them to a freezer bag or airtight container. When you’re ready to bake, you can bake them from frozen or let them thaw just enough to handle more easily, then give them the bath and bake right away. If you freeze them after shaping, plan on a little extra baking time.
Make ahead: fully baked pretzels
Let baked pretzels cool completely, then freeze them in an airtight container or freezer bag. Reheat from frozen in a hot oven or toaster oven until warmed through and crisp on the outside again. For the best texture, avoid the microwave unless you only need a very quick warm-up.
Short-term holding
Some bakers bath the shaped pretzels, then cover and refrigerate them for up to 24 hours before baking. This is useful when you want a fresh bake later the same day or the next day.
When to Consult a Master Baker
If your pretzels repeatedly come out pale, dense, or oddly flavored even after adjusting time and temperature, it may be worth comparing your flour strength, yeast freshness, and oven calibration with an experienced baker. Those three variables can change the final result more than most people expect.
For most home bakers, though, the fix is simpler: respect the dough’s texture, keep the bath brief, and bake until the color is truly deep golden brown.
FAQ
Do I need food-grade lye to make soft pretzels?
No. Baking soda is enough for a very good home version. Lye gives a more traditional crust, but it is optional and requires careful handling.
Why are my pretzels not chewy?
They may have been underkneaded, underbaked, or skipped the alkaline bath. Chew comes from gluten development plus that brief bath before baking.
Can I use all-purpose flour instead of bread flour?
Yes. All-purpose flour is a solid choice for softer pretzels. Bread flour gives more chew, so choose based on the texture you want.
Why did my pretzels taste metallic?
The bath was likely too long. Keep the dip brief, especially with baking soda.
Can I make the dough ahead of time?
Yes. You can refrigerate shaped pretzels for a short window before baking, or freeze them for later use.
What’s the best way to reheat them?
A hot oven or toaster oven is best. It restores the exterior better than a microwave.
How do I keep the salt from falling off?
Brush with egg wash before adding the salt, and use coarse pretzel salt rather than fine table salt.
If you’d like to keep building bread skills after this recipe, my soft bread crust guide pairs nicely with these pretzel techniques.