
How to Use a Kitchen Peeler Efficiently for Faster, Safer Prep

A kitchen peeler looks simple, but the difference between awkward peeling and smooth, low-waste prep usually comes down to setup and technique. If you cook for a busy household, the goal is not just to remove skin. It is to do it quickly, with control, and without shaving off more food than you need.
A good peeler can save time on potatoes, carrots, apples, cucumbers, and other everyday produce. It can also reduce cleanup, especially when you are batch-prepping for the week. But the tool only works well when you match it to the job and use a motion that fits the shape of the food.
What a kitchen peeler does best
A peeler is designed to remove a thin outer layer from firm produce. That makes it especially useful when you want speed and a clean finish without pulling out a knife for every item. For many home cooks, it is the easiest way to handle potatoes for mash, carrots for roasting, or apples for pie filling.
It is not always the best tool, though. If the produce has a very thick skin, an awkward shape, or a task that needs precision, a knife may be the better choice. Think of the peeler as the tool for thin, repeated strokes; the knife is better when the job calls for deeper cuts or more control over shape.
A quick comparison: peeler styles and when to use them
| Peeler type | Best for | Why it helps | Trade-off |
|---|---|---|---|
| Y-peeler | Potatoes, carrots, apples, pears, squash | Stable grip and efficient strokes | Can feel bulkier if you prefer a lighter tool |
| Swivel peeler | Curved produce and everyday peeling | Blade moves with the surface more naturally | May feel less rigid on thick skins |
| Julienne peeler | Creating thin strips as well as peeling | Useful when you want matchstick-style cuts | Not the best choice for basic peeling only |
For everyday meal prep, a Y-peeler is often the most practical starting point. America’s Test Kitchen identified one Y-shaped model as a top performer in its testing and described it as light, effective, efficient, comfortable, and affordable. That does not mean every Y-peeler will feel the same in your hand, but it does explain why many cooks reach for that shape first. America’s Test Kitchen
Choose the right peeler for the produce you’re prepping
The best peeler is the one that matches the shape and skin thickness of the food in front of you. A tool that feels great on potatoes may not be the most comfortable option for squash or apples.
Y-peeler vs. swivel peeler
A Y-peeler usually feels steadier for repetitive prep because the handle and blade position encourage a straight, efficient pull. That can be a real advantage when you are peeling a pile of vegetables for dinner or for the week ahead. A swivel peeler, on the other hand, can feel more forgiving on rounded surfaces because the blade adjusts as you move.
Use a Y-peeler if you want a firmer, more structured grip for batch prep. Choose a swivel peeler if you prefer a lighter feel and often work with curved produce. The practical question is which one lets you keep a smooth rhythm without gripping too tightly.
Straight peeler vs. julienne peeler
A straight peeler is the everyday workhorse. It removes skin cleanly and keeps the task simple. A julienne peeler is more specialized. It creates thin strips, which is useful in some recipes but unnecessary if your goal is just to peel efficiently.
If you only want one tool for a busy kitchen, skip the specialty blade unless you know you will use the strips regularly. A basic peeler will cover far more tasks with less clutter.
Matching the tool to the produce
- Potatoes: A Y-peeler is usually efficient because potatoes are firm and easy to rotate.
- Carrots: Either a Y-peeler or swivel peeler works well; the key is a smooth stroke.
- Apples and pears: A lighter grip often helps because the fruit is curved and easy to over-peel.
- Cucumbers and zucchini: A peeler is useful if the skin is thick or waxy, but you may not need to remove all of it.
- Butternut squash: A peeler can work, but the skin is thick enough that you may need a firmer hold. America’s Test Kitchen recommends holding the peeler more like a knife handle for thick-skinned produce, with the thumb and forefinger pressed into the grooves at the top of the handle. America’s Test Kitchen
Set up the produce and workspace before you peel
A few seconds of setup usually saves more time than it costs. If the food slips around, you will slow down, waste more flesh, and increase the chance of a cut.
Wash produce before peeling if it is dirty, since grit can drag across the blade and make the motion rough. Then dry it well enough that it does not slide in your hand. A damp, clean work surface is better than a wet one.
For round produce like potatoes, trim a thin slice from one side if needed so it sits more steadily on the cutting board. That small flat spot can make the whole task feel safer and more controlled. For long produce like carrots, hold the thicker end when possible so the item feels more stable as you peel.
If you are doing a large batch, place a bowl or compost container close to your cutting board. That keeps peelings from piling up under your hands and interfering with your grip.
How to hold a peeler and move it efficiently
The most efficient peeling motion is usually calm and repeatable, not forceful. You want short, smooth strokes that remove only the outer layer.
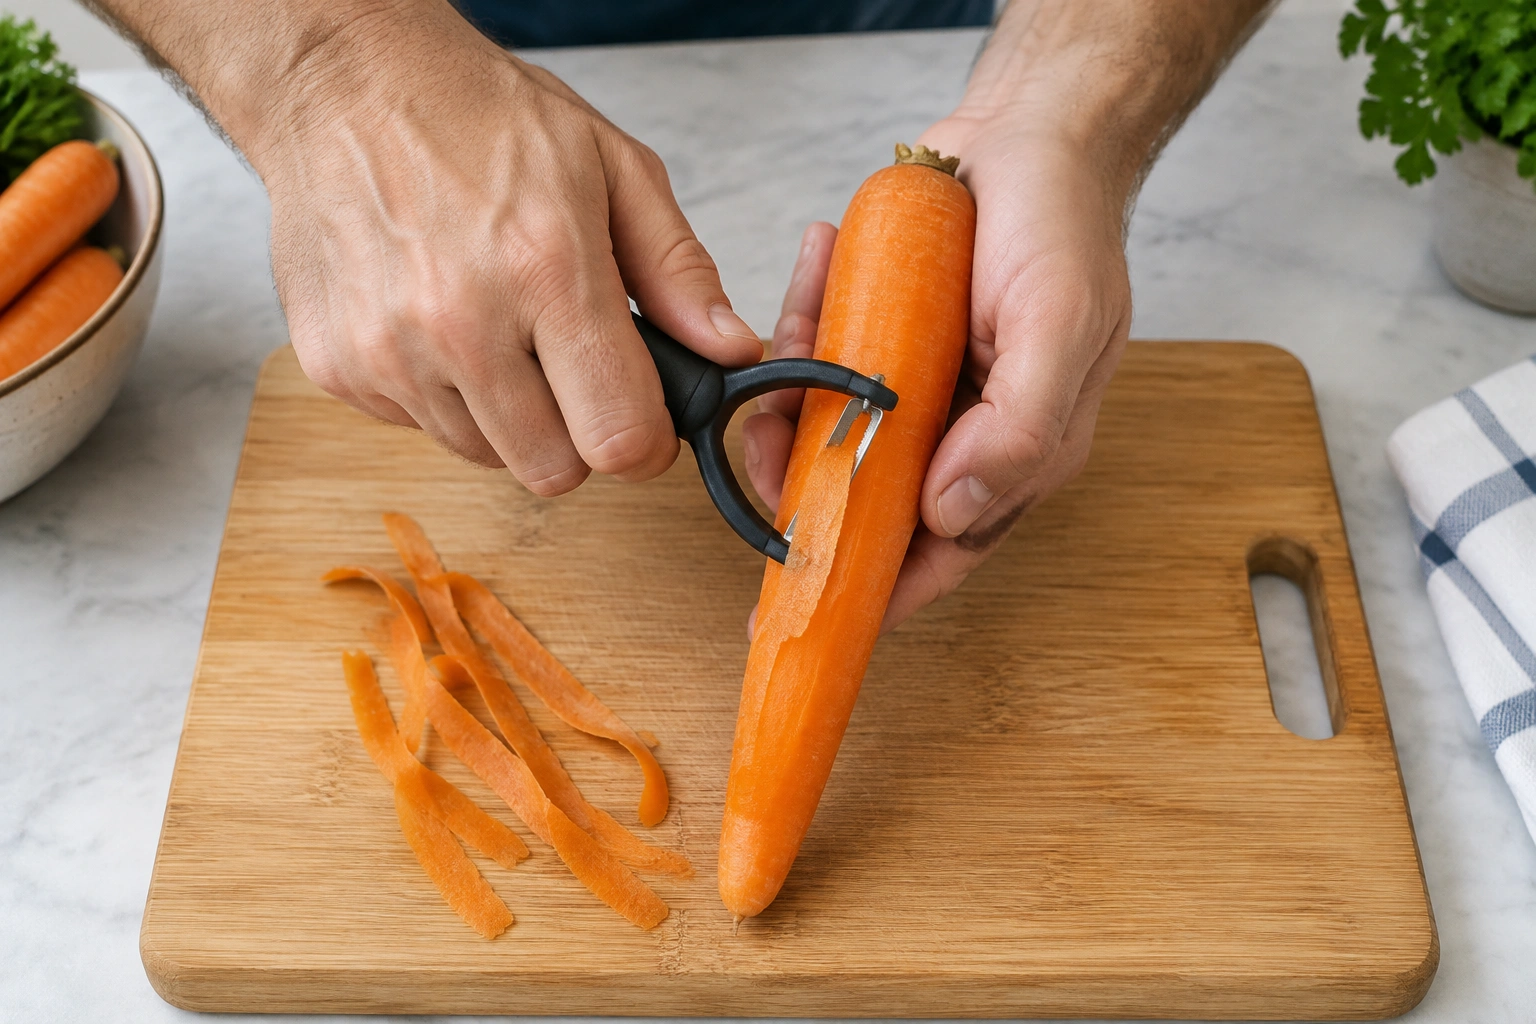
Verified technique from instructional sources points to a few basics: hold the peeler in your writing hand, hold the produce in the other hand, and keep the produce near the top while peeling downward with pressure. The thumb goes on the top side of the peeler and the fingers underneath to guide it. After each top-to-bottom motion, rotate the produce to expose a new section. How to Use a Vegetable Peeler
For the actual motion, think in small passes rather than long sweeps. A stroke of about 2 to 4 inches is usually enough for most produce. Keep the blade at a shallow angle—just enough to catch the skin without digging in. If the blade starts cutting too deeply, flatten the angle slightly and lighten your grip.
That rotation matters because it keeps you from trying to peel the same flat line over and over. Instead of fighting the shape of the produce, you keep presenting fresh surface to the blade.
A practical grip for curved produce
For potatoes, apples, and pears, America’s Test Kitchen suggests wrapping three or four fingers around the handle while keeping your thumb on the food. That gives you a stable hold for curved surfaces and helps you control the blade without pressing too hard. America’s Test Kitchen
A practical grip for thick-skinned produce
For butternut squash and similar produce, the same source recommends a firmer, knife-like grip with the thumb and forefinger pressed into the grooves at the top of the handle. The point is not brute force; it is leverage. When the skin resists, a more secure grip keeps the blade from skittering across the surface.
Which direction should you peel?
When possible, peel away from your body and away from your fingers. That gives you better visibility and more room to control the stroke. If a piece of produce is awkward to hold safely in that direction, pause and reposition it rather than forcing the motion.
How to peel common produce without wasting flesh
Different produce rewards different levels of pressure. The main goal is to remove skin, not to dig into the edible part underneath.
Potatoes
Potatoes are one of the easiest items to peel efficiently. Hold them firmly and use light, even strokes. If the skin is thin and clean, you may only need to remove the outer layer. If the skin has blemishes or eyes, trim those spots separately instead of peeling deeply across the whole potato.
Carrots
Carrots are a good practice item because they are firm and predictable. That is one reason many instructional sources suggest practicing on a carrot first. Once your motion feels smooth, you can work faster without overshooting into the flesh. How to Use a Vegetable Peeler
A carrot should not require heavy pressure. If the blade is tearing the skin instead of shaving it cleanly, slow down and check the peeler.
Apples and pears
Fruit skins are easy to remove too aggressively because the surface is rounded. Use shorter strokes and rotate the fruit often. If the recipe does not require fully peeled fruit, consider leaving the skin on when texture or presentation allows. That reduces waste and saves time.
Cucumbers and zucchini
These are often better treated as partial-peel vegetables. If the skin is thin and the recipe does not demand complete removal, you may only need to strip off sections. That can improve texture while keeping more of the produce intact.
Sweet potatoes and squash
These are the items where many cooks get frustrated. The skin is thicker, and the shape can be awkward. Use a more secure grip, work on a stable board, and take smaller passes. If the peeler is struggling badly, a knife may be the safer and more efficient tool for the first cuts.
Speed tips for batch peeling and meal prep
Batch prep is where a peeler can really earn its keep. The trick is to make the process steady rather than rushed.
Group similar produce together. Peel all the potatoes first, then all the carrots, then move to fruit. That keeps your grip and motion consistent instead of constantly adjusting to a new shape.
Keep the peeler and board dry. Even a thin film of moisture can make the handle feel less secure, especially if you are peeling several pounds of produce in one session.
Work over a bowl, sheet pan, or compost container so you are not stopping every few strokes to clear peelings from the board. Fewer interruptions mean a smoother rhythm.
If you are prepping for several meals, peel only what you expect to use. For example, if your roast vegetable plan only needs a partial peel on carrots and potatoes, do not automatically remove more skin than the recipe requires. Small savings add up in a budget-conscious kitchen.
Safety mistakes to avoid
Most peeler accidents happen when the tool is used too fast or the produce is not stable.
Avoid these common mistakes:
- Peeling toward your fingers without control. Keep fingers out of the blade path.
- Using too much pressure. That removes extra flesh and can cause slips.
- Holding slippery produce in the air. A cutting board gives you more stability.
- Continuing to use a dull or clogged blade. A peeler that drags is harder to control.
- Ignoring damaged handles or loose parts. If the tool feels unstable, replace it.
If you are peeling a lot at once or working with slippery produce, a cut-resistant glove can add a useful margin of safety. It is not a substitute for good technique, but it can help when your hands are tired or the produce is awkward to hold.
How to reduce food waste while peeling
The easiest way to waste less is to ask whether peeling is actually necessary. Some produce skins are perfectly fine to leave on, depending on the recipe and the condition of the food. If the skin is thin, clean, and the texture works in the dish, leaving it on can save time and preserve more of the produce.
When peeling is necessary, remove only the outer layer. A sharp peeler should take off skin in thin strips. If you find yourself shaving off thick ribbons of flesh, you are either pressing too hard or using an angle that is too steep.
For blemishes, spot-trim instead of over-peeling the whole item. That is especially helpful with potatoes and apples, where one damaged area does not mean the entire surface needs to go.
Cleaning and maintaining a peeler so it stays effective
A peeler does not need complicated care, but it does need basic attention.
Rinse it soon after use so starch, fruit residue, or vegetable fibers do not dry onto the blade. Then dry it well. That helps prevent buildup and keeps the handle comfortable the next time you reach for it.
For storage, keep the peeler in a utensil drawer or hang it where the blade will not rub against other tools. If your model came with a blade cover, use it to protect the edge and your fingers. That is especially helpful if you keep the peeler in a crowded drawer.
If the manufacturer says the peeler is dishwasher-safe, you can follow that instruction; otherwise, hand-washing is the safer default. Either way, a quick hand rinse after use is still a good habit because it prevents residue from drying on the blade.
Inspect the blade occasionally. If it starts tearing rather than peeling cleanly, or if you notice it feeling rough on the produce, it may be time to replace it. A dull peeler usually slows you down more than people expect, because every stroke takes extra effort.
If your peeler came with a safety cap, use it when storing the tool. One manufacturer advises removing the cap by holding the top and bottom and pulling it straight off, then replacing it by moving the blade to one side with your thumb and rolling the cap on from the top of the blade to the bottom. Spartan Kitchen Products
When to ask a food safety expert
If you are unsure whether a particular piece of produce is safe to use after damage, mold, or unusual spoilage, ask a qualified food safety source rather than guessing. A peeler can remove skin, but it is not a fix for food that has gone beyond normal trimming. For general home food safety guidance, FoodSafety.gov is a reliable place to check.
Quick decision guide: peeler or knife?
Use a peeler when the food is firm, the skin is thin, and you want speed with minimal waste. That covers most potatoes, carrots, apples, and similar everyday prep.
Use a knife when the produce is very thick-skinned, unusually shaped, or needs more precise trimming than a peeler can comfortably handle. A knife can also be better when you only need to remove a small section rather than peel the whole item.
If you are deciding between the two during meal prep, ask one practical question: which tool lets me remove only what I need with the least strain on my hands? That answer usually points to the right choice.
FAQ
Should I peel toward myself or away from myself?
Peeling away from your body is usually the safer, more controlled option because it keeps the blade path clearer and gives you better visibility.
Which hand should hold the peeler?
Use your writing hand for the peeler and your other hand for the produce. That matches the standard instructional approach and usually gives better control.
Do I need to peel every vegetable?
No. Some skins are optional depending on the recipe, texture, and condition of the produce. If the skin is thin and clean, leaving it on can save time and reduce waste.
Why does my peeler feel like it is tearing the skin?
A tearing motion usually means the blade is dull, clogged, or being pressed at the wrong angle. Clean the tool and test it on a firm piece of produce. If it still drags, replace it.
Is a Y-peeler better than a swivel peeler?
A Y-peeler often feels steadier for repetitive prep, while a swivel peeler can feel more flexible on curved produce. The better choice is the one that lets you peel smoothly without over-gripping.
Can I use a peeler for thick-skinned produce?
Yes, sometimes. But for very thick skins like squash, a firmer grip and more pressure may be needed, and a knife may be the better tool if the peeler struggles.
How do I keep food from slipping while peeling?
Use a dry board, trim a flat side if needed, and hold the produce near the top where it feels more stable. If the item is very slippery, slow down and reposition it instead of forcing the stroke.
How often should I replace a peeler?
Replace it when the blade no longer peels cleanly, the handle feels loose, or the tool becomes difficult to control. A worn peeler wastes more time than it saves.
How to Use a Vegetable Peeler
For a quick visual refresher on grip and motion, this short instructional video shows the basic peeling technique step by step.