
Stretch and Fold Method: A Practical Guide to Stronger Bread Dough

If you’ve ever mixed a bread dough that felt too sticky, too slack, or just plain unruly, the stretch and fold method can be a game changer. It’s one of the most useful techniques in artisan bread making because it builds structure during fermentation without the heavy, continuous kneading many beginners expect.
I’m Ethan Baker, and I like this method because it teaches you to read dough instead of forcing it into shape. You’re not trying to “beat” strength into the dough. You’re giving gluten time to organize itself, then nudging it along in short, deliberate rounds.
That matters most with wet doughs, sourdough, and formulas that benefit from a gentler hand. Used well, stretch and folds can improve dough strength, help it hold gas better, and set you up for a loaf with better volume and structure. Used poorly, they can tighten the dough too much, tear it, or interrupt fermentation progress.
Here’s how to use the method with confidence.
What the Stretch and Fold Method Actually Does
The stretch and fold method is a way of developing dough strength by lifting, stretching, and folding the dough over itself during bulk fermentation. Instead of kneading continuously, you work the dough in short sets, then let it rest.
That rest is the key. Gluten strengthens not just from handling, but from time. Each fold aligns and layers the dough, helping it become smoother, more elastic, and better able to trap gas from fermentation.
Bakers often use this technique for doughs that feel too wet or too delicate for heavy kneading. It’s especially useful when you want strength without overmixing. In practice, it can stand in for a good portion of kneading in many bread formulas, though some doughs still benefit from an initial mix or brief knead before the folds begin. For a useful comparison of how folding differs from traditional kneading, King Arthur Baking’s bread technique guides are a solid reference point.
A helpful way to think about it: kneading develops dough mainly through repeated mechanical work, while stretch and folds develop it gradually through a mix of handling and rest. That slower pace is often an advantage, not a drawback. It gives the dough time to ferment while strength builds.
When to Use Stretch and Folds
This method shines in doughs that are hydrated enough to feel slack, sticky, or loose at first. If the dough spreads quickly after mixing or seems weak when you try to shape it, stretch and folds are often the right tool.
They’re especially useful for:
- sourdough doughs during bulk fermentation
- lean doughs with moderate to high hydration
- no-knead style breads
- doughs that need gentle strengthening without aggressive mixing
They are less useful as the only method for very enriched doughs, such as brioche or doughs loaded with butter, sugar, and eggs. Those formulas usually need stronger initial mixing to build structure around the fat and sugar content before any folding makes sense.
A simple decision rule helps here:
- If the dough is wet and extensible, use stretch and folds.
- If the dough is already strong and elastic after mixing, stretch and folds are usually unnecessary or should be kept to a minimum.
- If the dough is very enriched, rely more on mixing than folding.
- If the dough tears immediately, it may need more rest before the next attempt.
In other words, stretch and folds are not always the best choice. If a dough already has good gluten development from mixing and feels smooth, elastic, and organized, extra folding can be redundant or even make it too tight. In that case, let bulk fermentation do the rest.
Hydration matters too. The wetter the dough, the more useful folding becomes, but the harder it can be to judge by feel. Very wet dough may seem hopelessly slack after mixing and then improve dramatically after a couple of fold rounds. That is normal.
Tools and Setup: Keep It Simple
You do not need special equipment. A bowl or container, a bench scraper if you want one, and slightly damp hands are usually enough.
A few practical setup tips make the process easier:
- Use a container with enough room for the dough to expand.
- Keep your hands lightly wet so the dough sticks less.
- Cover the dough between folds so it doesn’t dry out.
- Work in a calm, uncluttered space so you can handle the dough smoothly.
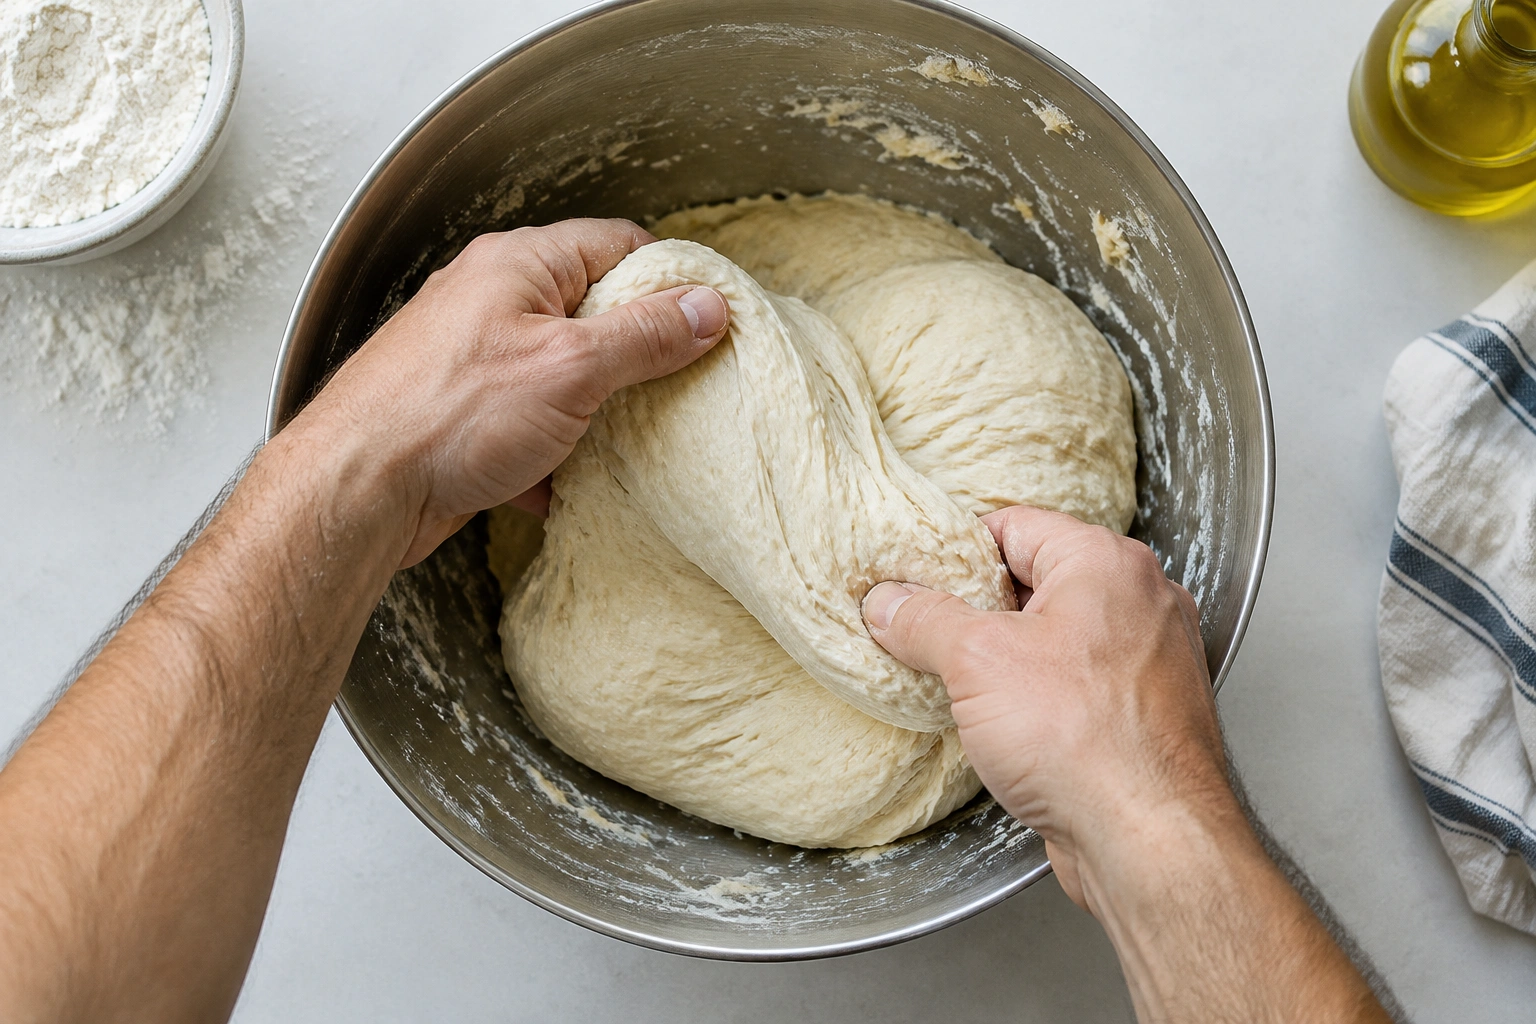
Wet hands are especially helpful with sticky doughs, but avoid soaking them. Too much water can make the dough slippery and harder to control. Damp is enough.
Before you begin, look at the dough itself. If it has just been mixed and still looks shaggy or uneven, that’s fine. It does not need to be perfect before the first fold. What matters is that the flour is hydrated and the dough is cohesive enough to handle.
How to Do One Stretch and Fold Step by Step
The classic version is simple once you’ve done it a few times.
-
Wet your hands lightly.
This reduces sticking and helps you handle the dough more cleanly. -
Lift one side of the dough.
Grab the edge, stretch it upward until you feel resistance, then stop before it tears. -
Fold it over the center.
Lay the stretched portion across the middle of the dough. -
Turn the bowl a quarter turn.
Repeat the same motion from the next side. -
Continue around the bowl.
Many bakers complete four folds in one set, one from each side. -
Cover the dough and let it rest.
Rest gives the gluten time to relax and reorganize before the next round.
That four-direction approach is common because it helps build even strength throughout the dough. It’s easy to remember in practice. If the dough is very slack, you may need a gentler lift. If it is already strengthening well, the folds can be more delicate.
The main thing to avoid is yanking the dough upward so hard that it tears. You want tension, not damage. If the dough resists too quickly, stop there and let the rest period do its job.
How Many Rounds to Do and How Far Apart to Space Them
There is no single universal number because recipes, flour types, and hydration levels all change the answer. Still, there is a practical pattern many bakers use during bulk fermentation: perform a few rounds early, then stop once the dough has gained enough strength.
A useful starting framework is:
- Very weak or slack dough: more assertive early folds, then reassess
- Moderately developed dough: gentler folds, fewer rounds
- Already strong dough: minimal folding, if any
Spacing matters as much as the number of sets. If folds are too close together, the dough never gets a chance to relax and strengthen between rounds. If they’re too far apart, you may miss the window when the dough benefits most from the extra structure.
A practical home-baking rhythm is often around 20 to 30 minutes between sets, but the best spacing depends on the dough and the room temperature. For example:
- a warm kitchen and a fairly active sourdough may need folds closer together, such as every 20 minutes early in bulk
- a cooler room or a stiffer dough may respond better to 30 to 45 minutes between rounds
The point is not to obey the clock blindly; it’s to give the dough enough rest to respond.
Think of it this way: if the dough still feels loose and ragged after a rest, another fold may help. If it already feels smoother and holds itself up better, more folding may be unnecessary.
How to Tell When the Dough Is Ready for the Next Fold
This is where many bakers level up. You’re not just counting sets; you’re reading the dough.
After a good fold, the dough often looks a little tighter and more organized. Over the next rest period, it should relax slightly while becoming smoother overall. By the next round, you want to see some improvement from where you started.
Ready for the next fold
- it still spreads noticeably in the bowl
- the surface looks loose rather than smooth
- it feels extensible, not rubbery
- it can be lifted without immediately tearing
- it has not yet gained much shape or tension
Ready to shape, not fold again
- the dough looks smoother and more cohesive
- it holds its shape better after resting
- it feels elastic and springy rather than floppy
- gas bubbles are becoming visible
- the dough resists stretching more than before
- it no longer seems to need extra strength from another fold
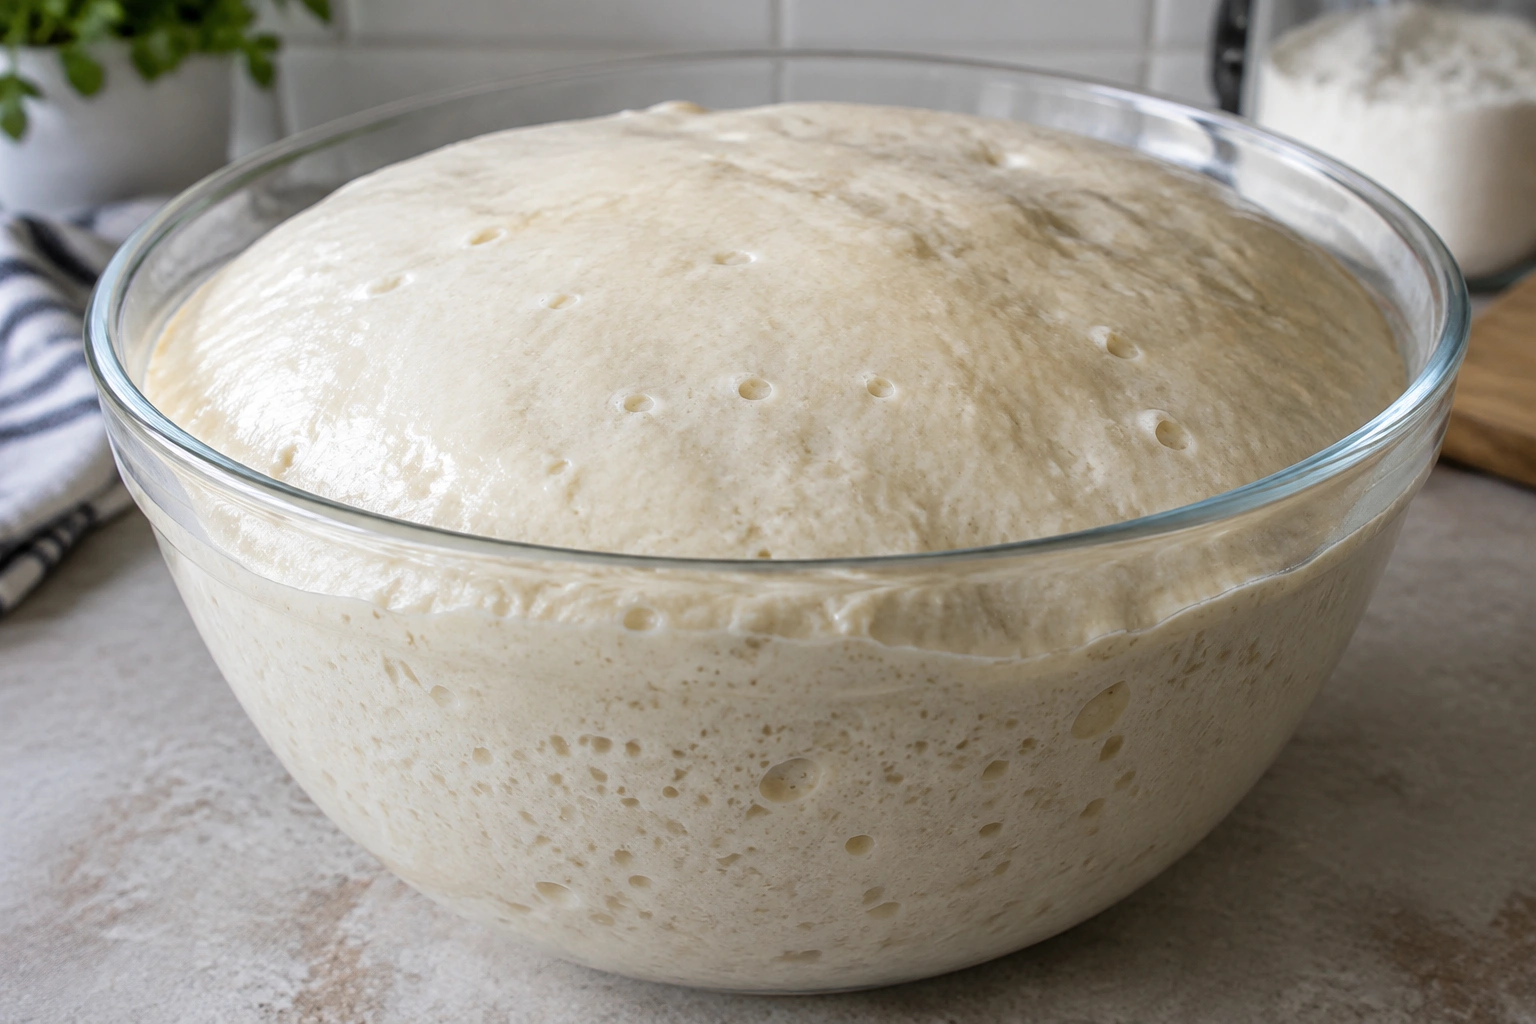
A rough windowpane test can help, but don’t obsess over a perfect result. If a small piece stretches thin without tearing immediately, that suggests the gluten is developing. If it tears instantly, the dough likely needs more time, more rest, or a gentler approach.
Stretch and Fold vs Kneading, Coil Folds, and Slap and Fold
Different doughs respond better to different strengthening methods. Here’s a practical comparison.
| Method | Best For | Strengths | Trade-Offs |
|---|---|---|---|
| Stretch and fold | Wet, slack, sourdough, lean dough | Gentle, easy to learn, works during bulk fermentation | Takes more time across the ferment |
| Kneading | Many lean doughs, doughs that need initial development | Fast gluten development, familiar to most bakers | Can overheat or overwork dough if pushed too far |
| Coil folds | Very wet, delicate doughs | Very gentle, excellent for high-hydration doughs | Slightly less intuitive for some beginners |
| Slap and fold | Stronger doughs that can handle more force | Builds strength quickly | More aggressive; not ideal for fragile or very wet doughs |
If you’re choosing between stretch and fold and coil folds, think about dough delicacy. Coil folds are often the better choice when the dough is extremely wet and classic stretching feels too harsh. If the dough is only moderately sticky, classic stretch and folds are usually simpler and easier to repeat.
Slap and fold is a different tool altogether. It can be effective for building strength in firmer doughs, but it is not the gentlest option. If your dough is fragile or highly hydrated, it may be too aggressive.
Common Mistakes and How to Fix Them
Stretching too hard and tearing the dough
If the dough tears, the fold was too aggressive or the gluten was not ready. Next time, use a lighter touch and allow a longer rest before the next round.
Folding too many times
More is not always better. Too many folds can make the dough tight and less extensible, which can limit the openness of the crumb. If the dough already feels smooth and strong, stop folding and let fermentation continue.
Folding too soon
If the dough has barely rested after mixing, it may resist every attempt and keep tearing. Give it time. Gluten relaxes during rest, and that relaxation makes the next fold more effective.
Using the same method for every dough
A high-hydration sourdough is not the same as an enriched sandwich dough. Adjust your approach to the formula instead of forcing one routine onto every batch.
Ignoring fermentation progress
A dough can be strong enough structurally but still underfermented, or well fermented but not yet strong enough. You need both. If the dough is improving in strength but still feels dense, it may need more fermentation time rather than more folds.
Troubleshooting Sticky, Slack, Tight, or Underdeveloped Dough
If the dough is very sticky
Use wet hands, not flour, during the folds. Extra flour at this stage can make the dough drier on the outside without actually improving structure. If the dough is extremely sticky, coil folds may be easier than classic stretching.
If the dough stays slack
That usually means it needs more time, more folds, or both. Check whether the dough was mixed enough at the beginning. Stretch and folds help, but they are not a magic fix for poor hydration balance or under-mixing.
If the dough feels tight and fights back
You may be overhandling it. Stop folding and let it rest longer. Tight dough often needs relaxation more than more strength.
If the dough tears repeatedly
The gluten may not have developed enough yet, or the dough may be too cold and unrelaxed. Give it a longer rest before trying again, and use a gentler lift.
If the dough doesn’t rise well
Poor rise is not always a folding problem. It can come from weak fermentation, old yeast, an underactive starter, or a formula that needs more time. Folding builds structure, but it cannot create fermentation that isn’t happening.
Practical Examples for Different Dough Styles
Sourdough
Sourdough often benefits from several fold rounds during bulk fermentation because the dough needs both fermentation time and structure. A typical pattern is a few sets early in bulk, then stopping once the dough becomes smoother and more elastic. The exact number depends on flour strength, hydration, and room temperature.
Lean dough
A lean dough with flour, water, salt, and yeast or starter often responds very well to stretch and folds. If it starts off slack, two to four sets may be enough to transform the texture from ragged to cohesive. Watch the dough, not the clock.
High-hydration dough
For very wet doughs like ciabatta-style formulas, gentler handling often works better than force. If classic stretching feels messy or tears the dough, switch to coil folds. The goal is the same: build strength without flattening all the gas you’ve already developed.
Enriched dough
For doughs with butter, eggs, or sugar, folding alone usually is not the main development method. These doughs often need more thorough mixing first, with folding used only lightly if at all.
If you want to compare how dough handling fits into the rest of your bread workflow, our guide on how to bake bread without a Dutch oven pairs nicely with this one when you’re planning the full bake.
Quick Recap: Signs You Should Stop Folding
Stop folding when the dough tells you it’s ready:
- it looks smoother and more cohesive
- it holds shape better after resting
- it stretches with resistance instead of tearing
- visible gas is developing
- the dough feels stronger, not just tighter
That last distinction matters. Tight dough and strong dough are not the same thing. Strong dough can still be extensible and alive. Tight dough is often just overhandled.
The stretch and fold method works best when you use it as a conversation with the dough. Fold, rest, observe, and adjust. That’s how you build better bread with less guesswork.
Frequently Asked Questions
Can stretch and fold replace kneading completely?
Sometimes, yes—especially in many lean and sourdough doughs. But some formulas still benefit from initial mixing or brief kneading before folding begins.
How many stretch and folds should I do?
There is no fixed number that fits every dough. Many bakers use a few sets during bulk fermentation and stop once the dough feels stronger, smoother, and more elastic.
Do I need special tools?
No. A bowl, damp hands, and a covered resting space are usually enough.
What if my dough keeps tearing?
Be gentler and wait longer between rounds. If the dough is very weak, it may need more rest before the next fold.
Is this method only for sourdough?
No. Sourdough is a common use case, but the method also works well for many yeast breads, especially wetter lean doughs.
What’s the biggest sign I should stop?
When the dough holds itself better, feels elastic, and no longer needs repeated strengthening to stay cohesive, it’s time to move on to shaping.