
How to Bake Bread Without a Dutch Oven: Practical Methods for a Crisp, Well-Risen Loaf

A Dutch oven makes bread baking easier because it traps steam and holds heat well. That steam keeps the loaf surface flexible long enough for good oven spring, while the hot vessel helps the crust set and brown. But you can still bake excellent bread without one.
The key is to replicate those two functions as closely as your kitchen allows: moisture early in the bake, then dry heat for browning. Once you understand that trade-off, the rest becomes a choice of tools rather than a limitation. You can use a baking stone, baking steel, sheet pan, roasting pan, loaf pan, or even a cloche substitute and still get a loaf with good rise and a crust worth eating.
If you already bake sourdough or no-knead bread, this guide will help you choose the right setup for your kitchen and your loaf.
Quick Decision Guide: Which Method Should You Use?
If you already have the equipment, use this shortcut:
- Best crust: Baking steel or baking stone with steam
- Easiest: Sheet pan with steam or a loaf pan for shaped bread
- Closest to Dutch oven: Covered roasting pan or cloche substitute
Choose based on your loaf shape:
- For boules and batards: use a stone, steel, or covered pan
- For shaped sandwich loaves: use a loaf pan
- For the simplest beginner setup: use a sheet pan plus steam tray
Why a Dutch Oven Works So Well for Bread
A Dutch oven gives bread three advantages at once:
- It traps steam released by the dough during the first part of baking.
- It creates even, intense heat around the loaf.
- It limits early drying, which helps the loaf expand before the crust hardens.
That combination is why Dutch oven bread often looks so dramatic. The crust stays flexible longer, so the loaf can spring upward instead of setting too soon. The enclosed space also helps the crust blister and brown more deeply.
Without a Dutch oven, you need to recreate those conditions in another way. That usually means one of two approaches:
- Covered baking for the first stage, then uncovering to finish
- Open baking with added steam in the oven
In most home-oven setups, the goal is not to copy the vessel exactly. It is to preserve moisture early, then allow the crust to dry and color later.
What You Can Use Instead
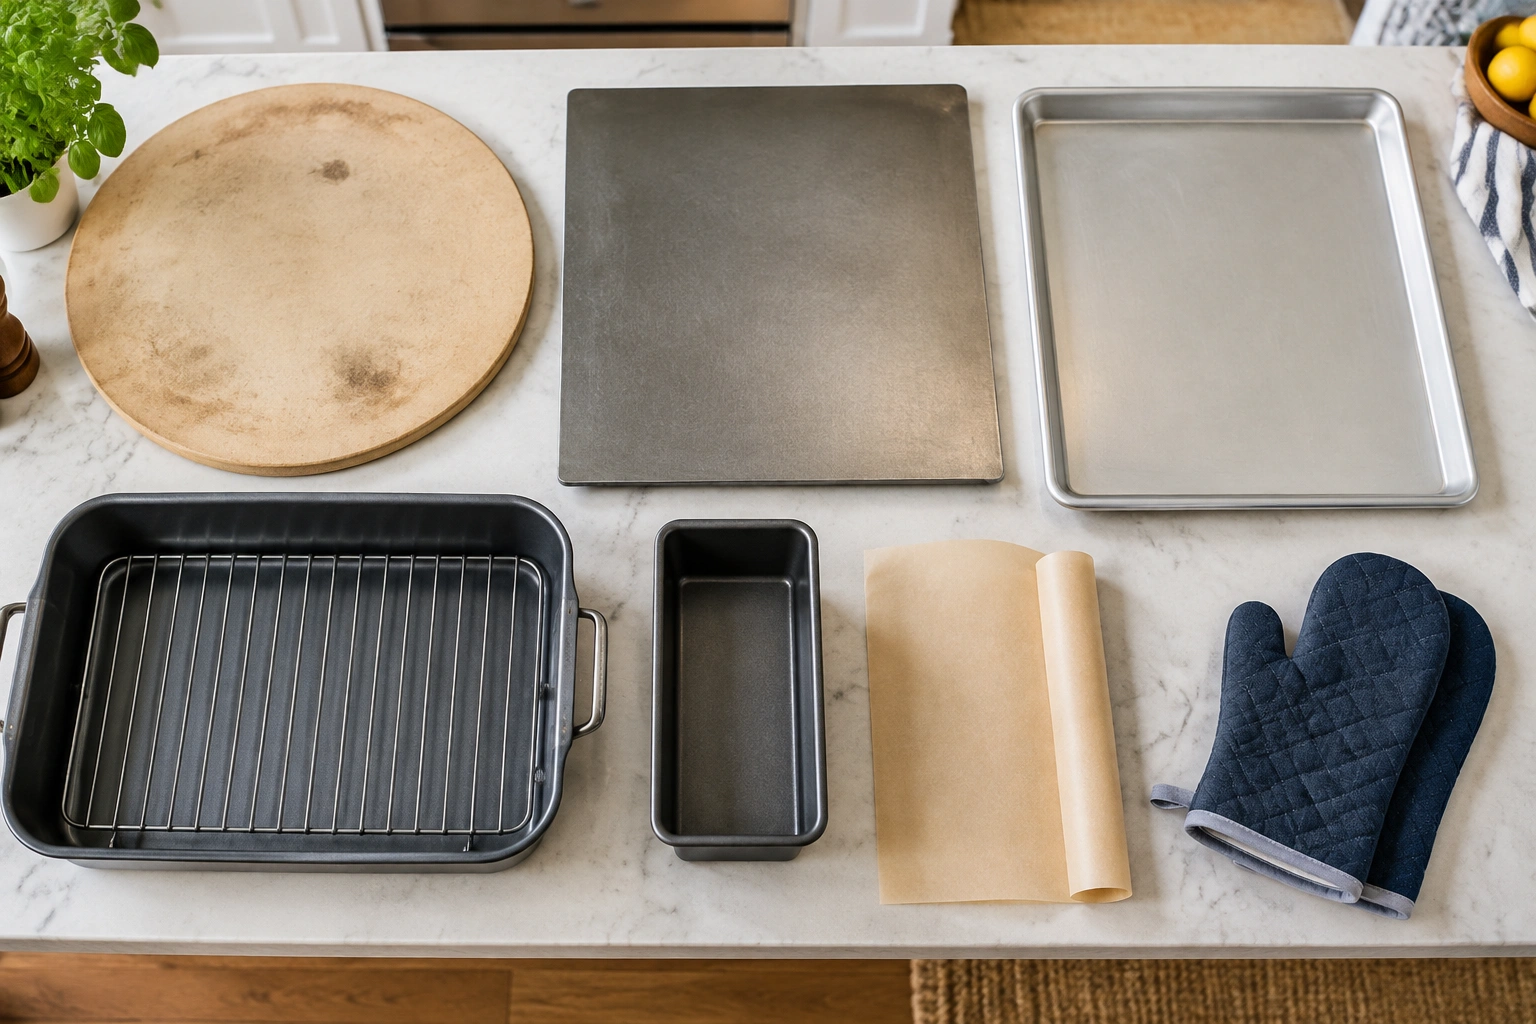
Here’s the simplest way to choose your method.
| Substitute or method | Steam needed? | Preheat required? | Crust quality | Ease | Best for |
|---|---|---|---|---|---|
| Baking stone | Yes, for best oven spring | Yes | Very good | Moderate | Artisan boules, batards |
| Baking steel | Yes, for best oven spring | Yes | Very good, especially bottom browning | Moderate | Lean doughs, shaped loaves |
| Sheet pan | Yes | Usually no | Good to fair | Easiest | Beginner loaves, sandwich-style bread |
| Covered roasting pan | Less steam needed because the cover traps moisture | Often yes | Very good | Moderate | Boules, no-knead loaves |
| Loaf pan | Usually no | No or light preheat | Fair to good | Easiest for shaped bread | Sandwich bread, enriched doughs |
| Cast iron skillet | Yes | Often yes | Good | Moderate | Round loaves, smaller batches |
| Cloche substitute | Less steam needed because it acts like a cover | Often yes | Very good | Moderate | Artisan-style loaves |
How to decide quickly
- Want the closest result to a Dutch oven? Use a covered roasting pan or cloche substitute.
- Want the best bottom crust and strong oven spring? Use a baking steel or baking stone with steam.
- Want the simplest setup? Bake on a sheet pan and add steam with a tray or pan of hot water.
- Making sandwich bread or shaped loaves? A loaf pan is often the most reliable choice.
One practical note: a steel pot or very thin metal vessel can heat up quickly and may burn the bottom if preheated aggressively, which is why open or covered methods need to be matched carefully to the cookware you have.
Tools, Materials, and Setup Checklist
Before you heat the oven, gather what you need:
- Bread dough, shaped and ready for its final proof
- Parchment paper for safe loading and easier transfer
- Oven mitts or dry heatproof gloves
- A baking stone, baking steel, sheet pan, roasting pan, loaf pan, or skillet
- A steam tray if you’re using open baking
- A sharp blade or lame for scoring
- A cooling rack
- Optional: a spray bottle for light misting, though it is not essential
If you are using a covered method, make sure the lid or inverted pan is truly oven-safe at the temperatures you plan to use. Avoid guessing with glass or thin cookware.
Steam Safety: How Much Water to Use and How to Add It
A little steam goes a long way in a home oven. You usually do not need to flood the oven.
A practical starting point is:
- About 1/2 cup to 1 cup of hot water in a steam tray for most home ovens
- Enough to create visible steam, but not so much that water sloshes or spills
Safe ways to generate steam
- Preheat a metal tray or pan on a lower rack, then carefully add hot water when the loaf goes in.
- Use a roasting pan or covered vessel to trap the loaf’s own moisture instead of adding much water.
- Mist lightly only if your oven tolerates it, but do not spray heating elements, glass oven doors, or hot light bulbs.
Safety tips
- Add water quickly and carefully to avoid a steam burst.
- Keep your face and hands back when you open the oven.
- Use metal cookware, not cold glass, for direct steam contact.
- Do not pour water onto the oven floor or heating element unless your oven manual specifically allows it.
- If your oven has exposed elements, be extra cautious; sudden water contact can damage the oven or create a burn hazard.
The goal is moisture early, not a sauna.
Method 1: Bake on a Baking Stone or Baking Steel
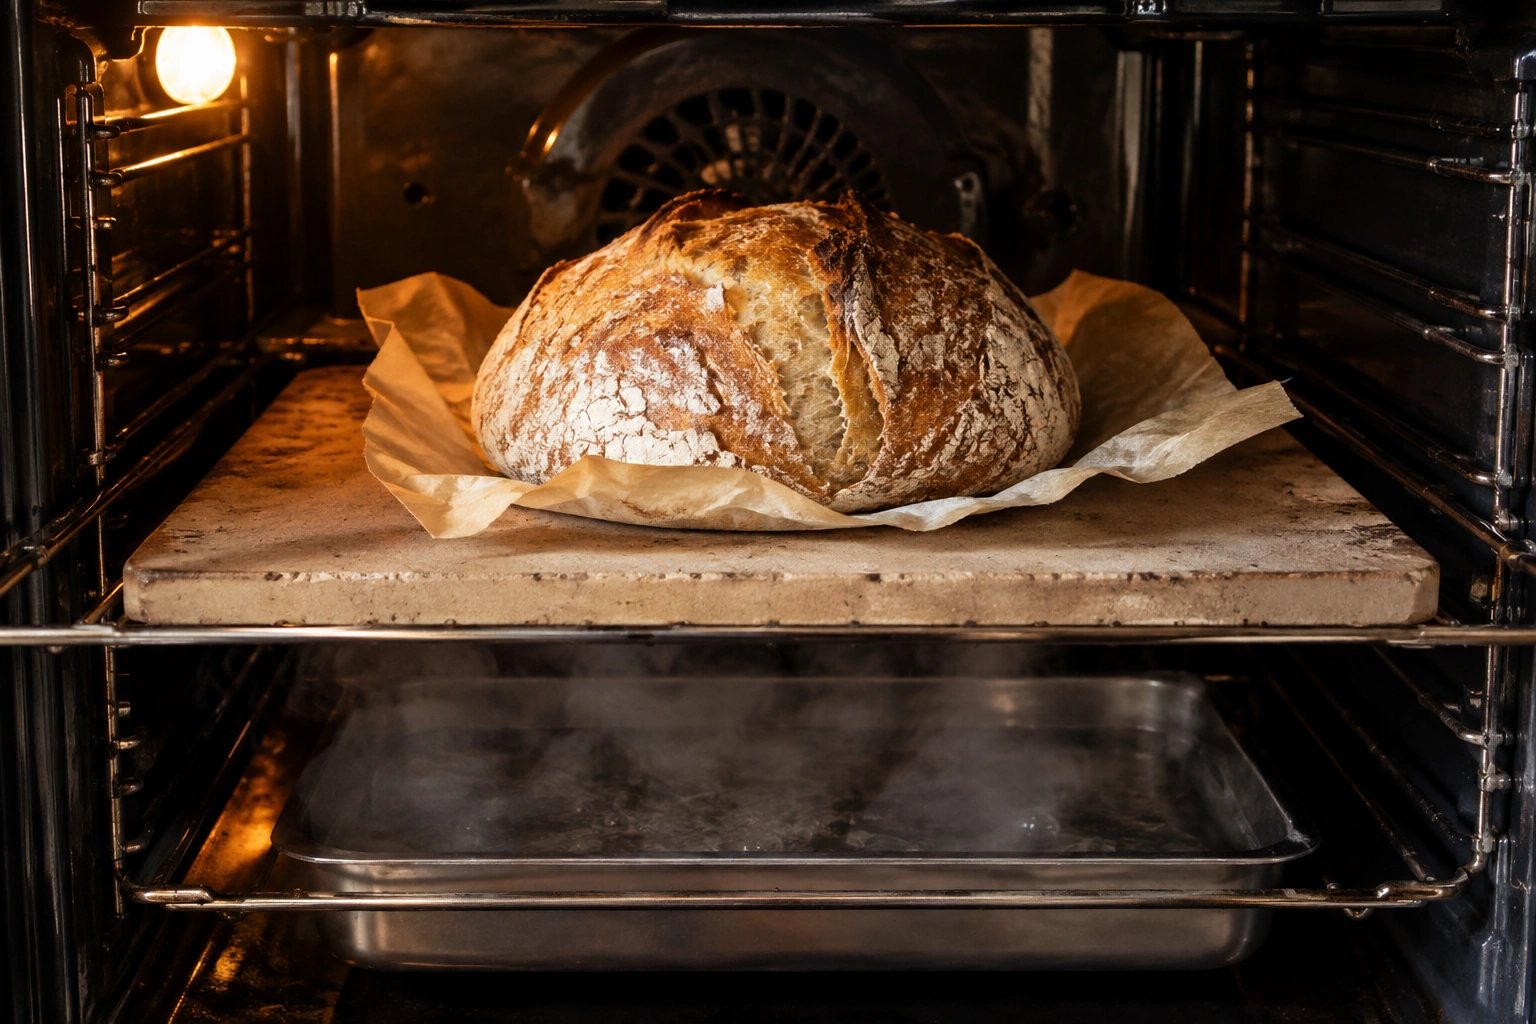
This is the closest open-oven method to artisan bread baking. The hot surface gives the loaf strong bottom heat, while steam helps the crust stay flexible early on.
Best for
- Boules and batards
- Lean doughs like sourdough
- Bakers who want a crisp crust without a covered vessel
How to do it
-
Preheat the oven with the stone or steel inside.
Give it enough time to fully heat through. A stone or steel that is only partly heated will not help much with oven spring. A good rule is 45 to 60 minutes of preheating at 450°F to 500°F, depending on your oven and the thickness of the surface. -
Set up steam.
Place a metal tray or empty pan on a lower rack while the oven preheats. When you load the loaf, add about 1/2 cup to 1 cup of hot water to that pan to create steam. -
Shape the dough and place it on parchment.
Parchment makes loading safer and reduces sticking. -
Score the loaf just before baking.
A shallow, hesitant cut often leads to weak expansion. Use a confident slash so the loaf can open where you want it to. -
Load the loaf onto the hot stone or steel.
Slide the parchment and dough together onto the preheated surface. -
Add steam immediately.
Pour hot water into the steam tray and close the oven quickly. Keep your face and hands back from the steam. -
Bake with steam for the first stage, then dry out the oven.
For a typical boule or batard, keep steam in the oven for about 15 to 20 minutes, then remove the steam tray if possible or let the water finish evaporating. Continue baking until the crust is deep golden brown.
Typical temperature and time range
- Temperature: 450°F to 500°F
- Total bake time: often 30 to 45 minutes for medium artisan loaves
- Steam stage: usually the first 15 to 20 minutes
- Finish uncovered: the remaining 10 to 25 minutes, depending on loaf size and color
Why this works
The stone or steel gives the base of the loaf a fast burst of heat, which helps with lift and structure. Steam keeps the crust from setting too early. This method is especially useful when you want a more open crumb and a darker, crisper crust.
Stone vs. steel
- Baking stone: heats more gradually and gives gentler bottom heat.
- Baking steel: heats faster and transfers heat more aggressively, which can improve browning underneath. That same intensity can also overbrown delicate doughs or thinner loaves if you are not careful.
Method 2: Bake on a Sheet Pan with Steam
If you do not have a stone or steel, this is the easiest everyday method. It is less dramatic than covered baking, but it works well, especially for shaped loaves.
Best for
- Beginners
- Smaller loaves
- Bakers who want a simple setup with common tools
How to do it
-
Preheat the oven.
If your recipe calls for a hot bake, let the oven come fully to temperature before loading. A common range is 425°F to 475°F. -
Place the shaped loaf on a parchment-lined sheet pan.
A rimmed sheet pan helps contain the loaf and makes handling easier. -
Score the top.
This matters even more in open baking, because the loaf has no cover to guide its expansion. -
Create steam in the oven.
Use a preheated metal pan on a lower rack and add about 1/2 cup to 1 cup of hot water when the loaf goes in. You want visible steam, not a flood. -
Bake until the loaf has expanded, then let it finish dry.
For most shaped loaves, keep steam for about 10 to 15 minutes, then remove the steam tray or let the oven dry out so the crust can brown.
Typical temperature and time range
- Temperature: 425°F to 475°F
- Total bake time: often 25 to 40 minutes
- Steam stage: usually the first 10 to 15 minutes
- Finish uncovered: the remaining 15 to 25 minutes
Trade-offs
This method is simple, but it gives the loaf less support than a covered vessel. If your dough is very slack, it may spread more. That is not a failure of the method; it is a sign that the dough needs either stronger shaping or a more supportive vessel.
For a round artisan loaf, a sheet pan usually gives a flatter profile than a Dutch oven. For shaped bread, though, it is often perfectly adequate. Expect a crust that is good, but usually a little less dramatic than a covered bake.
Method 3: Use a Covered Roasting Pan or Cloche Substitute
If you want the closest no-Dutch-oven result, this is the method to try. The cover traps steam around the loaf during the first part of baking, then you remove it for browning.
Best for
- Boules
- No-knead doughs
- Bakers who want a more enclosed bake
How to do it
-
Preheat the oven and the base pan if needed.
Some bakers preheat the base pan for better oven spring, but be careful with thin cookware that heats unevenly. A practical range is 450°F to 475°F. -
Place the dough on parchment in the base pan.
-
Cover it with an inverted roasting pan, oven-safe bowl, or similar lid substitute.
The goal is a sealed environment, or close to it. -
Bake covered for the first stage.
Keep it covered for about 20 to 25 minutes for a medium boule, or until the loaf has expanded and the crust has mostly set. -
Remove the cover carefully.
Hot steam will escape, so lift it away from your face and hands. -
Finish uncovered until deeply browned.
Bake another 15 to 20 minutes or until the crust has the color and firmness you want.
Typical temperature and time range
- Temperature: 450°F to 475°F
- Total bake time: often 35 to 45 minutes
- Covered stage: usually 20 to 25 minutes
- Uncovered stage: usually 15 to 20 minutes
Why this method is so effective
This setup is the closest match to a Dutch oven because it combines heat retention with trapped steam. The loaf gets a protected first phase, then a dry second phase for crust color. If you only want one alternative method to learn well, this is probably the one.
Safety note
Make sure the cover is oven-safe and large enough to avoid touching the dough as it rises. A cramped cover can stick to the loaf or deform the shape.
Method 4: Bake Sandwich Loaves or Shaped Dough in a Loaf Pan
Not every bread needs an artisan boule. If your goal is a dependable everyday loaf, a loaf pan is often the best tool in the kitchen.
Best for
- Sandwich bread
- Enriched doughs
- Loaves that should hold a neat shape
How to do it
- Grease the pan lightly or line it if needed.
- Place the shaped dough seam-side down.
- Proof until the dough rises appropriately for the pan.
- Bake at the recipe’s recommended temperature, checking early if the loaf is small.
- Remove from the pan once baked and cool on a rack.
Typical temperature and time range
- Temperature: usually 350°F to 425°F, depending on the dough
- Total bake time: often 25 to 40 minutes for standard loaf pans
- Steam: usually not needed
- When to remove from pan: as soon as the loaf is baked through and can be handled safely
What changes here
A loaf pan supports the dough, so spreading is less of a problem. Because the shape is more enclosed, you do not usually need heavy steam. The crust will be softer than a boule baked on a stone or under a cover, which is exactly what many sandwich loaves need.
Step-by-Step: Boules vs. Shaped Loaves
Use the workflow that matches your dough.
For boules
- Shape the dough tightly so it holds its form.
- Use a baking stone, baking steel, covered roasting pan, or cloche substitute.
- Preheat fully if your method calls for it.
- Score the top just before baking.
- Use steam or a cover during the first stage.
- Remove the cover or dry out the oven for the finish.
For shaped loaves
- Shape the dough into a batard or sandwich-loaf form.
- Use a sheet pan, loaf pan, or baking stone/steel if the dough can support itself.
- Score if the loaf is meant to open on top.
- Use steam early only if the crust needs it.
- Finish uncovered so the crust can brown without over-softening.
If your dough is soft or high hydration, a loaf pan or covered method usually gives better shape control than a bare sheet pan.
Step-by-Step: How to Bake Bread Without a Dutch Oven
Here is the practical workflow to think through the bake:
-
Choose the vessel based on the loaf.
Boule or batard? Use a stone, steel, covered pan, or cloche substitute. Sandwich loaf? Use a loaf pan. -
Preheat if your method needs it.
Stones, steels, and many covered setups work best when fully heated. -
Prepare parchment, scoring tool, and steam setup.
Have everything ready before the dough leaves the proofing basket or bowl. -
Load the loaf quickly and safely.
The less time it spends sitting out, the better its shape usually holds. -
Use steam or a cover during the early bake.
This is the stage that protects oven spring. -
Remove the cover or dry out the oven for browning.
The crust needs a dry environment to color well. -
Bake until the loaf is deeply browned and sounds hollow enough to suggest doneness.
For exact doneness, internal temperature is one of the most reliable checks, but crust color and loaf feel still matter too. If you want a deeper guide on that, see our article on what temperature to bake bread. -
Cool fully before slicing.
Cutting too soon can make the crumb seem gummy even when the bread is baked through.
Temperature and Time Adjustments by Method
The exact bake depends on dough type, loaf size, and oven behavior, but these rules are dependable:
- Covered methods usually begin hot, then finish uncovered for color.
- Stone or steel bakes often need strong initial heat and steam.
- Sheet pan bakes may need slightly gentler heat to avoid overbrowning before the center cooks.
- Loaf pans usually bake more evenly at moderate-high heat and need less steam.
Quick temperature and time guide
| Method | Typical oven temperature | Approximate bake time | When to remove steam or uncover |
|---|---|---|---|
| Baking stone or steel | 450°F to 500°F | 30 to 45 minutes | Remove steam after 15 to 20 minutes |
| Sheet pan with steam | 425°F to 475°F | 25 to 40 minutes | Remove steam after 10 to 15 minutes |
| Covered roasting pan or cloche | 450°F to 475°F | 35 to 45 minutes | Uncover after 20 to 25 minutes |
| Loaf pan | 350°F to 425°F | 25 to 40 minutes | Usually no steam; bake uncovered |
A useful decision rule: if the crust is browning too fast before the center is done, lower the temperature slightly and extend the bake. If the loaf is pale but cooked through, the oven likely needed more drying time at the end.
For a broader temperature strategy across bread styles, our guide on the best temperature to bake bread can help you match heat to dough.
Common Mistakes to Avoid
Skipping steam entirely
If the oven is dry from the first minute, the crust can set too early and the loaf may not spring well.
Not preheating the baking surface
A cold stone or steel will not give the strong bottom heat that helps lift the loaf.
Using too much water for steam
You want steam, not a soggy oven. Too much water can make the oven environment unstable, reduce browning, and create a burn hazard when you open the door.
Leaving the loaf covered too long
A cover is useful early, but if you keep it on too long, the crust may stay pale and soft.
Scoring too timidly
Weak scoring can force the loaf to burst unpredictably instead of opening where you planned.
Using the wrong vessel for the dough
A slack, high-hydration dough may need more support than a bare sheet pan can provide.
Troubleshooting: Pale Crust, Dense Crumb, or Flat Loaf
Pale crust
Likely causes: not enough steam early, oven not hot enough, or not enough time uncovered at the end.
Fix: give the loaf a drier finishing stage and bake until the crust is deeper in color.
Dense crumb
Likely causes: underproofing, weak shaping, or insufficient oven spring.
Fix: improve proof timing and make sure the loaf gets steam or a cover during the first stage.
Flat loaf
Likely causes: dough spread too much, surface tension was weak, or the baking surface did not give enough support.
Fix: shape more tightly and consider a stone, steel, or covered pan instead of a bare sheet pan.
Weak oven spring
Likely causes: insufficient preheat, too little steam, scoring that was too shallow, or dough that was overproofed.
Fix: preheat the oven and surface fully, use steam or a cover early, and score decisively before baking.
Burnt bottom
Likely causes: too much direct bottom heat, especially with thin metal cookware or a steel.
Fix: move the rack up one level, reduce preheat intensity, or place an empty sheet pan below the loaf as a heat buffer.
Soggy or dried-out loaf
Likely causes: too much steam for too long, or the loaf stayed in the oven or pan after baking.
Fix: remove the steam source after the first stage, uncover on time, and cool the bread on a rack so air can circulate.
Loaf spread too much
Likely causes: underdeveloped shaping, weak gluten, or a baking surface that did not support the dough.
Fix: tighten shaping, strengthen the dough’s structure, and use a loaf pan, covered pan, or preheated stone if the dough is soft.
Practical Examples and Best-Use Scenarios
If you are a beginner
A sheet pan plus steam tray is the easiest place to begin. It uses common tools and teaches you how your oven behaves without demanding special equipment.
If you want the best crust without a Dutch oven
Try a baking stone or baking steel with steam. You will get stronger bottom heat and better browning than a plain sheet pan usually delivers.
If you bake no-knead bread often
A covered roasting pan can be a smart substitute because it gives the loaf a protected first stage, which suits rustic doughs well.
If you bake sandwich loaves for the week
A loaf pan is the most practical choice. It gives you predictable shape and a softer crust that works well for everyday slices.
If your oven runs hot on the bottom
Use a sheet pan or loaf pan and avoid aggressive preheating of thin cookware. A steel can be excellent, but only if you can manage the heat it delivers.
A Final Baker’s Take
You do not need a Dutch oven to bake good bread. You need a plan for steam, heat, and timing. Once you choose the vessel that matches your dough, the rest becomes a matter of controlling the first stage of the bake so the loaf can rise before the crust sets.
Choose this method if you want the closest Dutch-oven result, the easiest setup, or the best crust for your loaf: covered roasting pan for the closest match, sheet pan for the easiest start, and baking stone or steel for the strongest crust.
FAQs
Can I bake sourdough without a Dutch oven?
Yes. Sourdough often benefits from steam or a covered first stage, but it can be baked successfully on a stone, steel, sheet pan, or in a covered roasting pan.
What is the closest substitute to a Dutch oven?
A covered roasting pan or cloche substitute is usually the closest because it traps steam around the loaf during the early bake.
Do I always need steam?
No, but steam helps the crust stay flexible long enough for better oven spring. If you use a covered vessel, that cover provides the moisture protection for the early stage.
Can I bake no-knead bread on a sheet pan?
Yes. It is a workable method, especially for beginners, though the loaf may spread more than it would in a covered vessel.
Why did my bread brown too fast on the bottom?
Your baking surface may have been too intense, especially if you used a steel or thin metal pan. Move the rack higher or reduce direct bottom heat.
How do I keep the crust crisp after baking?
Cool the loaf on a rack so moisture can escape. If you leave it in a pan or on a flat surface, the bottom can soften.
Which method is best for shaped loaves?
For shaped loaves, a baking stone or steel with steam is often the most flexible option. A loaf pan is the most reliable if your goal is a neat sandwich loaf.
Is a baking steel better than a baking stone?
A steel usually transfers heat faster, which can improve bottom browning. A stone heats more gradually. The better choice depends on how much heat intensity your dough can handle.
Can I use a roasting pan as a lid?
Yes, if it is oven-safe and large enough to cover the loaf without touching it. That setup is one of the most useful Dutch oven substitutes.
How do I know the bread is done?
Color and feel help, but the most dependable check is internal temperature. If you want a fuller guide, see our article on steam oven bread for more on moisture, crust, and baking behavior.
What if my loaf spreads instead of rising?
That usually means the dough needs stronger shaping, better proof control, or more support from the baking vessel. A loaf pan or covered bake can help with soft doughs.
How much steam is enough?
Usually just enough to create visible moisture in the oven, often from about 1/2 cup to 1 cup of hot water in a steam tray. More is not better if it risks spills or slows browning.