
Why Your Sourdough Starter Isn’t Rising — and How to Fix It

If your sourdough starter is not rising, the good news is that “flat” does not automatically mean “dead.” The most common culprits are usually boring, fixable things: a kitchen that’s too cool, a feeding schedule that’s out of sync with the starter’s strength, flour that isn’t giving the culture enough nutrition, or a jar that makes rise hard to see.
The trick is to diagnose before you change everything at once. A starter can bubble, smell tangy, and still fail to rise much if it’s too thin, too weak, or too cold. On the other hand, a young starter may simply need more time before it can reliably double. So let’s read the signs properly and choose the right fix.
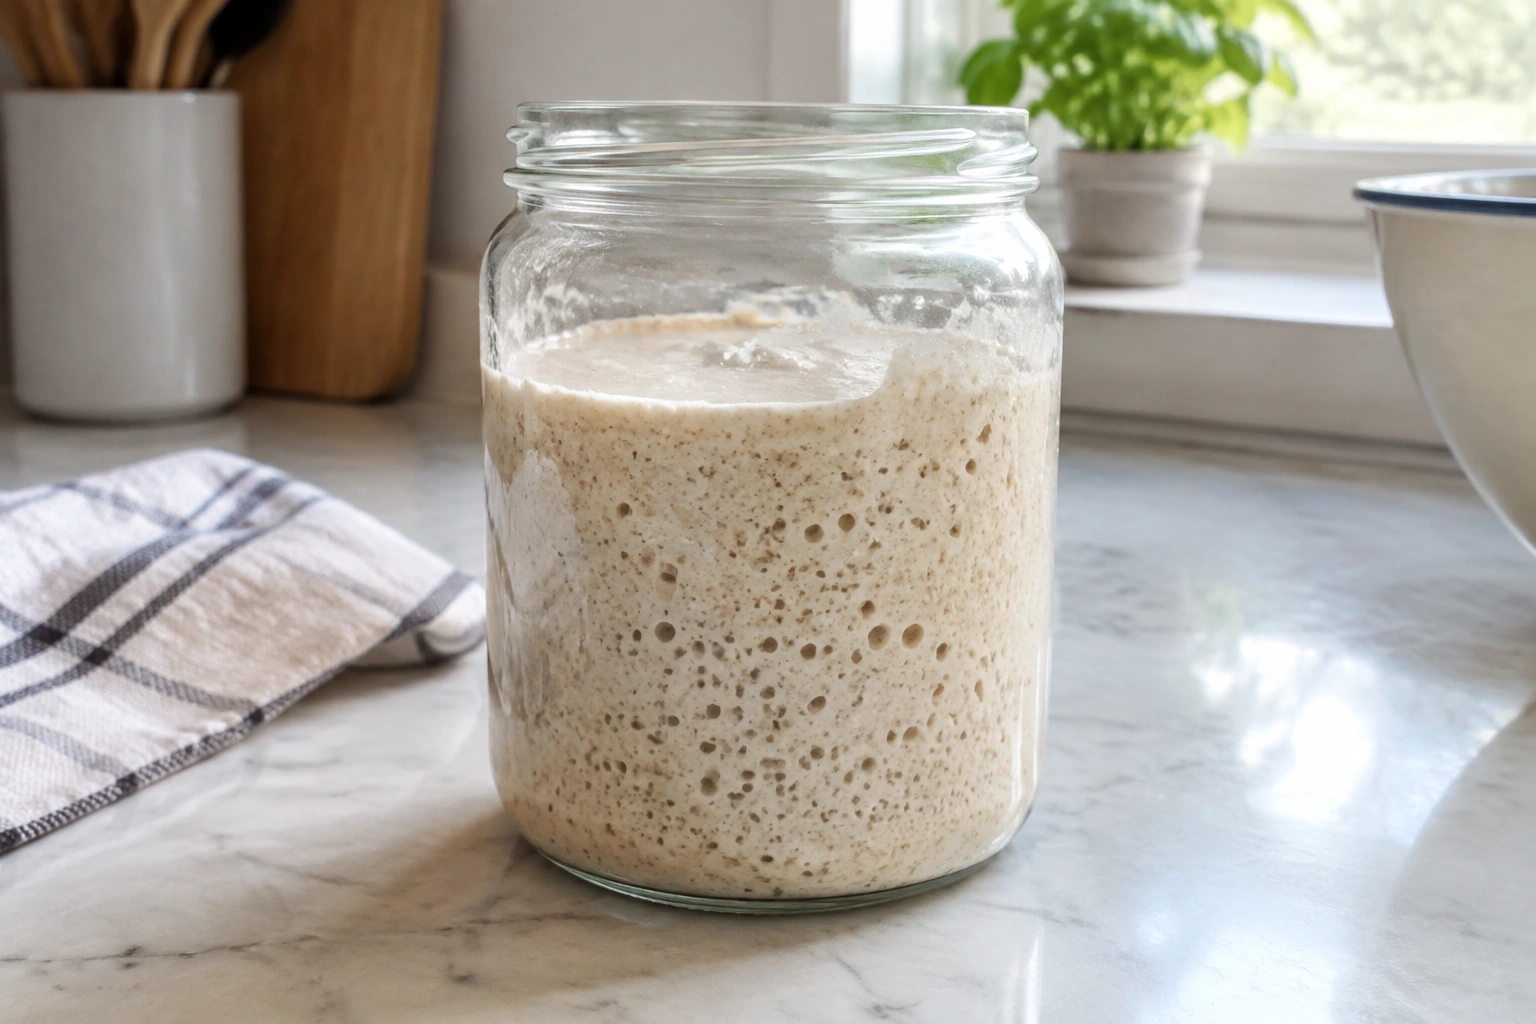
Quick diagnosis: what your starter’s symptoms are telling you
Use the table below as a fast first pass. It won’t replace observation, but it will help you avoid random “fixes” that make troubleshooting harder.
| Starter age / condition | Room temp clue | What you may see | Most likely cause | Best next move |
|---|---|---|---|---|
| Days 1–5 | Cool room | A few bubbles, little or no rise | Normal immature starter | Keep feeding consistently and warm it slightly |
| Days 6–14 | Average room | Bubbling but inconsistent rise | Still developing, or feedings are off | Keep a steady routine; don’t overcorrect daily |
| Mature starter | Cool kitchen | Slow rise, may never double on the counter | Temperature too low | Move to a warmer spot before changing flour or ratio |
| Mature starter | Warm room | Bubbles but weak lift | Too thin, overfed, or underfed | Adjust feeding ratio and consistency |
| Mature starter | Warm room | Sour smell, little activity | Hungry or overly acidic | Refresh with a stronger feeding schedule |
| Any age | Any room | Pink/orange discoloration, mold, rotten smell | Spoilage | Discard immediately |
A young starter often behaves erratically before it becomes stable, so don’t expect perfect, repeatable rise patterns in the first couple of weeks. If you’re unsure whether the starter is merely sluggish or truly spoiled, smell matters. A tangy, yogurt-like, or pleasantly sour aroma usually points to a culture that still has life in it. Rotten, putrid, or obviously off odors are different, and visible mold or pinkish discoloration is a hard stop.
What a healthy starter should look and smell like
A healthy starter does not have to look dramatic every hour of the day. What matters is a repeatable pattern: after feeding, it becomes aerated, expands, reaches a peak, and then begins to fall. That cycle is the real sign of activity.
Here’s what I look for:
- Bubbles throughout the jar, not just on the surface
- Noticeable expansion after feeding
- A domed top or peaked surface before it falls
- A smell that is pleasantly sour, yeasty, or lightly fruity
- A texture that looks alive, not separated into a watery layer and a dense paste for no reason
Bubbles alone are not enough. Gas can form without the starter having enough strength to trap it and rise. That’s why a starter can look lively but still be poor at leavening bread.
If you want a deeper readiness checklist, I also cover the practical signs in how to tell when sourdough starter is ready to bake.
Before you troubleshoot, check these basics
A lot of “starter problems” are really measurement problems. Before changing the recipe of your feedings, make sure the setup is honest.
Use a straight-sided jar
A narrow, straight-sided jar makes rise easier to judge. A wide bowl or oddly shaped container can hide a starter’s actual expansion.
Weigh your ingredients
Feeding by volume can drift fast. A scale gives you repeatable results, especially when you’re trying to tell whether a change helped.
Note the room temperature
Kitchen temperature changes fermentation speed more than many beginners expect. A starter that rises well in one spot may crawl in another.
Check your flour and water
Unbleached flour is usually a safer baseline than heavily processed flour. Whole wheat or rye often gives a sluggish starter a stronger push because those flours bring more nutrients to the culture. Water that is heavily treated or unpleasant to drink is worth replacing with filtered or dechlorinated water for troubleshooting. If your tap water is heavily chlorinated, that can be part of the problem, so try filtered water for a few feedings before changing anything else.
Watch the starter, not the clock alone
A schedule is useful, but peak rise depends on strength, temperature, and feeding balance. Focus on whether it is doubling, peaking, and falling in a repeatable way.
Is your starter dead, weak, or just young?
This is the key decision point.
A young starter
A young starter may bubble before it rises reliably. That does not mean it has failed. Early in development, the culture is still balancing yeast and bacteria, and its gas production may be inconsistent. If it is only a few days old, patience is part of the process.
A weak starter
A weak starter is alive but underperforming. It may smell normal, bubble a bit, and still fail to double. This is often a feeding or temperature issue, not a fatal one.
A neglected starter
A neglected starter can become sluggish from hunger and acidity. It may smell sharp, produce fewer bubbles, and rise slowly after feeding. This is usually recoverable if there is no spoilage.
A spoiled starter
If you see mold, pink or orange discoloration, or smell something rotten or putrid, do not try to rescue it. Toss it and begin again. That is the safest call.
King Arthur Baking gives the same safety warning: if a starter smells off or rotten, or shows pinkish liquid or visible mold, it’s time to discard it and start over. You can read their guidance here.
Why a starter bubbles but still doesn’t rise
This is one of the most confusing sourdough situations, and it usually comes down to one of six things.
1) The starter is too cold
Cool temperatures slow fermentation. Your starter may still be alive, but it will work more slowly and may not double in a normal-looking time frame.
Fix: move it to a warmer spot before changing anything else. A modestly warmer environment often tells you more than a new feeding formula.
2) The feeding ratio is off
If you feed too much flour and water relative to the amount of starter, you can dilute the yeast and bacteria so much that rise looks delayed. If you feed too little, the starter can become overly acidic and run out of fuel too fast.
Decision rule: if your starter is consistently peaking too fast and then collapsing, it may need more food. If it barely moves and smells very sharp, it may need a fresher, more generous feeding.
3) The hydration is too loose
A very wet starter can ferment well and still appear flatter because it cannot hold gas as visibly. That does not always mean it is weak; it may just be too fluid to show dramatic lift.
Trade-off: a looser starter can be easier to mix and may ferment quickly, but a thicker starter often makes rise easier to see. For troubleshooting, a slightly thicker consistency can be useful.
4) The flour is too low in nutrients
White flour can maintain a starter, but a struggling culture often perks up with a temporary switch to whole wheat or rye. Those flours tend to give the microbes more to work with.
Trade-off: whole grain flour can strengthen activity faster, but it also changes flavor. If you prefer a milder taste later, you can transition back to white flour once the starter is stable.
5) The starter is being fed too often
This is a common mistake. If a starter is weak and you keep refreshing it before it has a chance to ferment, you can actually keep it diluted and underdeveloped.
Rule of thumb: if it has not shown meaningful rise yet, feeding more frequently is not always the answer.
6) The starter is simply not mature enough yet
A starter in its first couple of weeks may bubble without reliably doubling. That’s normal development, not failure.
How long should a starter take to rise?
There is no single universal timer, because temperature and starter strength matter so much. A better question is: how long does it take in your kitchen, with your flour, and at your feeding ratio?
Use these practical benchmarks as a guide:
- Warm kitchen: a healthy mature starter often doubles in about 4 to 6 hours
- Average room temperature: a healthy mature starter often doubles in about 6 to 8 hours
- Cool kitchen: a healthy mature starter may take about 8 to 12 hours or longer to double
These are approximate rise windows, not hard deadlines. A starter that is still developing, recently changed, or fed with a different ratio may take longer. What matters most is whether it is rising predictably and reaching a clear peak.
If your starter rises well one day and barely moves the next, don’t immediately assume it’s broken. Check the room temperature first, then the feeding ratio, then the flour.
A useful habit is to track three things in a notebook or phone note:
1. When you fed it
2. What flour and ratio you used
3. How long it took to peak
That pattern tells you far more than a single jar snapshot.
Step-by-step fix for a sluggish starter
If your starter is safe but flat, here’s the revival process I’d use.
1) Keep only a small amount
Retain a modest amount of starter so you are not feeding a large, tired mass of culture. This helps the fresh flour matter more.
2) Feed with a reliable flour
If the starter has been weak for a while, use a blend that includes whole wheat or rye for a few feedings. That often gives the culture a stronger push than white flour alone.
3) Use one concrete revival formula
A simple place to start is 1 part starter, 2 parts water, and 2 parts flour by weight. For example, feed 20 g starter + 40 g water + 40 g flour. Keep that ratio for 2 to 3 consecutive feedings before deciding whether it is improving.
4) Aim for a consistent, not soupy, texture
You want a mixture that can trap gas. If it is very runny, the rise may be hard to see even when fermentation is happening.
5) Move it somewhere warmer
A gentle warmth is often enough. You are trying to support fermentation, not bake the starter.
6) Mark the level

Use a rubber band, tape, or marker line so you can see whether it actually expands. Many starters are doing more than their owners realize.
7) Watch for peak, not just bubbles
If it rises and then falls, that’s progress. Falling after a peak means the starter is working.
8) Reassess after a few feedings
If there is no clear improvement after 2 to 3 feedings at the same ratio, same flour, and similar temperature, reassess the plan instead of randomly changing everything again.
How to adjust feeding ratio, schedule, and flour
This is where many bakers overcomplicate things. Keep the logic simple.
If the starter seems underfed
Most likely signs: it smells sharp or sour, collapses quickly after feeding, and may look acidic or thin.
Exact next step: feed it more generously and keep the schedule steady. A good troubleshooting move is 1:2:2 by weight for a few feedings so it gets enough fresh food without being overwhelmed.
If the starter seems overfed
Most likely signs: it has been refreshed very often, looks diluted or sluggish, and never seems to get a chance to build strength.
Exact next step: feed it less often and let it ferment fully before refreshing it again. In other words, wait for a real rise or peak before the next feeding.
If the starter is weak on white flour alone
Try: a temporary boost with whole wheat or rye. Once it becomes more predictable, you can gradually return to your preferred flour mix.
If the starter is too loose
Try: a thicker mix so expansion is easier to see. This is especially useful when you are diagnosing whether the starter is rising at all or just fermenting invisibly.
Common mistakes that keep a starter flat
These errors show up over and over:
- Judging by bubbles alone
- Feeding again before the starter has had time to work
- Ignoring kitchen temperature
- Using a container that hides rise
- Switching flour, hydration, and schedule all at once
- Assuming a young starter should behave like a mature one
- Throwing out a starter too early without checking for spoilage signs
The biggest one, in my view, is changing too many variables. Good troubleshooting means changing one thing, then observing.
When to keep reviving and when to discard
Keep trying if the starter:
– smells sour but not rotten
– shows bubbles
– has no mold
– has no pink or orange discoloration
– improves even a little after feeding and warmth
If your starter bubbles but still does not rise, it is usually worth trying a consistent revival routine for a few feedings before giving up. That pattern often points to temperature, hydration, or feeding balance rather than a lost culture.
Discard and restart if the starter:
– has visible mold
– smells rotten, putrid, or clearly spoiled
– shows pinkish or orange streaking
– has been neglected so badly that the condition is unsafe to judge confidently
If you are on the fence, safety wins. A sour smell is usually fine. A rotten smell is not.
How to know when it’s ready to bake with
A starter is ready when it behaves predictably, not just once, but repeatedly.
Look for:
– consistent rise after feeding
– a clear peak before collapse
– a smell that is pleasantly tangy or yeasty
– enough strength to expand in a reasonable window for your kitchen conditions
The float test can be a backup check, but I would not rely on it alone. A starter can pass or fail it for reasons that have more to do with bubbles and hydration than true readiness. If you want to use that test, make sure you also check repeated rise behavior and peak timing. I explain that in sourdough float test: how to tell when your starter is really ready.
Practical examples: what this looks like in real life
Example 1: A day-5 starter in a cool kitchen
It bubbles around the edges but never rises much. That is not unusual. The fix is not panic; it’s warmth, consistency, and time.
Example 2: A mature starter smells tangy but barely rises
This often points to temperature or feeding balance. Before changing flour, move it warmer and observe a few feedings.
Example 3: A starter that was fed every few hours
It looks tired and thin. In that case, more frequent feeding may have diluted it. Give it a more sensible rhythm and let it ferment fully between refreshments.
Example 4: A starter with bubbles but no lift
Check hydration and jar shape. A very loose starter can ferment without showing much height, and a wide container can hide expansion.
Frequently asked questions
Why is my sourdough starter bubbling but not rising?
Usually because it is too cold, too loose, underfed, overfed, or still immature. Bubbles show fermentation; rise depends on how well the starter traps gas.
Is my starter dead if it doesn’t rise?
Not necessarily. Many starters that look inactive are just cold, hungry, or weak. Mold, pink/orange discoloration, or rotten odor are the bigger warning signs.
Should I keep feeding it every day?
Only if that schedule matches how quickly it is using its food. Feeding too often can weaken a starter that is already struggling.
Does whole wheat help a starter rise?
Often, yes. Whole wheat or rye can give a sluggish starter a stronger boost than white flour alone.
How long should it take for a mature starter to double?
In a warm kitchen, often about 4 to 6 hours. In an average room, about 6 to 8 hours. In a cool kitchen, 8 to 12 hours or longer may be normal.
Can I save a starter that bubbles but still won’t rise?
Usually, yes. If it smells normal and shows no mold or discoloration, try a consistent feeding ratio, warmer placement, and a few consecutive feedings before restarting.
What if I’m still not sure?
If the starter is safe but confusing, simplify the variables: keep the amount small, use a reliable flour, warm it gently, and track the rise over several feedings.
A sourdough starter that is not rising is frustrating, but it is rarely mysterious once you look at the whole picture. Temperature, food, hydration, and age all affect the result. Read the signs carefully, change one variable at a time, and the culture usually tells you what it needs.