Baking soda and vinegar can freshen a garbage disposal and help with light residue, but they are not a fix for clogs or jams. Use the method for routine odor control, then rinse well and call a pro if the disposal shows mechanical problems.
If you want a simple way to freshen a smelly sink, a baking soda and vinegar garbage disposal treatment is a common DIY option. It is best for odor control and light cleaning, not for fixing a jammed or badly clogged disposal.
- Best use: Good for mild odors and light freshening.
- Method: Add baking soda first, then vinegar, then rinse with hot tap water.
- Limit: It will not reliably clear a clog or jam.
- Safety: Turn off the disposal and never reach inside the chamber.
- Maintenance: Regular flushing and splash guard cleaning help prevent buildup.
Why Baking Soda and Vinegar Are Used in Garbage Disposal Cleaning
This method is popular because it uses two household ingredients that are easy to measure, inexpensive for most kitchens, and familiar to beginner home cooks. It also feels like a practical “cleaning science” project: the baking soda is alkaline, the vinegar is acidic, and the fizzing reaction can help loosen some soft residue on surfaces.
What each ingredient does in the drain and disposal chamber
Baking soda can help neutralize sour odors and lift light grime from the inside of the disposal chamber. Vinegar helps dissolve some mineral film and contributes to the foaming reaction, but it does not magically scrub away heavy grease or trapped food by itself.
In a disposal, the fizz is most useful where the liquid can reach: the chamber walls, the underside of the splash guard, and the upper drain area. It is less effective on packed debris, stuck fibrous food, or anything wedged deeper in the impellers.
Why this method appeals to homeowners in 2026
Many homeowners still prefer simple, low-cost cleaning routines that do not require specialty products. A baking soda and vinegar garbage disposal cleanup fits that need, especially for people who want a quick deodorizing step between deeper cleanings.
It also appeals to renters and busy households because it is fast, easy to repeat, and uses ingredients already in the pantry. That said, convenience should not be confused with deep cleaning power.
The fizzing reaction is strongest when the ingredients first meet, but the cleaning benefit comes more from contact time and rinsing than from the foam itself.
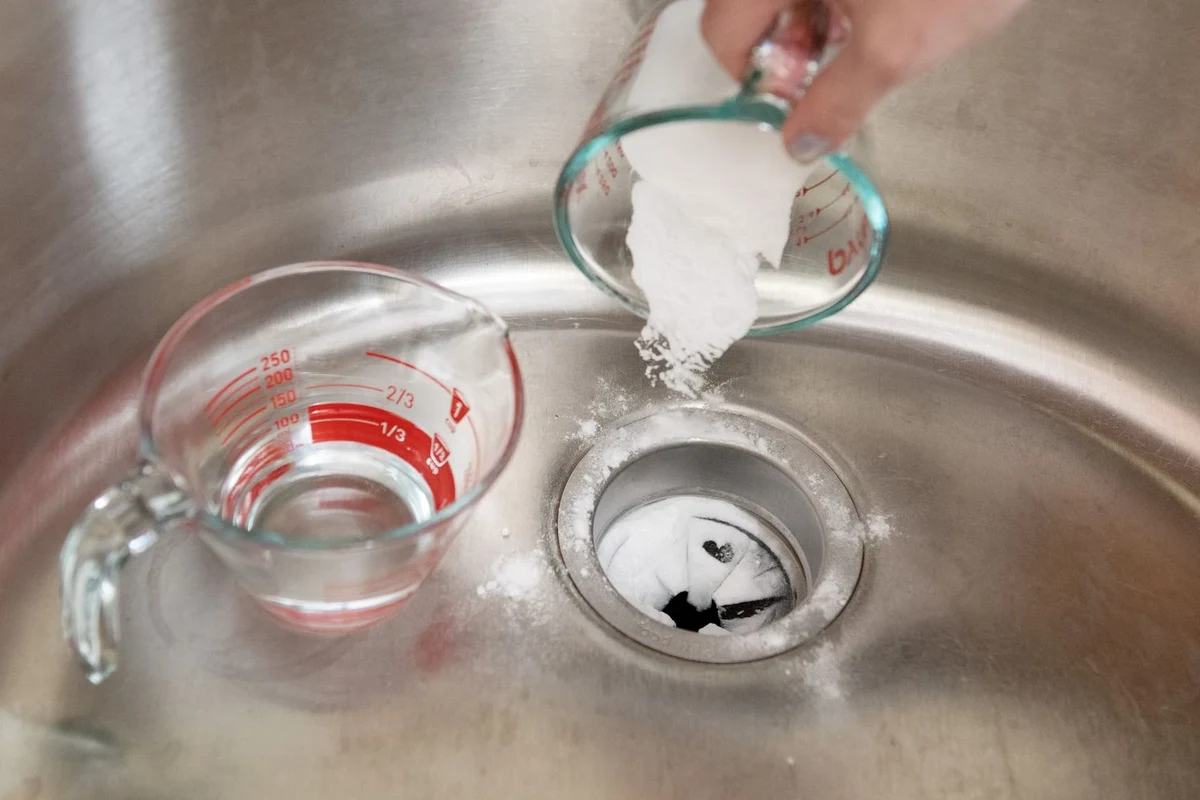
How to Clean a Garbage Disposal with Baking Soda and Vinegar Step by Step
The basic method is simple, but the order matters. Start with a dry chamber as much as possible, add baking soda first, then vinegar, and finish with a careful hot-water rinse.
Recommended amounts and the right order of application
A practical starting point is about 1/2 cup of baking soda followed by about 1 cup of vinegar. Pour the baking soda directly into the disposal opening first, then slowly add the vinegar so the reaction happens inside the chamber instead of spilling out of the sink.
If your sink has a lot of standing water, bail it out first so the mixture is not immediately diluted. More product does not automatically mean better cleaning; too much can just create overflow and mess.
Make sure the switch is off and remove visible food from the sink opening. Never reach into the disposal chamber.
Pour the baking soda into the drain opening so it settles around the chamber and upper drain area.
Add the vinegar gradually to encourage fizzing without splashing the sink or countertop.
Allow the mixture to work before rinsing so it can loosen light residue and help reduce odors.
How long to let the mixture sit before flushing
Let the mixture sit for about 10 to 15 minutes in most routine cleanings. That gives the ingredients time to contact the chamber walls and the splash guard, where odors often collect.
For a stronger smell, some people leave it a little longer, but extended soaking is not a substitute for removing buildup. If the disposal is already slow or partially blocked, do not keep adding more liquid and hoping for a better result.
Best water temperature and rinse method for finishing the clean
Finish with a steady flush of hot tap water, not boiling water. Very hot or boiling water can be hard on some sink parts and plumbing materials, while hot tap water is usually enough to rinse loosened residue away.
Run the water for several seconds before turning on the disposal, then keep it running while you operate the unit briefly. This helps carry loosened debris through the drain line instead of letting it settle back in the chamber.
Follow your disposal manufacturer’s instructions if they differ from general cleaning advice. Some brands recommend specific cleaners or warn against certain ingredients.
What This Method Can and Cannot Do
The baking soda and vinegar method is useful, but it has a narrow job. Think of it as a deodorizing and light-freshening step, not a full mechanical cleaning solution.
Odor control versus grease, grime, and stuck debris
This treatment can help with sour smells caused by food residue, mild slime, or damp buildup around the splash guard. It may also reduce the stale odor that comes from a disposal that has not been used or flushed properly.
It usually does not remove hardened grease, stringy vegetable fibers, or compacted food particles trapped deeper in the unit. If the smell returns quickly, the issue is often buildup on the guard, food trapped under the baffle, or a drain problem farther down the line.
- Simple and inexpensive
- Good for light odor control
- Easy to repeat as part of routine care
- Weak against heavy grease or packed debris
- Can splatter if poured too quickly
- Does not fix mechanical jams
When a baking soda and vinegar treatment is enough
It is usually enough when the disposal is draining normally, the smell is mild, and there is no sign of a clog or grinding problem. In that case, the goal is freshening and routine maintenance rather than rescue cleaning.
If the unit still sounds normal and water moves through the sink without backing up, this method can be a reasonable first step. Many households use it after cooking sessions that leave behind onion, garlic, or other strong odors.
When the disposal needs manual cleaning or a plumber
If the disposal hums but does not grind, trips the reset button repeatedly, or leaves water standing in the sink, you may be dealing with a jam or blockage. That kind of problem usually needs the power off, a manual check with the proper tool, or a licensed plumber if the issue is in the drain line.
Persistent sewer-like odors, leaks under the sink, or repeated backups also point to a deeper issue. In those cases, cleaning foam will not solve the root cause.
Do not use this method as a fix for a jammed disposal. Always turn off power before any inspection, and follow the manufacturer’s safety steps before attempting manual clearing.
Safety Considerations Before You Start
Cleaning a disposal is simple, but the unit contains blades, moving parts, and electrical components. Treat it like any other kitchen appliance that can cause injury if handled carelessly.
Power off, splash risk, and avoiding accidental activation
Turn the disposal switch off before you begin, and keep hands, utensils, and cleaning tools away from the opening. Splashing can happen when vinegar hits baking soda, so pour slowly and stand back a little.
If you need to inspect the disposal, unplug it or switch off the circuit breaker when possible. Never place your hand inside the chamber, even if the unit seems inactive.
Keep children and pets away from the sink while the mixture is fizzing and while the disposal is running. Wet floors and sudden splashes can create a slip hazard.
Why this method should not replace proper disposal use habits
A disposal stays cleaner when it is used correctly in the first place. Feed it small amounts of food, run cold or cool water during grinding unless the manufacturer says otherwise, and avoid forcing fibrous or starchy scraps through in large piles.
Regular flushing matters more than occasional deep cleaning. If food residue sits in the chamber, it can dry into a sticky film that no quick DIY treatment will fully remove.
Situations where vinegar, bleach, or harsh cleaners should be avoided
Vinegar is usually safe for routine DIY use, but it should not be mixed with bleach or other chemical cleaners. That combination can create dangerous fumes.
Harsh drain cleaners are also a poor choice for most disposals because they can damage seals, pipes, or internal parts. If you are not sure what a product does in your plumbing system, check the label and the appliance manual first.
Common Mistakes Homeowners Make with Baking Soda and Vinegar
Most problems with this method come from expectations, not from the ingredients themselves. The reaction is visible, but visible foam is not the same thing as deep scrubbing.
Using too much product and expecting a stronger reaction
Adding extra baking soda or vinegar will not necessarily make the disposal cleaner. It may simply increase foaming, overflow, and cleanup time.
Stick to a measured amount unless your manufacturer suggests something different. Consistent routine cleaning works better than dramatic one-time treatments.
Skipping the rinse and leaving residue behind
The rinse is essential because loosened residue has to leave the chamber. If you stop after the fizzing ends, the disposal can still hold damp particles and smell again later.
Run plenty of hot tap water and briefly operate the disposal so the loosened material can move through the drain. A clean-looking sink opening does not always mean the drain is fully flushed.
Pouring in the wrong items and causing clogs or dull blades
Even a good cleaning routine cannot make the disposal safe for everything. Grease, coffee grounds in large amounts, pasta, rice, celery, corn husks, bones, and other problem foods can create buildup or strain the unit.
Also avoid pushing in hard objects or scraps that could bounce around and make noise without breaking down. The best disposal habit is still careful food management at the sink.
- Use measured amounts of baking soda and vinegar
- Rinse with hot tap water after treatment
- Keep the disposal running only as directed
- Dumping in extra cleaner for a stronger reaction
- Leaving residue in the chamber
- Using the disposal for grease-heavy or fibrous scraps
Best Practices for Ongoing Garbage Disposal Maintenance
Routine care is what keeps odors from building up in the first place. A quick cleaning schedule is usually more effective than waiting until the sink smells bad.
How often to use this cleaning method for odor prevention
For many households, once every one to two weeks is a reasonable deodorizing routine, especially if the disposal sees frequent use. A lightly used disposal may need it less often, while a busy kitchen may benefit from more regular attention.
Frequency depends on what goes down the drain, how much water is used, and how quickly residue tends to build up. If your sink stays fresh with simpler habits, you may not need the treatment as often.
Daily habits that reduce buildup, slime, and food residue
Run enough water before, during, and after using the disposal so scraps move through instead of sticking. Feed food in small amounts and avoid stuffing the chamber full.
Cold or cool water is often recommended during grinding for greasy foods because it can help keep fat more solid while it moves through the system, but always follow the appliance manual. After use, a short flush helps wash away lingering particles.
Simple add-on cleaning steps for the sink flange and splash guard
Many odors come from the rubber splash guard, not just the chamber. Wipe the underside of the guard and the sink flange with a sponge or brush after the disposal is off.
If the guard is removable, clean it according to the manufacturer’s instructions. That small step often makes a bigger difference than adding more vinegar.
For a fresher sink, pair the baking soda and vinegar treatment with a quick wipe of the splash guard. Odors often cling to that hidden edge more than to the disposal blades themselves.
When to Choose a Different Cleaning Approach
Some disposal problems are not cleaning problems. If the unit is clogged, jammed, or leaking, you need a different solution.
Signs of a deeper blockage, jam, or mechanical issue
Warning signs include humming without grinding, repeated resets, a burning smell, water that drains slowly, or water backing up into the sink. Any of these can mean the problem is mechanical or located farther down the drain.
If you hear metal-on-metal noises or the unit stops unexpectedly, stop using it right away. Continued operation can make the damage worse.
Alternative options for stubborn odors and heavy grease buildup
For stubborn odors, mechanical cleaning of the splash guard, drain opening, and nearby sink area may work better than more fizzing. Some homeowners also use manufacturer-approved disposal cleaning products or a brush designed for the drain opening.
Heavy grease buildup may require hotter rinse water, better food disposal habits, or professional drain cleaning if the line is affected. Choose the method that matches the problem instead of assuming one DIY trick fits every situation.
How to decide between DIY cleaning and professional service
If the disposal is working normally and the issue is mainly odor, DIY cleaning is a sensible first step. If the sink backs up, the unit jams, or the smell persists even after cleaning the visible parts, professional help is usually the better next move.
When in doubt, follow the appliance manual and use recognized plumbing guidance. That approach is safer than trying multiple strong chemicals or forcing the unit to work harder than it should.
Final Verdict: Is Baking Soda and Vinegar a Good Garbage Disposal Cleaner?
Yes, for the right job. A baking soda and vinegar garbage disposal cleaning is a good low-cost routine for light odor control and basic freshening, especially in busy kitchens that need a quick reset.
Practical use cases for homeowners, renters, and busy kitchens
Homeowners can use it as part of a regular maintenance routine. Renters may like it because it is simple and does not require special tools, and busy cooks may appreciate that it takes only a few minutes.
It is also a useful option after strong-smelling foods or when the sink begins to smell stale. Just keep expectations realistic.
Balanced recap of benefits, limits, and the best next step
The main benefit is convenience, not heavy-duty cleaning power. The main limit is that it cannot fix jams, deep clogs, or serious buildup on its own.
If your disposal is only mildly smelly, this method is a smart first step. If the problem is persistent, mechanical, or backed up, move on to manual cleaning, manufacturer guidance, or a plumber instead of repeating the same treatment.
Baking soda and vinegar are a practical garbage disposal cleaner for odors and light residue, but they are not a cure-all. Use them as routine maintenance, rinse well, and choose a stronger or professional solution when the disposal shows signs of blockage or damage.
Frequently Asked Questions
A common starting point is 1/2 cup of baking soda followed by 1 cup of vinegar. The exact amount can vary by disposal size and manufacturer guidance, so check your appliance manual if it gives different directions.
Let the mixture sit for about 10 to 15 minutes for routine deodorizing. If the disposal still smells bad after rinsing, the issue may be buildup on the splash guard or a deeper drain problem.
It may help with light residue, but it usually will not clear a real clog or jam. If water backs up, the unit hums, or the reset button keeps tripping, you may need manual cleaning or a plumber.
Hot tap water is commonly used after the baking soda and vinegar treatment to help flush loosened residue away. During normal food grinding, follow your manufacturer’s instructions, since some units recommend cool water for certain foods.
No. Never mix vinegar with bleach or other chemical cleaners, because dangerous fumes can form. Use only one cleaning method at a time and follow product labels carefully.
For many homes, once every one to two weeks is enough for odor prevention. Frequency depends on how often the disposal is used, what foods go in it, and how quickly residue builds up.
