Baking soda and crazy glue can create a very fast, hard repair for small cracks, chips, and gap filling. It works best on light-duty fixes, but it is not the right choice for every material or structural repair.
“Baking soda and crazy glue” is a fast-fix trick that many DIYers use for small repairs, gap filling, and reinforcing broken edges. It is not a universal adhesive solution, but when used carefully, it can create a hard repair that sets almost immediately.
- Fast setting: Baking soda speeds cyanoacrylate cure and helps it harden almost immediately.
- Best use: Small cracks, chipped edges, and cosmetic gap filling are the strongest use cases.
- Use carefully: Too much powder can make the repair chalky, brittle, or heat-prone.
- Test first: Delicate plastics, painted surfaces, and heat-sensitive materials may be damaged.
- Know the limit: For structural or safety-critical fixes, epoxy or replacement may be better.
What “Baking Soda and Crazy Glue” Actually Refers to in Fast-Repair Projects
In everyday conversation, “crazy glue” usually means cyanoacrylate glue, the fast-setting adhesive sold under many brand names. When baking soda is added, it can speed up the set and help build a thicker repair where plain glue might run or sink into a crack.
Why this combo is popular for instant bonding and gap filling
The appeal is simple: it works quickly, is easy to find, and can save a small item from the trash. For a cracked plastic tab, a chipped corner, or a tiny broken handle, the reaction can lock the repair in place before the parts drift apart.
It is especially useful when you need a rigid fill rather than a flexible adhesive line. That makes it handy for small gaps, missing chips, and edge rebuilding where shape matters as much as strength.
What kinds of materials it works on best in 2026
This method tends to perform best on hard, nonporous materials such as some plastics, ceramics, metal, and sealed wood. It is less dependable on oily surfaces, very flexible plastics, and anything that bends a lot after repair.
As of 2026, the basic chemistry has not changed, but product formulas can vary by brand. Always check the glue label, because some cyanoacrylate products are thicker, slower, or designed for specific materials.
This trick is best understood as a quick repair method, not a substitute for structural adhesive systems when a part must carry heavy stress.
How Baking Soda Changes the Behavior of Crazy Glue
Cyanoacrylate glue cures when it meets moisture and reactive surfaces. Baking soda acts like a helper that speeds the hardening process and gives the glue something solid to build around.
The chemical role of baking soda as an accelerator and filler
Baking soda does two jobs here. First, it helps the glue set much faster. Second, it behaves like a filler, turning a thin adhesive into a more paste-like repair material that can bridge small voids.
That is why the repair often feels almost immediate. Instead of waiting for glue alone to seep and cure, the powder creates a larger contact area and a harder mass.
Why the bond hardens so quickly and where heat can build up
The fast cure can produce noticeable warmth, especially if a large amount of glue and baking soda are combined at once. That heat is part of the reaction, and it is one reason you should avoid dumping a big pile of powder onto a wet glue puddle.
Small applications are usually safer and more controllable. On thin plastics, painted finishes, and delicate trim, too much heat can warp, discolor, or crack the surface.
Fast curing does not mean safe to touch right away. Fresh cyanoacrylate repairs can still be hot, brittle, or irritating to skin and eyes, so keep your face away from the work area.
Ideal ratios and the importance of testing on scrap material first
There is no perfect universal ratio because glue thickness, humidity, and surface texture all affect the result. A practical approach is to start with a small amount of glue, then add baking soda in light layers until the repair fills the gap.
Test first on scrap material if possible, especially with plastic parts you care about. Some materials darken, fog, or weaken around cyanoacrylate, and a quick test can prevent a permanent mistake.
Cyanoacrylate glue often cures faster in the presence of moisture, which is why even a little humidity can change working time and final hardness.
Best Uses for Baking Soda and Crazy Glue Around the Home and Workshop
This method is most useful where the repair needs to set quickly and the repaired area does not need to flex much. It is common in small household fixes, hobby work, and detail repairs where sanding or shaping afterward matters.
Cracked plastic repairs, chipped edges, and broken household items
Broken remote-control housings, small appliance trim pieces, plastic clips, and chipped corners are common candidates. The repair works best when the break fits together cleanly and the joint can be held still during the first few seconds.
It can also help rebuild a missing edge on a container, tray, or decorative object. Just remember that appearance may improve faster than strength, so a repaired item should be treated gently unless you know the load is light.
Small woodworking fixes, model building, and craft reinforcement
For small wood repairs, the method can stabilize a split corner, a loose hobby piece, or a tiny missing section. It is often used in model making because it sets fast and can be shaped after cure.
In crafts, the hard finish is useful when you want a stiff patch before sanding or painting. It is not the same as a flexible wood glue joint, but it can be very practical for detail work.
Filling gaps before sanding or shaping the repaired area
One of the best uses is gap filling. The baking soda gives the glue body, so you can build up a low spot and then sand it smooth once it has fully hardened.
That makes it helpful for cosmetic repairs on small objects. The repaired area may still show a seam, but it can often be trimmed and blended better than glue alone.
Step-by-Step Method for Getting a Strong, Fast Repair
A clean, dry surface matters more than most people expect. If the part is greasy, dusty, or damp in the wrong place, the repair may harden quickly but fail later.
Surface prep: cleaning, drying, and roughing up the area
Start by cleaning the break with a dry cloth or a cleaner that is safe for the material. Let it dry completely before applying glue, because trapped moisture, oil, or dust can weaken the bond.
If the surface is smooth and nonporous, lightly roughing it with fine sandpaper can help. You do not need to remove a lot of material; just create a little tooth so the adhesive has more grip.
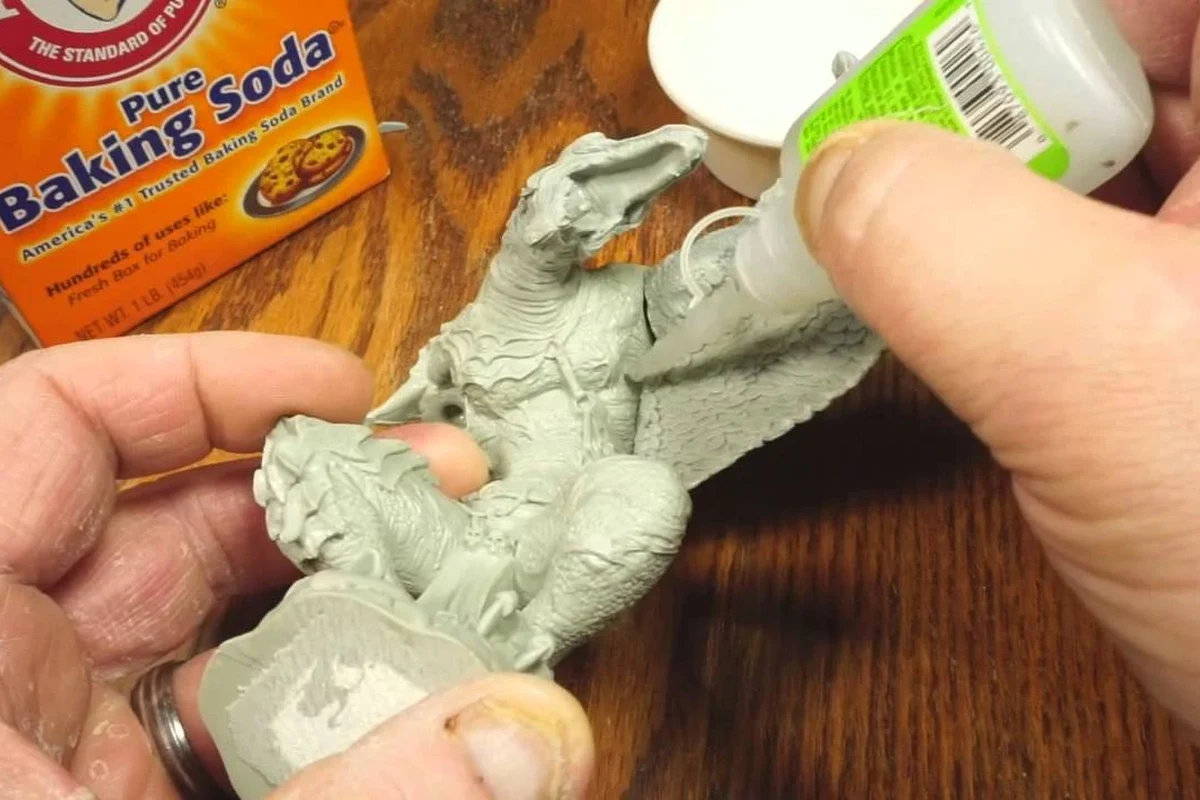
Applying glue first, then adding baking soda in controlled layers
Apply a small amount of crazy glue to one side of the break or into the gap. Then sprinkle or tap in a small amount of baking soda, letting the reaction start in place instead of mixing everything in a separate pile.
Work in controlled layers rather than one large dump. This gives you better control over shape, heat, and final hardness.
- Dry-fit the broken pieces first
- Have gloves and ventilation ready
- Keep the glue tip clear of powder
- Use scrap material for a quick test if possible
How to build thickness without creating a brittle blob
Build the repair in thin passes. A single thick mass can cure unevenly and become more brittle than a layered repair.
If the gap is deep, add a little glue and a little baking soda, let it harden, then repeat. This is slower than making one giant fill, but the result is usually easier to shape and less likely to crack.
What “done” looks like before sanding, trimming, or painting
The repair should feel hard, stable, and no longer tacky before you touch it with tools. If the surface still dents easily or smells strongly of active reaction, give it more time.
Once it is firm, you can sand, trim, or paint depending on the material and the paint system you plan to use. For best results, remove dust before finishing so the top layer adheres cleanly.
Remove dust, grease, and moisture so the glue can bond to the surface instead of to contamination.
Use only enough glue to wet the repair area without flooding it.
Sprinkle lightly, let it react, then repeat until the gap is filled.
Wait until the repair is fully hard before sanding, trimming, or painting.
Common Mistakes That Cause Weak Bonds or Damage
Most failures come from using too much material, rushing the cure, or choosing the wrong surface. The trick itself is simple, but the details matter.
Using too much baking soda and creating a chalky failure point
If you overload the glue with powder, the repair can become chalky and weak. It may look full, but the bond can crumble or chip because there is not enough adhesive holding the filler together.
The fix is to use less powder and more layering. The goal is a hard repair, not a dry mound.
Mixing on delicate plastics, painted surfaces, or heat-sensitive materials
Some plastics can fog, soften, or warp. Painted surfaces may discolor or lose their finish, and heat-sensitive parts can deform during the cure.
If the item matters cosmetically, test first in an unseen spot. When in doubt, choose a slower adhesive that is better suited to the material.
Rushing the repair before full cure or structural support
Fast set does not always mean full strength. A part that is moved too soon can crack at the edge of the repair even if the surface feels hard.
For pieces that must line up precisely, hold or support them until the bond has clearly stabilized. Clamps, tape, or a simple brace can help keep the repair aligned.
Ignoring fumes, skin contact, and eye protection
Cyanoacrylate fumes can be irritating, especially in a closed room. Keep the work area ventilated, avoid leaning directly over the repair, and do not touch the reaction while it is active.
If glue bonds skin, do not pull forcefully. Follow the product label for safe removal, and seek medical help if glue gets into the eyes or causes a serious reaction.
Keep this repair method away from food-contact surfaces unless the product label allows that use after full cure. When a repaired item touches food, follow the manufacturer’s instructions and replace the item if safety is uncertain.
Safety, Storage, and Cleanup for DIY Users
Good storage and cleanup habits make the method safer and more reliable. They also help keep both materials usable for future repairs.
Ventilation, gloves, and keeping the reaction away from your face
Work in a well-ventilated area and keep your face back from the repair. Gloves can help reduce accidental skin bonding, but they should not replace careful handling.
Use small amounts and pause if the reaction becomes hot or smoky. That is a sign you are using too much material at once.
How to store crazy glue and baking soda so they stay usable
Store cyanoacrylate tightly sealed, away from heat and moisture, because humidity can shorten shelf life. Baking soda should also stay dry and sealed so it does not clump.
Do not store glue where it can leak onto other items. A separate container or bag can help prevent accidental bonding in your toolbox or kitchen drawer.
Removing excess material and handling accidental bonding safely
Once cured, extra repair material can usually be filed, sanded, or carefully trimmed. If the glue is still active, avoid scraping aggressively, because that can spread it or damage the base material.
For accidental bonding, follow the glue manufacturer’s label directions. If there is any concern about skin injury, eye exposure, or inhalation irritation, contact a medical professional or poison control guidance right away.
When This Trick Works Fast—and When It Is the Wrong Fix
This is a smart shortcut for some repairs and a poor choice for others. The key is knowing whether you need speed, appearance, flexibility, or real structural strength.
Best use cases for quick, non-load-bearing repairs
Use baking soda and crazy glue when you need a fast fix on a small break, a cosmetic chip, or a light-duty part. It is especially helpful when the item can be held still and does not need to flex much afterward.
It also makes sense when you want to fill a tiny void before sanding or painting. In those cases, the rigid finish is a feature, not a problem.
Situations that need epoxy, plastic welding, clamps, or replacement parts
Choose a different method when the part carries weight, flexes often, or must stay food-safe, heat-safe, or waterproof under real use. Epoxy may be better for some gap-filling jobs, while plastic welding or replacement may be better for broken structural parts.
Clamps can help with wood and some repairs that need pressure during cure. For items that are badly cracked, missing large sections, or repeatedly failing, replacement is often the safer long-term answer.
How to judge whether the repair is cosmetic, temporary, or structural
If the item only needs to look better, the method can be a good cosmetic fix. If it needs to function for a short time, it may be a temporary repair. If the part must hold stress, carry weight, or protect safety, treat this trick as a stopgap unless the material and product instructions clearly support the use.
- Sets very quickly
- Fills small gaps well
- Easy to sand and shape after cure
- Can become brittle if overused
- Not ideal for flexible or heat-sensitive materials
- Heat and fumes require care
Final Recommendation: Is Baking Soda and Crazy Glue Worth Using in 2026?
Yes, baking soda and crazy glue is still worth knowing in 2026 if you do small repairs, hobby work, or quick gap filling. It is fast, practical, and surprisingly useful when you want a hard repair that can be shaped afterward.
Practical recap for fast repairs, durability expectations, and next-step choices
The best results come from clean surfaces, small layers, and realistic expectations. Use it for light-duty fixes and cosmetic rebuilding, but switch to epoxy, clamps, plastic welding, or replacement parts when the repair must be flexible or structurally strong.
If you remember only one rule, make it this: start small, test first, and let the material guide you. That approach gives you the speed of the trick without turning a simple repair into a bigger problem.
For any repair that affects food-contact items, electrical parts, safety equipment, or load-bearing pieces, verify the product label and choose the repair method that matches the item’s real use.
Frequently Asked Questions
Baking soda helps cyanoacrylate glue set much faster and adds bulk so it can fill small gaps. It is useful for quick repairs, but the result can be brittle if you use too much.
Sometimes, yes, especially on hard plastic parts with small cracks or chips. Test on a hidden area first, because some plastics can fog, warp, or weaken around cyanoacrylate.
There is no single exact ratio because glue thickness and surface type change the result. Start with a small amount of glue and add baking soda in light layers until the gap is filled.
Usually not for parts that carry heavy stress, flex often, or affect safety. For structural repairs, epoxy, plastic welding, clamps, or replacement parts may be a better choice.
Wait until the repair is fully hard and no longer tacky, then sand carefully with fine grit. If the surface chips or crumbles, the repair may have too much baking soda or not enough cure time.
Yes. Use ventilation, avoid skin and eye contact, and be careful because the reaction can heat up quickly. Follow the glue label for cleanup and safe removal if accidental bonding happens.
