
Bread Without a Stand Mixer: How to Make and Knead Dough by Hand

If you want to bake good bread without a stand mixer, the short answer is yes—you absolutely can. Hand mixing takes more attention and a little more patience, but it gives you excellent control over the dough. In many cases, it also helps you learn what properly developed bread dough actually feels like, which is a skill that pays off long after you get a mixer.
The main trade-off is simple: a stand mixer saves effort, while hand mixing asks for a bit more time and technique. That does not mean the bread will be inferior. It just means you’ll be relying on your eyes, hands, and a few smart rest periods instead of machine power.
For home bakers and culinary students, that’s often a good thing. Once you understand how dough behaves by hand, recipes become less mysterious. You can tell when flour still needs hydration, when gluten is building, and when the dough is ready for its first rise.
Tools and Ingredients You Need for Hand-Mixed Bread
You do not need much equipment to make bread dough by hand. In fact, a simple setup is often easier than juggling a mixer attachment, especially in a small kitchen.
Here’s the basic toolkit:
- A large mixing bowl
- A sturdy spoon, spatula, or dough whisk
- A clean countertop or work surface
- A bench scraper
- Measuring cups and spoons, or a scale if you prefer precision
- A clean towel or plastic wrap for covering the dough
A bench scraper is especially helpful. It lets you lift sticky dough, tidy the work surface, and gather loose flour without adding too much extra flour to the dough itself.
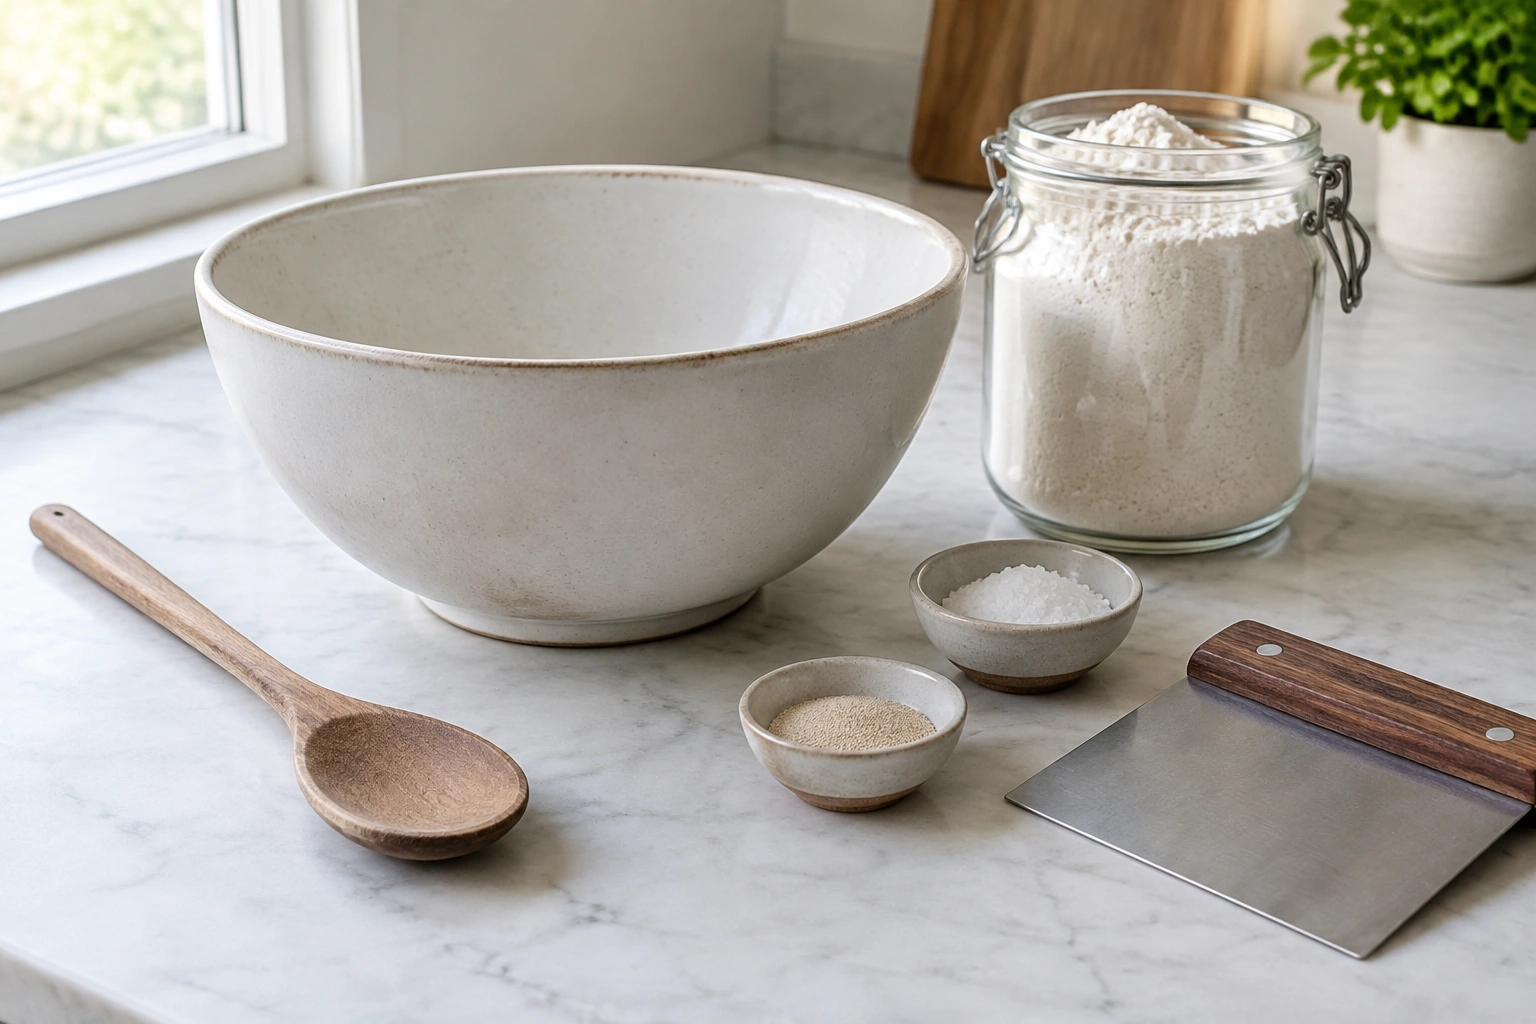
For ingredients, most basic yeast breads use the same core group: flour, water, yeast, and salt. Some recipes include sugar, milk, butter, or oil. Bread baking commonly relies on wheat or rye flour for structure, and yeast for fermentation, but the exact flour and yeast choice depends on the recipe and style you are making. Britannica on bread
If you are just getting started, choose a fairly straightforward dough before trying very wet artisan styles. A simple sandwich loaf or a basic crusty loaf is easier to manage by hand than a sticky ciabatta-style dough.
Choose the Right Dough Method for Your Recipe
Not every bread dough should be handled the same way. The smartest method depends on how wet the dough is, how much strength it needs, and how comfortable you are working by hand.
Traditional kneading works best for moderate doughs
If the dough feels moderately firm and elastic, traditional kneading on the counter is a practical choice. This is the best fit for many sandwich breads and enriched doughs that need a more even, developed structure.
Use this approach when:
– The dough is soft but not soupy
– You want a straightforward, familiar method
– The recipe was written for a standard yeast loaf
Stretch-and-fold suits wetter doughs
Very sticky or high-hydration doughs are often easier to develop through stretch-and-folds. Instead of long kneading, you gently lift and fold the dough over itself during rest periods. This builds strength without forcing you to keep adding flour.
Use this approach when:
– The dough is wet and slack
– You want a lighter crumb or more open texture
– Kneading feels messy or unmanageable
Autolyse helps when dough feels tight or resistant
An autolyse is simply a rest after mixing flour and water before adding salt and yeast, or after a brief initial mix. That rest gives flour time to hydrate, which can make the dough easier to knead and less stubborn on the counter.
Use this approach when:
– The dough feels dry, stiff, or rough
– You want to reduce kneading time
– The flour needs a little time to absorb the liquid fully
For beginners, a simple rule works well: use traditional kneading for moderate, sandwich-style doughs; use stretch-and-folds for wetter artisan doughs; and use an autolyse when the dough feels tight or the flour needs time to hydrate. If the dough fights you, rest it. If it’s moderately firm, knead it. If it’s very sticky, fold it.
How to Mix Bread Dough by Hand
A good hand-mixed dough starts with even hydration. The goal is to get rid of dry flour pockets before you worry about kneading.
1. Combine the dry ingredients
Add the flour, salt, and yeast to your bowl if your recipe calls for mixing them together first. Stir with a spoon or dough whisk so everything is evenly distributed.
2. Add the liquid gradually
Pour in most of the water or milk first, then stir. Hold back a small amount if you are unsure, because it is easier to add a little more liquid than to fix a dough that has become too wet.
3. Stir until the dough looks shaggy
At this stage, the dough will probably look rough, lumpy, and uneven. That is normal. You are not trying to make it smooth yet. You are trying to make sure every bit of flour is moistened.
4. Let it rest if needed
If the dough seems dry in some places and sticky in others, cover it and let it sit for 10 to 20 minutes. That short pause often makes the next mixing or kneading round much easier.
5. Check for dry spots before moving on
Use your fingers or spoon to scrape the bottom and sides of the bowl. If you see flour hiding underneath, mix a little longer before turning the dough out.
A clean, even mix matters because dry flour pockets can stay hidden in the center of the dough and show up later as tough, underhydrated streaks.
How to Knead Bread Dough by Hand
Kneading is where the dough gets strength. You are not just pushing it around; you are aligning and developing the gluten so the loaf can trap gas and rise well.
A useful detail from King Arthur Baking is that its bread flour has a high protein content that helps provide structure, a lofty rise, and satisfying texture. That structural help still depends on proper mixing and kneading, especially when you are working without a mixer. King Arthur Baking’s bread flour and beginner loaf
Countertop kneading method
- Lightly flour the work surface, not the dough itself.
- Turn the dough out and gather it into a rough mound.
- Press the dough away from you with the heel of your hand.
- Fold it back over itself.
- Rotate it slightly and repeat.
The motion should feel rhythmic rather than aggressive. If the dough sticks, use a bench scraper to lift it instead of dumping in a handful of flour. Too much flour at this stage can make the loaf dry and dense.
Bowl kneading method
If your kitchen space is tight or the dough is only mildly sticky, kneading in the bowl can work well.
- Grab one side of the dough and stretch it up.
- Fold it toward the center.
- Turn the bowl a quarter turn.
- Repeat several times.
This technique is especially useful early on, before the dough becomes smoother. It is not as powerful as countertop kneading, but it can help organize a shaggy dough without making a mess.
A practical middle ground
Many bakers use both methods: a short mix in the bowl, a rest, then a few minutes of countertop kneading. That hybrid approach is often the easiest way to handle dough without a stand mixer.
How Long to Knead Dough and How to Tell It’s Ready
A fixed timer is less useful than the dough’s behavior. Two doughs can need very different amounts of kneading depending on flour type, hydration, and room conditions.
Instead of chasing an exact number, look for these signs:
- The dough becomes smoother
- It feels more elastic and less ragged
- It holds together instead of tearing easily
- It springs back somewhat when pressed
- It can stretch thin without immediately ripping
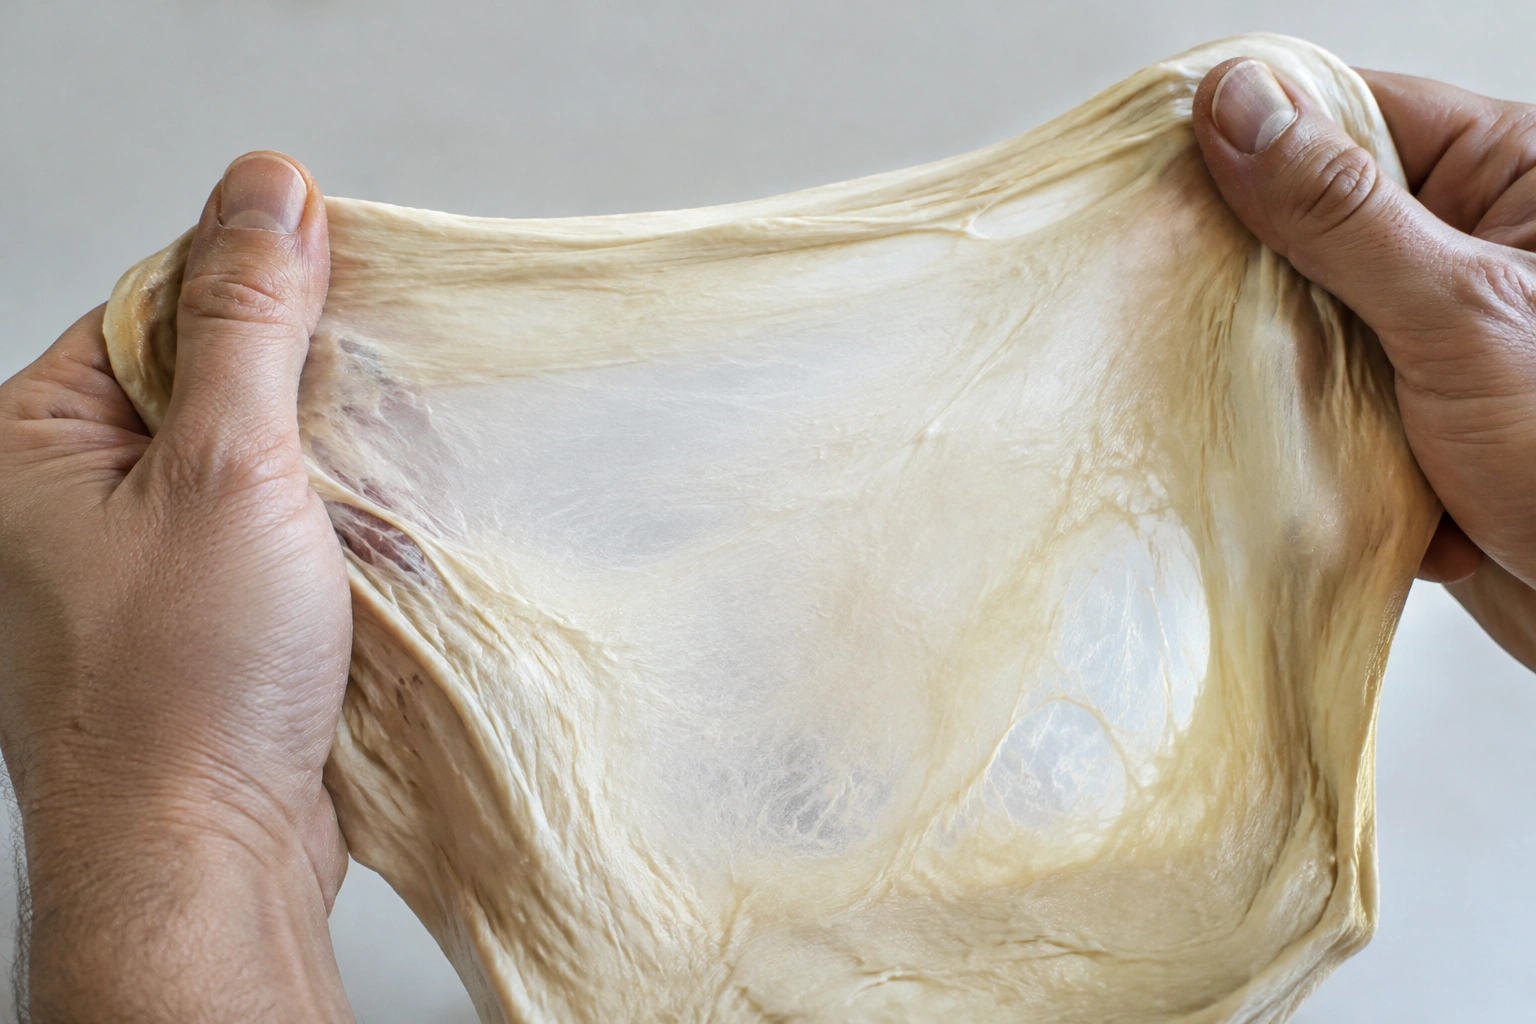
The windowpane test is a helpful check. Take a small piece of dough and gently stretch it between your fingers. If it stretches into a thin, translucent sheet before tearing, gluten development is usually in a good place. If it tears almost immediately, it needs more kneading or more rest.
Tactile cues matter more than appearance alone
A properly kneaded dough usually feels alive in your hands. It becomes tacky rather than gluey, smooth rather than shaggy, and supple rather than stiff. That change is often more useful than watching the clock.
High-hydration versus lower-hydration doughs
Wetter doughs often need less traditional kneading and more folding. Lower-hydration doughs are easier to knead by hand, but they may produce a tighter crumb if they are too dry. If you are new to bread making, a moderately hydrated dough is usually the most forgiving place to begin.
How to Handle Sticky, Dry, or Tough Dough
Most hand-mixed bread problems come from trying to fix the dough too quickly. A little patience usually works better than a big adjustment.
If the dough is too sticky
First, pause. Sticky dough is not automatically bad. Many good breads begin that way.
Try this sequence:
– Rest the dough for 10 to 20 minutes
– Use a bench scraper instead of adding lots of flour
– Lightly oil your hands if needed
– Add flour only if the dough is still too wet to handle, and do it in small pinches or about 1 tablespoon at a time
Use tackiness as your guide: a dough that clings a little is normal, but if it smears heavily on your hands and won’t hold shape at all after resting, it likely needs a small flour adjustment. The main risk here is overflouring. Once too much flour goes in, the dough can become dry, heavy, and harder to rise well.
If the dough is too dry
If the dough feels stiff, crumbly, or resistant to kneading, it may simply need more hydration.
Add water a teaspoon or tablespoon at a time and knead it in fully before deciding whether to add more. A dry dough often looks like it is refusing to come together, but a small amount of extra liquid can change that quickly.
If the dough feels tough and won’t stretch
That usually means one of two things: the dough is underdeveloped, or it needs a rest. Give it 10 minutes covered, then try again. Resting lets the gluten relax, which can make the dough easier to shape and less likely to tear.
Common Mistakes When Making Bread Without a Mixer
The most common error is treating hand mixing like a race. Bread rewards observation more than speed.
Here are the mistakes that cause the most trouble:
- Adding too much flour too early
- Stopping kneading because the dough “looks okay”
- Skipping rest periods
- Not mixing out dry flour pockets in the bowl
- Forcing a wet dough into a traditional kneading method
- Confusing sticky dough with underhydrated dough
A useful decision rule: if the dough is sticky but cohesive, keep going and let it rest. If it is dry and tearing, add a little water. If it is very wet and slack, switch to folds instead of fighting it on the counter.
Practical Example: Basic Hand-Mixed Sandwich Bread Workflow
Here is how a simple hand-mixed loaf might come together in a real kitchen.
- Mix flour, yeast, salt, and liquid in a bowl until no dry flour remains.
- Let the dough rest briefly if it feels rough or tight.
- Knead on the counter for several minutes, using folds and pushes.
- Check whether the dough is becoming smoother and more elastic.
- Perform a windowpane test if you want a clearer readiness check.
- Place the dough in a lightly oiled bowl for the first rise.
- After it has risen, shape it gently and let it proof again.
- Bake according to the recipe.
That workflow works because it balances effort with rest. You are not trying to brute-force the dough into strength; you are letting time help the gluten as much as your hands do.
How to Adapt a Stand-Mixer Recipe for Hand Mixing
A recipe written for a mixer can often be adapted, but the method may need a small adjustment.
What usually stays the same
- Ingredient amounts
- Yeast type
- Salt level
- Baking temperature
- Final loaf shaping and proofing
What often changes
- Mixing time
- Kneading method
- Use of rests or autolyse
- The order in which you add liquid
If a recipe assumes five to eight minutes of mixer kneading, you may need to replace that with a longer hand-kneading session or a mix of kneading and folding. For wetter doughs, a direct substitution is not always the best choice. A stretch-and-fold approach may produce a better result than trying to knead aggressively by hand.
A few practical adaptation rules help:
– If the recipe is for a lean sandwich loaf, start with the same flour and liquid amounts, then adjust only if the dough feels too stiff or too wet.
– If the dough is enriched with butter, eggs, or milk, expect it to take longer to develop by hand and use extra rest periods.
– If the dough was meant for a mixer and feels tight during hand mixing, pause for 10 to 15 minutes before adding more flour.
– If the dough is very sticky, resist the urge to “fix” it with a lot of flour; use rests and folds first.
If you want a broader look at how kneading works with machine support, you may also find our guide on kneading dough in a stand mixer useful for comparison.
Rise, Shape, and Bake After Hand Mixing
Once the dough is developed, the rest of the process is familiar.
First rise
Place the dough in a lightly oiled bowl, cover it, and let it rise until it has visibly expanded. The exact time depends on temperature and dough strength, so watch the dough rather than the clock.
Shaping
Turn the dough out gently. Shape it with enough tension to support the loaf, but do not press out every bit of gas. You want structure, not a flattened mass.
Final proof and bake
Let the shaped loaf rise again until it looks puffy and ready for the oven. Then bake according to your recipe. Handle the hot pan or stone carefully when it is time to load the loaf.
If you are interested in another simple bread path, our guide to flatbread without yeast is a useful contrast because it uses a very different dough strategy.
Frequently Asked Questions About Bread Without a Stand Mixer
Can you make bread without a stand mixer?
Yes. Bread dough can be mixed and kneaded by hand successfully. The main difference is that you provide the gluten development with your hands, rests, and time instead of a machine.
How long should you knead dough by hand?
There is no universal number that fits every dough. Judge readiness by smoothness, elasticity, and the windowpane test rather than a fixed timer.
Do I need to add more flour if the dough is sticky?
Not necessarily. Sticky dough is common. Try resting it first, then use a bench scraper and lightly floured hands before adding more flour in small amounts.
Is stretch-and-fold better than kneading?
For very wet doughs, often yes. For moderately firm doughs, traditional kneading is usually simpler. The better method is the one that matches the dough’s hydration and your comfort level.
Will hand-kneaded bread be as good as mixer-kneaded bread?
It can be. Good bread depends on proper gluten development, fermentation, shaping, and baking. A mixer changes the workflow, but it does not automatically make better bread.
What is the easiest bread to make by hand?
A basic loaf with moderate hydration is usually the easiest place to begin. Recipes with just a few everyday ingredients and straightforward instructions are especially helpful for beginners.
Should I use an autolyse?
If the dough feels tight, dry, or hard to knead, an autolyse or short rest can help. If the dough is already soft and manageable, you may not need it.
When to Consult a Master Baker
If your dough repeatedly tears, never seems to strengthen, or behaves differently every time despite careful mixing, it may be worth getting a more experienced baker to look at your method. Sometimes the issue is not the recipe at all, but flour choice, hydration, room temperature, or a small technique problem that is hard to spot alone.
A baker with experience can often spot the likely issue quickly, but that does not mean every dough problem is obvious on sight. In practice, the best fix still comes from testing small adjustments to rest time, hydration, or mixing method.
Bread without a stand mixer is not a compromise version of bread making. It is the bread-making process stripped down to the essentials: flour, water, yeast, salt, and your hands. Once you learn to read the dough, you gain a skill that works in any kitchen.