Baking soda and vinegar can help lift surface grime from tile grout and make it look brighter. They work best on everyday buildup, not on deep stains or damaged grout.
Clean tile grout baking soda vinegar is a simple DIY method for lifting everyday grime, especially in kitchens and bathrooms. Used carefully, it can help grout look brighter without relying on harsh chemicals.
- Best use: Good for soap film, light grease, and general dullness.
- Safety first: Avoid vinegar on natural stone and never mix it with bleach.
- Application: Use a thick baking soda paste, then spray lightly and scrub gently.
- Limit: Deep stains, mold, and aging grout may need stronger treatment.
- Maintenance: Dry grout well and clean high-traffic areas regularly.
Why Baking Soda and Vinegar Are Used on Tile Grout
Baking soda is mildly abrasive and slightly alkaline, so it can help loosen sticky residue sitting on the surface of grout. Vinegar is acidic, which can help break down some mineral film and soap buildup.
Together, they create a fizzing reaction. That bubbling does not magically deep-clean grout on its own, but it can help disturb loose dirt so scrubbing is easier. For a fuller explanation of the chemistry, see our guide to the baking soda and vinegar reaction explained simply.
How the fizzing reaction helps loosen surface grime
When baking soda and vinegar meet, they produce carbon dioxide bubbles. In a grout line, that action can lift soft soil, dried spills, and soap film from the textured surface.
The reaction works best on grime sitting near the top of the grout, not on stains that have soaked in deeply. Think of it as a helper for scrubbing, not a replacement for elbow grease.
What this method can and cannot remove from grout lines
This method is often useful for everyday discoloration from cooking splatter, bathroom residue, and general dullness. It may improve the look of grout that has collected a thin layer of dirt over time.
It is less effective on old stains, mold growth that has penetrated porous grout, rust marks, or grout that has already aged unevenly. If the grout is permanently stained, you may get a cleaner look, but not a true whitening result.
If your grout is sealed, damaged, or part of a natural stone installation, check the tile manufacturer’s care guidance before using vinegar. Acid can etch some stone surfaces and may shorten the life of certain sealers.
Materials, Ratios, and Safety Checks Before You Start
Before mixing anything, look at the tile type and the condition of the grout. A careful start matters more than using a stronger mixture.
Recommended baking soda paste consistency and vinegar dilution options
A practical baking soda paste should be thick enough to stay in the grout line, similar to soft toothpaste. If it is too runny, it will slide off the joints and waste product.
For vinegar, many people use it straight in a spray bottle for light cleaning, but a diluted mix can be a gentler choice for routine use. If you want to reduce the acid strength, mix equal parts vinegar and water. Always test a small hidden area first.
Tools that make grout cleaning easier: brush, spray bottle, microfiber cloth
A small grout brush gives you better control than a large scrub pad. An old toothbrush can also work if the bristles are firm enough to reach into the joint without spreading slurry across the tile.
A spray bottle helps you apply vinegar lightly instead of soaking the area. Keep a microfiber cloth nearby for wiping residue and drying the tile after rinsing.
Do not mix vinegar with bleach or any cleaner that contains bleach. That combination can create dangerous fumes. If you are unsure what was used on the tile before, rinse thoroughly and let the area dry before starting.
When to avoid vinegar on natural stone, damaged grout, or sealed surfaces
Vinegar is not a good choice for marble, limestone, travertine, or other acid-sensitive stone. It can dull the finish or cause visible etching.
Avoid vinegar if the grout is cracked, crumbling, or separating from the tile. Liquid can seep in and make the damage worse. If you are dealing with a sealed surface, use the manufacturer’s recommended cleaner instead of assuming vinegar is safe.
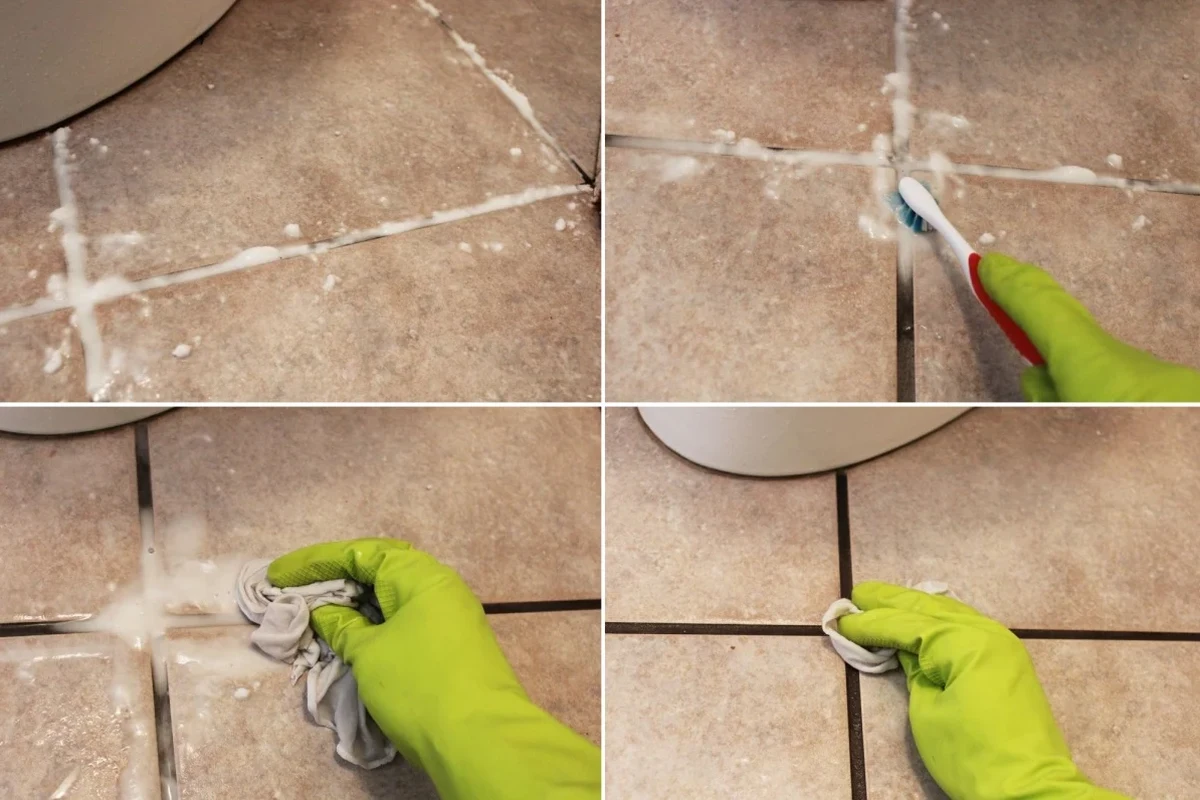
Step-by-Step Grout Cleaning Method for a Bright Finish
The safest approach is to clean the tile first, then work directly on the grout. That keeps loose dirt from spreading back into the joints.
Wipe or sweep away crumbs, dust, and loose soil before you touch the grout. On kitchen floors, this helps prevent greasy debris from smearing into the lines while you scrub.
Spoon or spread the paste directly into the grout lines. Press it gently so it fills the joint instead of sitting only on top of the tile.
Mist the paste with vinegar just enough to activate a gentle fizz. Let it sit for a few minutes, then scrub the grout with short back-and-forth strokes. Avoid aggressive pressure, which can wear down older grout.
Wipe the area with clean water and a microfiber cloth, then dry it well. Check the grout once it is fully dry, since damp grout can look darker than it really is.
If the paste dries too quickly, work in a smaller section. A manageable area gives the fizz time to loosen grime before you scrub.
Pre-cleaning the tile surface to prevent spreading dirt into grout
Dry debris is easier to remove than muddy residue. A quick sweep, vacuum, or wipe-down can make the whole process more effective.
This is especially important on kitchen floors where oil, flour dust, and food particles can settle in corners. If you are also cleaning nearby appliances or oven splatter, our article on baking soda vinegar cleaning ovens covers a similar low-odor approach for baked-on messes.
Applying baking soda paste into grout lines
Use enough paste to coat the grout, but not so much that it floods the tile surface. A thin, even layer is usually easier to scrub and rinse.
If the grout lines are narrow, a small spoon or your fingertip in a glove can help place the paste more precisely. Focus on the dirtiest lines first so you can judge how much cleaning they actually need.
Spraying vinegar, waiting the right amount of time, and scrubbing safely
After spraying, wait until the fizzing slows. That usually means the active reaction has done most of its surface work, and it is time to scrub.
Use firm but controlled pressure. You want to clean the grout, not grind away the top layer. If the grout starts to look rough or sandy, stop and reassess before continuing.
Rinsing, drying, and checking whether a second pass is needed
Rinsing removes loosened residue and any leftover baking soda film. Skipping this step can leave the tile looking cloudy or streaky once it dries.
After the area dries, inspect it in good light. A second pass may help on isolated spots, but if the grout still looks dingy overall, the stain may be too old for this method alone.
Grout is porous, so it can hold onto stains more easily than glazed tile. That is why surface cleaning often improves the look, but does not always restore the original color.
Common Grout Stains, Problem Areas, and What This Method Does Best
Different stains respond differently. Knowing the source of the discoloration helps you decide whether baking soda and vinegar is a good first step.
Kitchen grease, bathroom soap scum, and everyday discoloration
In kitchens, light grease and food splatter are common causes of dull grout. In bathrooms, soap scum, body oils, and hard-water film often create a gray or yellow cast.
This method is often most helpful when the problem is a thin layer of buildup rather than a deep stain. It can also work well for regular maintenance between deeper cleanings.
Mold, mildew, and deeply embedded stains that may need stronger treatment
If you see black spotting, fuzzy growth, or a musty smell, you may be dealing with mold or mildew. In that case, surface fizzing alone is usually not enough.
For health and safety, follow recognized guidance for mold cleanup and ventilation, especially in damp rooms. If the growth is widespread, recurring, or tied to hidden moisture, professional help may be the safer option.
High-traffic grout lines versus lightly soiled areas
Entryways, kitchen walkways, and shower floors tend to collect more soil than low-use areas. These spots may need more than one cleaning session or a different product after the first pass.
Lightly soiled grout often responds faster and may show a visible brightness boost after just one careful cleaning. The more traffic a line gets, the more likely it is to need regular upkeep.
- Uses common household ingredients
- Can lift surface grime and soap film
- Useful for small touch-up jobs
- Not a fix for deep stains or damage
- Vinegar is unsafe for some stone surfaces
- Can leave residue if not rinsed well
Mistakes That Can Leave Grout Dull, Damaged, or Streaky
Most disappointing results come from using too much product or expecting too much from one cleaning round. A careful method usually works better than an aggressive one.
Using too much vinegar or scrubbing with excessive force
More vinegar does not automatically mean cleaner grout. Too much liquid can wash the paste away before it has time to work, and strong acid use can be hard on sensitive surfaces.
Heavy scrubbing can also wear down older grout, especially if the joints are already thin or sandy. If you need to press hard, the grout may be too damaged for a simple DIY refresh.
Skipping a rinse and leaving residue behind
Baking soda residue can dry into a chalky film if it is not wiped away. That film may make the tile look cloudy even when the grout itself is cleaner.
Rinse with clean water and dry thoroughly. This final step is what often gives the floor or wall its brighter finish.
Expecting whitening results on permanently stained or aging grout
Old grout can darken from age, wear, or previous sealers breaking down. In those cases, cleaning may improve the appearance without restoring the original color.
If the grout is unevenly colored across the whole room, the issue may be wear rather than surface soil. That is a normal limit of DIY cleaning, not a failure of the method.
The grout looks cleaner while damp, but turns dull again after drying.
This usually means residue was left behind or the stain is deeper than surface grime. Rinse more thoroughly, dry completely, and repeat only on small sections if needed.
How to Maintain Cleaner Grout After the First Deep Clean
Once the grout looks better, the goal is to keep it from building up again too quickly. Small habits make a big difference.
Routine touch-up cleaning schedule for kitchens and bathrooms
For busy kitchens and bathrooms, a light touch-up every one to two weeks can help reduce buildup. High-traffic floors may need more frequent attention than wall tile or low-use areas.
You do not need to deep-clean every time. Often, a quick wipe and targeted scrub on the dirtiest lines is enough to keep grout from looking tired.
Drying habits, ventilation, and spill cleanup to reduce future buildup
Moisture is one of grout’s biggest enemies because it helps grime stick and can encourage mildew. Good ventilation in bathrooms and prompt cleanup in kitchens both help.
Wipe spills before they dry, and do not leave standing water on the floor after mopping. Dry grout tends to stay cleaner longer and is less likely to develop that gray film.
When sealing grout makes sense for longer-lasting results
Sealing can help reduce how quickly grout absorbs spills and dirt, especially in kitchens, entryways, and showers. It is not a permanent fix, but it can make maintenance easier.
Only seal grout that is fully clean and fully dry, and follow the sealer label carefully. Product instructions matter here because sealers vary in formula and application needs.
When to Use a Different Cleaner or Call a Professional
Sometimes the safest choice is to stop at a basic clean and use a stronger method only when it is appropriate. That is especially true when the surface is old, fragile, or expensive.
Signs that grout is crumbling, cracked, or beyond DIY cleaning
If grout flakes off, feels soft, or has open cracks, cleaning may not solve the problem. Water can get behind the tile and make the damage worse over time.
In that situation, repair or regrouting may be needed before any real cleaning can help. A cleaner finish is only possible when the base material is still intact.
Situations where commercial grout cleaners or steam cleaning may be better
Commercial grout cleaners can be more effective on stubborn buildup, but they should be chosen carefully and used according to the label. Steam cleaning may also help loosen embedded soil without relying on acid, though some grout and tile types handle steam better than others.
If you are comparing methods, think about the tile material, stain type, and how much scrubbing the surface can tolerate. For a broader household use case, our clean drains with vinegar baking soda fast and easy guide shows another place where the same ingredients are helpful, but still limited by the situation.
Final recap: choosing the safest method for a bright, clean tile finish
Clean tile grout baking soda vinegar works best as a gentle, practical way to lift surface grime and freshen tired-looking grout. It is most useful when the problem is everyday buildup, not deep damage or permanent staining.
Start with a small test area, use light pressure, rinse well, and avoid vinegar on stone or compromised grout. If the grout still looks uneven after a careful cleaning, the safest next step may be a different cleaner, sealing, or professional repair.
Keep the area ventilated, wear gloves if your skin is sensitive, and never combine vinegar with bleach or unknown cleaners. When in doubt, use the mildest safe method first.
Frequently Asked Questions
They can improve the look of surface grime and light discoloration. Deep or permanent stains may need a stronger cleaner, sealing, or repair.
Straight vinegar is stronger, but a diluted mix can be gentler for routine cleaning. Always test a small hidden area first, especially on older grout.
Let it fizz briefly, then scrub while the paste is still active. Avoid letting it dry completely on the surface.
No. Avoid vinegar on natural stone like marble, limestone, and travertine, and follow the tile manufacturer’s care instructions for sealed surfaces.
Rinse and dry the area fully before judging the result. If it still looks dull, the stain may be deep, the grout may be aged, or a different cleaner may be needed.
Use it as an occasional touch-up rather than a daily cleaner. For kitchens and bathrooms, light maintenance and good drying habits help reduce the need for deep scrubbing.
