
How to Proof Dough in an Oven: A Practical Guide for Reliable Bread Rise

If you’ve ever stood over a bowl of dough wondering whether your kitchen is too cold, you’re not alone. Proofing is one of those bread steps that seems simple until the dough stalls, dries out, or races past ready. A home oven can solve that problem beautifully—if you use it as a gentle, controlled warm space rather than a place to “help” the dough by heating it aggressively.

Proofing, in plain language, is the rise that happens after mixing and shaping. Yeast keeps producing gas, gluten stretches, and the dough gains volume and structure. The goal is warmth without heat stress: enough to wake up the yeast, not enough to cook the dough or weaken it.
A well-managed oven proofing setup gives you that middle ground. It can be especially useful in a cold house, during winter, or anytime your dough seems to move at a snail’s pace.
What It Means to Proof Dough in an Oven
When bakers say “proof,” they usually mean letting dough rise in its final stage before baking. In an oven, that rise happens in a small enclosed space that holds warmth better than a countertop.
The big advantage is a more controlled environment. Room temperature can swing a lot from one part of the kitchen to another. An oven gives you steadier conditions, which matters because yeast responds strongly to temperature. Too cool, and the dough crawls. Too warm, and the dough can rise unevenly or overproof before you notice.
For home bakers, the sweet spot is a warm environment, not a hot one. Think “cozy” rather than “heated.” If your oven setup feels like it could brown a casserole, it’s too hot for dough.
What You Need Before You Start
You do not need special bakery equipment to proof dough in an oven. A few simple tools make the process safer and more predictable:
- A bowl, tray, or pan that fits comfortably in the oven
- Plastic wrap, a lid, or a damp towel to cover the dough
- An oven thermometer, if you have one
- A mug or bowl for hot water, if you want extra humidity
- Oven mitts or a towel for handling warm containers
The cover matters more than many beginners realize. Dough exposed to dry oven air can form a skin on the surface. That skin restricts expansion, which can leave you with a loaf that rises unevenly or tears in odd places. A light coating of oil on the bowl or dough can also help reduce sticking and slow surface drying.
If you’re using a towel, make sure it’s damp, not dripping. A soaked towel can cool too quickly or drip onto the dough.
Choose the Safest Oven Proofing Method
Not every oven behaves the same way. Some have a proof setting. Some have a light that gives off gentle warmth. Some run surprisingly hot even when they seem “off.” Before you trust your dough to the oven, choose the method that matches your appliance and your dough.
| Method | Warmth | Humidity | Best For | Main Trade-Off |
|---|---|---|---|---|
| Oven light only | Mild | Low to moderate | Cool kitchens, simple setup | Some ovens barely warm the cavity |
| Turned-off oven after brief warming | Moderate | Low unless covered | Ovens with a reliable low residual heat | Easy to overshoot if the oven stays too hot |
| Bowl of hot water in an off oven | Mild to moderate | High | Dry kitchens, enriched dough, skin-prone dough | Needs monitoring and safe containers |
| Built-in proof setting | Usually best if calibrated well | Varies by oven | Bakers who know their oven’s behavior | Some proof settings run warmer than ideal |
Use the method that fits both your oven and your dough:
- Cool kitchen + lean dough: start with the oven light only.
- Dry kitchen + enriched dough: use hot water for added humidity.
- Oven that holds heat well: use residual heat only if you can verify the temperature is gentle.
- Oven with a proven proof setting: use it if an oven thermometer confirms it stays in a safe range.
Oven light only
This is the simplest method. Close the dough in the oven with the light on and let the small amount of heat from the bulb do the work. It’s often enough for a normal home kitchen, especially if your room is cool.
The drawback is inconsistency. Some ovens generate barely any warmth from the light. Others run hotter than expected. If your dough seems to move too fast or the surface feels warm, check the cavity temperature with an oven thermometer before relying on this method.
Turned-off oven with residual heat
A common technique is to warm the oven briefly, then turn it off and place the dough inside once the temperature falls into a gentle range. Sunrise Flour Mill recommends turning the oven on to the lowest setting and switching it off once it reaches about 100 to 110 degrees Fahrenheit; if your oven won’t go that low, turn it off before it reaches that point. That’s a useful practical target when you need a warm chamber without active heat. Source
The trade-off is obvious: if your oven holds heat well, it can stay too warm for too long. That’s why a thermometer is helpful. Guessing is where trouble begins.
Hot water for warmth and humidity
A bowl or mug of hot water placed in an off oven can add both gentle warmth and moisture. That combination is especially useful for dough that tends to skin over, such as enriched doughs or doughs proofed in a dry climate.
The upside is moisture retention. The downside is that the water cools over time, so the environment may change during proofing. It’s a good method when you want a softer, more forgiving atmosphere, but it still needs a quick temperature check if your oven is known to run warm.
Built-in proof setting
If your oven has a proof setting, it can be very convenient. But convenience is not the same as accuracy. Some proof settings are excellent; others are warmer than you’d want for delicate dough. Treat it as a tool to test, not a guarantee. A quick trial run with an oven thermometer tells you far more than the label on the control panel.
Step-by-Step: How to Proof Dough in an Oven
Here’s a reliable home method that works for most yeast doughs.
-
Choose your setup. Decide whether you’re using the oven light, residual heat, hot water, or a proof setting. If you’re unsure, start with the gentlest option and adjust next time.
-
Prepare the dough container. Put the dough in a lightly oiled bowl or pan. The oil helps prevent sticking and can reduce surface drying.
-
Cover the dough. Use plastic wrap, a lid, or a damp towel. The cover should trap moisture without pressing into the dough.
-
Check the oven temperature if possible. If you’re using residual heat or a proof setting, verify that the cavity is in a warm range, not a hot one. Some ovens run warmer than expected even with only the light on.
-
Place the dough in the oven. Set it on a middle rack or a stable surface where it won’t touch heating elements, the door, or any hot metal. Avoid crowding the cavity with other pans that could block airflow or create hotspots.
-
Close the door and leave it alone. Repeated opening lets heat and humidity escape. If you need to check progress, do it quickly.
-
Watch for readiness, not just time. Dough may be ready sooner than you expect in a warm oven. Check it with sight and touch rather than assuming a fixed schedule.
How Long Dough Usually Takes to Proof in the Oven
There is no single proofing time that fits every dough. Temperature, yeast strength, dough hydration, and enrichment all matter.
Use these practical ranges as a starting point:
| Dough type | Oven light only | Residual heat / proof setting | Hot water method |
|---|---|---|---|
| Lean doughs | about 45 to 90 minutes | about 30 to 60 minutes | about 40 to 75 minutes |
| Enriched doughs | about 60 to 120 minutes | about 45 to 90 minutes | about 50 to 100 minutes |
| Very cool dough or cool kitchen | about 60 to 120 minutes | about 40 to 75 minutes | about 45 to 90 minutes |
These are starting ranges, not guarantees. A dough that would take 60 to 90 minutes at room temperature may be ready sooner in a warm oven, while enriched dough may still need the longer end of the range.
The best habit is to check regularly once the dough looks noticeably puffed. Warm environments can move from “not ready” to “overproofed” faster than beginners expect.
If you want a deeper timing framework for different breads, this guide on how long bread dough should rise pairs well with oven proofing.
How to Tell When Dough Is Properly Proofed
“Double in size” is helpful, but it is not enough by itself. Some doughs are ready before they fully double. Others can double and still be underdeveloped if the dough is dense or the fermentation is uneven.
Use a few cues together:
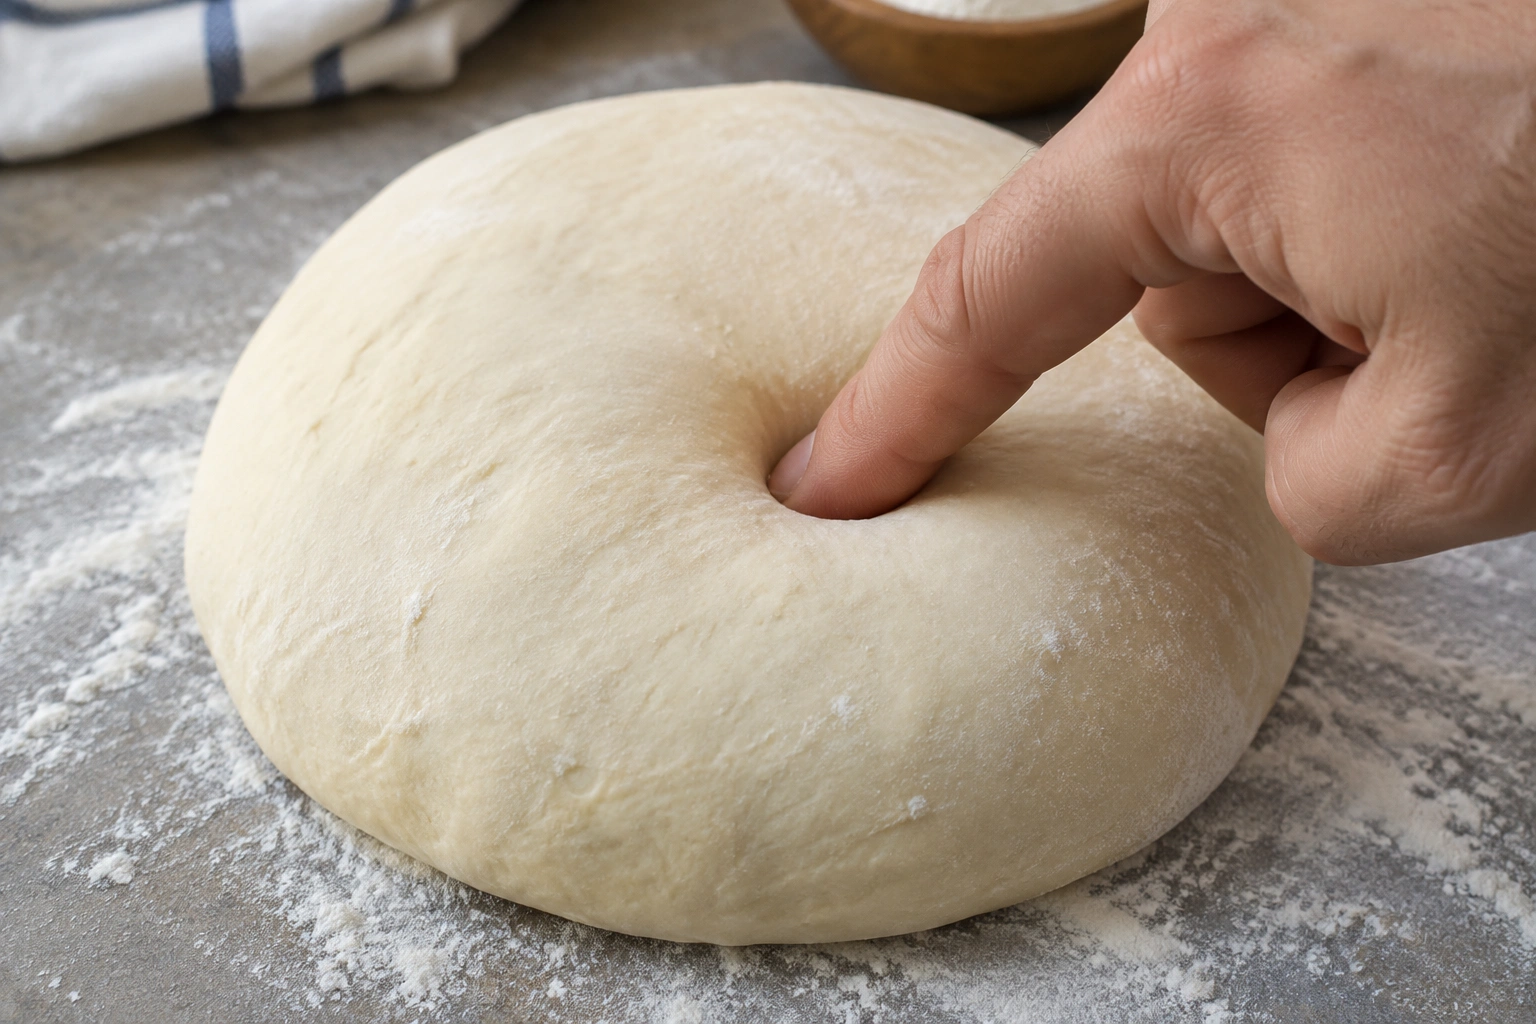
The finger poke test
Gently press a floured finger into the dough about half an inch deep.
- If the indentation springs back quickly, the dough likely needs more time.
- If it springs back slowly and leaves a slight impression, it is usually ready.
- If the dent stays deep and the dough feels fragile, it may be overproofed.
Enriched dough and very airy dough can respond a little differently. Enriched dough may spring back more slowly even when it is ready, while very airy dough can feel delicate and leave a softer impression without being overproofed. Use the poke test with the dough’s overall look and feel, not by itself.
The look of the dough
Properly proofed dough often looks fuller, smoother, and slightly airy. It may jiggle a little if you move the bowl. The surface should still look elastic, not collapsed or wrinkled.
The feel of the dough
Well-proofed dough feels lighter and more extensible than when it first went into the oven. If it feels tight and resistant, it likely needs more time. If it feels weak, slack, or overly gassy, it may have gone too far.
A warm oven can speed everything up, so checking early is smarter than waiting for a dramatic visual change.
Common Mistakes to Avoid
The most common oven-proofing errors are easy to prevent once you know what to watch for.
Letting the oven get too hot
This is the biggest risk. Yeast thrives in warmth, but excessive heat can damage it and start pushing the dough toward cooking instead of proofing. That’s why a thermometer is such a useful safeguard.
Leaving dough uncovered
Dry oven air can form a skin on the dough. That skin restricts rise and can create a tough top layer. Cover the dough unless your setup has very high humidity and you’re monitoring it closely.
Assuming the light is always safe
An oven light is not a universal proofing solution. Some ovens stay too cool; others warm more than you’d expect. Check your own oven instead of trusting the idea in general.
Relying on time alone
A warm oven can cut proofing time significantly, but dough readiness is still about structure and feel. If you only watch the clock, you can miss the ideal window.
Forgetting that enriched dough behaves differently
Brioche, cinnamon rolls, and similar doughs often rise more slowly than lean doughs. If you proof them on the same schedule as a plain sandwich loaf, you may underproof them or rush the process.
Troubleshooting Oven Proofing Problems
The dough is rising too slowly
If the dough seems sluggish, the oven is probably too cool. Try one of these fixes:
- Turn the oven light on if it isn’t already on
- Add a bowl of hot water for a little extra warmth
- Move the dough to the warmest safe part of the oven cavity
- Check whether your oven’s proof setting is actually warm enough
The dough is drying out
That usually means the oven air is too dry or the cover is too loose. Use a tighter cover, switch to plastic wrap or a lid, or add a bowl of hot water to increase humidity.
The dough is rising unevenly
Uneven rise often points to hot spots or inconsistent heat. Rotate the bowl only if necessary and only briefly. Better yet, move the dough to a more stable setup next time. If one side of the oven is hotter, avoid placing the bowl near that area.
The dough seems too warm or starts to collapse
Remove it immediately and let it sit in a cooler spot. If the dough has already become fragile and overexpanded, you may still be able to bake it, but expect less oven spring. For future batches, reduce the oven temperature, shorten the warm-up time, or skip the residual-heat method.
How Oven Proofing Differs for Lean Dough and Enriched Dough
Lean doughs and enriched doughs do not behave the same way in a warm oven.
Lean dough
Lean doughs contain little or no fat and sugar beyond the basics. They usually ferment more predictably and can handle a straightforward proofing environment. Pizza dough and artisan-style bread dough often do well with a simple warm oven setup.
Enriched dough
Butter, eggs, sugar, and milk slow fermentation and can make the dough more sensitive to heat. These doughs benefit from a gentler, slightly more humid setup. A bowl of hot water can help keep the surface from drying while the dough rises more gradually.
That difference matters because a fast rise is not always a better rise. Enriched dough needs time to build strength and tenderness. If you rush it, the final texture can be dense or uneven.
Practical Examples of Oven Proofing at Home
A cold kitchen in winter
Your room is chilly, and the dough barely moves on the counter. Use the oven light or a lightly warmed, turned-off oven. Cover the bowl well and check the dough a little earlier than usual. This is the classic case where oven proofing saves the day.
A dry oven with a brioche dough
If the dough surface keeps tightening or forming a skin, place a mug or bowl of hot water in the oven alongside the covered dough. The added humidity helps protect the surface while the richer dough rises.
An oven light that runs hot
Some ovens surprise you. If the light alone makes the cavity warmer than expected, treat that setup as a real proofing environment and not just a storage space. An oven thermometer will tell you whether the light is helping or overheating.
A pizza dough after a brief warm-up
If you warm the oven briefly and then turn it off, wait until the temperature falls into a gentle range before adding the dough. That method can work well, but it rewards attention. If the oven still feels hot, wait longer.
When to Consult a Master Baker
If your dough repeatedly overproofs, rises unevenly, or seems to change behavior from batch to batch, the issue may be less about timing and more about formula, flour choice, or fermentation management. That’s the point where a more experienced baker can help you diagnose the bigger pattern rather than just the symptom.
Final Thoughts
Proofing dough in an oven is really about control. When you create a warm, covered, gently humid space, you give yeast the conditions it needs to do its work without pushing the dough too far. The method is practical, but it rewards awareness: check the temperature, cover the dough, and judge readiness by feel as much as by time.
Once you’ve used your own oven a few times, you’ll learn its personality. That’s when this method becomes less of a trick and more of a dependable part of your bread routine.