Baking soda galaxy ornaments use a thickened paint mixture to create a soft matte space effect on holiday ornaments. With thin layers, careful drying, and a few star details, the craft looks polished without being difficult.
Baking soda galaxy ornaments are a simple way to make holiday decor look dreamy, cosmic, and handmade without needing advanced craft skills. The baking soda helps create a soft matte finish that makes layered blues, purples, and blacks look more like a night sky than flat paint.
- Texture matters: Baking soda softens shine and helps create the galaxy’s matte, cloudy look.
- Thin layers work best: Build color slowly to avoid chalkiness, cracking, or muddy blends.
- Base choice affects results: Foam, plastic, and wood each change how the paint grips and dries.
- Detailing should stay light: A few stars and shimmer accents look better than heavy glitter coverage.
- Dry fully before handling: Let the ornament set completely to protect the finish and prevent smears.
What Baking Soda Galaxy Ornaments Are and Why They Became a Popular DIY Craft
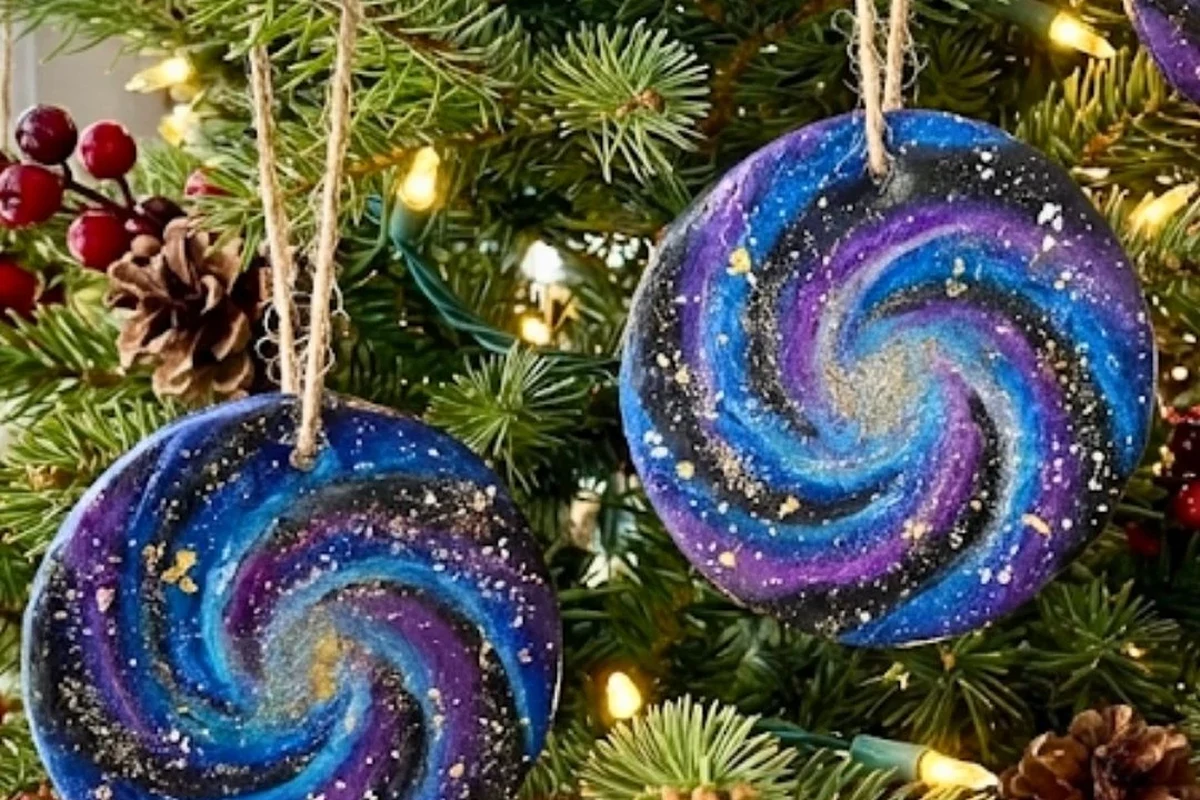
Baking soda galaxy ornaments are decorated ornaments finished with a baking soda paint or paste mixture so the surface looks slightly textured and velvety. That texture softens shine, which helps the colors read as deep space, nebula clouds, and scattered stars instead of glossy craft paint.
This craft became popular because it is flexible, inexpensive, and easy to adapt for different ages and skill levels. It also works well for winter holidays, space-themed parties, school projects, and handmade gifts, especially when you want something more interesting than a plain painted ornament.
The visual effect: how the “galaxy” look is created
The galaxy look comes from contrast. Dark base colors suggest outer space, while lighter swirls, speckles, and shimmer mimic distant clouds and stars.
Baking soda changes the surface by adding body to the paint and reducing gloss. That slight chalky finish helps layered colors blend softly, which is useful when you want a nebula effect rather than hard stripes.
Why this craft appeals to families, classrooms, and seasonal decorators
Families like it because the process is forgiving. Small mistakes often disappear under the next layer of color, and the finished ornament usually looks intentional even when the brushwork is loose.
Classrooms appreciate it because the materials are familiar and the visual result is dramatic. Seasonal decorators also like that the ornaments can be customized to match a tree color palette, a winter display, or a gift wrap theme.
If you want a cleaner science-style explanation of why baking soda changes texture, it helps to think of it as a filler that makes paint thicker and less reflective. It is not a leavening job here; it is mainly a surface-finish tool.
Materials, Ingredients, and Tool Choices for a Clean, Durable Finish
The best results come from choosing a sturdy ornament base and a paint that can grip it well. The exact supplies can vary by brand, but most versions of this craft use baking soda, acrylic paint, small brushes, and a way to hang the ornament once it dries.
Baking soda’s role in the texture, opacity, and matte surface
Baking soda makes the paint feel thicker and less slick. That usually increases opacity a little and creates the soft, dusty finish that suits a galaxy design.
Too much baking soda can make the mixture crumbly or hard to spread, though, so the goal is a paintable paste rather than a dry paste. If the mixture drags on the ornament, thin it with a little more paint until it brushes on smoothly.
Best ornament bases: foam, plastic, wood, and paper options
Foam ornaments are easy for beginners because they are light, forgiving, and less likely to crack if handled gently. Plastic ornaments are also a good choice, especially smooth ones that accept paint well after a light cleaning.
Wood ornaments can look polished and durable, but the grain may show through unless you prime them. Paper ornaments are the least durable, so they are better for short-term classroom projects or displays that will not be handled much.
Paint, glitter, sealant, and hanging hardware considerations
Acrylic paint is usually the most practical choice because it dries fairly quickly and adheres well to many ornament surfaces. Glitter can add a starfield effect, but too much can overwhelm the galaxy look and make the ornament feel busy.
If you use a sealer, choose one that is suitable for the ornament material and follow the label directions. Hanging hardware should be secure enough to support the ornament after it dries, especially if you add several layers of paint.
Use craft materials only as directed by the manufacturer. If children are helping, keep small ornament parts, sharp hooks, and spray sealers out of reach, and work in a ventilated area.
How to Make Baking Soda Galaxy Ornaments Step by Step
There is no single perfect formula, because paint brands and ornament surfaces vary. Start with a small batch and adjust as needed so the mixture spreads evenly without looking watery or grainy.
Wipe the surface clean and dry. If the ornament is very shiny, a light scuff or primer can help the paint grip better.
Stir baking soda into acrylic paint until it becomes a thick, brushable paste. Add baking soda gradually so you can stop before the texture turns chalky or clumpy.
Apply a deep color first, such as navy, black, or deep violet. Let it dry enough that the next layer does not smear when touched lightly.
Use a sponge or soft brush to place lighter blues, purples, pinks, or teal in irregular patches. Blend the edges gently so the colors look cloudlike rather than striped.
Flick on tiny white specks, dot on stars, or add a small amount of shimmer paint. Stop before the surface becomes crowded.
Mixing ratios for the baking soda paint or paste effect
A practical starting point is to add baking soda a little at a time to your acrylic paint until the mixture looks thick like frosting or heavy cream, depending on the effect you want. For smoother coverage, use less baking soda; for a more textured matte finish, use a bit more.
If the mixture looks dry before it reaches the ornament, it likely has too much baking soda. If it looks glossy and thin, it needs more powder or a second textured coat after the first layer dries.
Clean the ornament, gather tools, and mix a small test batch of paint.
Let each layer dry until it no longer feels tacky before adding another color.
Not needed for this craft, but allow the ornament to fully set before hanging or storing.
Layering color to mimic nebula clouds and star fields
The strongest galaxy effects come from layering, not from trying to get the full look in one coat. Start dark, then add color in broken patches, leaving some of the base visible so the ornament still feels like space.
After the color layers, add white or pale specks with a toothbrush, stiff brush, or fine-tip brush. A few sharp dots can suggest stars better than a heavy dusting that covers everything.
Drying times, handling, and when the ornament is fully set
Drying time depends on the ornament material, paint thickness, humidity, and how much baking soda is in the mixture. A thin layer on foam may dry faster than a thick layer on wood or plastic.
The ornament is fully set when it feels dry to the touch, no longer cool or tacky, and does not smear when gently handled. If you plan to seal it, wait until the paint is completely dry first.
Baking soda works especially well in crafts where you want a soft matte look, which is why it is also popular in other finishing projects, including some baking soda cleaning methods that rely on its gentle, non-glossy residue.
Design Techniques That Make the Galaxy Effect Look More Realistic
Realistic galaxy ornaments usually have depth, uneven contrast, and a few bright highlights. The goal is to suggest space, not to paint every detail literally.
Color combinations that work best in 2026 craft trends
For current craft styling, deep navy with violet, indigo, plum, and a touch of teal remains a strong base. Soft pink, icy blue, and silver accents can make the ornament feel more modern without losing the cosmic look.
Black can be useful, but it works best when balanced with color. If the ornament is only black and white, it may read more like a chalkboard surface than a galaxy.
Using sponges, brushes, splatter, and dry-brush methods
Sponges are useful for soft cloud shapes because they dab color on without hard edges. Brushes are better for controlled blending and for placing small highlights where you want them.
Splatter creates the starfield effect, but it should be used lightly. Dry-brushing a small amount of pale paint over raised texture can also bring out depth without making the ornament look muddy.
Work in thin layers. A galaxy design usually looks better after three light passes than after one heavy coat, because the surface keeps its texture and the colors stay clearer.
Adding stars, shimmer, and contrast without overloading the surface
Use stars as a finishing detail, not the main event. A few bright dots, tiny flecks of silver, or a narrow shimmer band can make the ornament sparkle without hiding the color work underneath.
If you want more contrast, add brightness selectively around the edges of a color cloud rather than across the whole ornament. That keeps the design dimensional and helps the eye move across the surface.
Common Mistakes, Troubleshooting, and How to Fix Uneven Results
Most problems with baking soda galaxy ornaments come from mixing too heavily, applying too much paint at once, or not letting layers dry. The good news is that many flaws can be corrected with another thin coat or a more controlled top layer.
The surface looks chalky, clumpy, or dusty.
There is probably too much baking soda in the mix. Add more paint, then apply a thinner layer and smooth it out before it dries.
The colors turned muddy instead of galaxy-like.
Too many colors were blended before the previous layer set. Let each layer dry longer and use fewer brush strokes when adding the next color.
The ornament looks glossy and flat.
Add a little more baking soda to the next coat or finish with a matte-compatible sealer. A soft top layer usually improves the space effect.
Why the surface can turn chalky, clumpy, or muddy
Chalkiness usually means the paint-to-baking-soda ratio is off. Clumping often happens when the mixture is too dry or when it sits too long before being applied.
Mud happens when too many wet colors are mixed together on the ornament instead of layered. This is common with dark blue, purple, and black, so restraint matters more than forceful blending.
How to prevent paint from peeling or cracking after drying
Peeling is more likely when the ornament is dirty, too smooth, or handled before the paint cures. Cracking can happen if the paint layer is too thick or if the ornament flexes while drying.
To reduce those risks, clean the surface first, use thin coats, and let each layer dry fully. If the ornament base is flexible, avoid overloading it with thick paste.
Fixes for ornaments that look too dark, too flat, or too glossy
If the ornament is too dark, add a few soft highlights with pale blue, lavender, or silver. If it looks flat, use a sponge to add one more cloud layer in a lighter shade.
If it is too glossy, a matte finish is usually the answer. Baking soda can help, but the best fix is often a lighter final coat rather than trying to cover the shine all at once.
- Creates a soft, cosmic matte finish
- Works on several ornament base types
- Easy to customize for different color themes
- Too much baking soda can make the surface chalky
- Heavy layers may crack or dry unevenly
- Glossy sealers can reduce the galaxy effect
Safety, Cleanup, and Storage for Long-Lasting Holiday Use
Although this is a craft project, it still benefits from the same careful setup you would use for any messy kitchen or studio task. Protect the workspace, keep small pieces organized, and let the finish dry completely before packing anything away.
Kid-safe crafting tips and supervision considerations
Children can usually help with mixing, dabbing, and adding stars, but adults should handle sealers, hooks, and any sharp tools. Small ornaments and glitter can also create choking hazards for younger children.
If you are crafting with a group, pre-portion the paint and baking soda so there is less mess and less chance of overmixing. Clear rules make the project smoother and safer.
Protecting work surfaces, clothing, and hands during the project
Cover the table with paper, plastic, or a washable mat before you begin. Wear clothing that can handle paint splashes, because tiny specks from star effects tend to travel farther than expected.
Wash hands after handling paint and baking soda, especially before touching food or your face. If you use a spray sealer, follow the product label and keep the area ventilated.
Do not use craft materials on surfaces where food is prepared unless everything is fully cleaned and separated afterward. Keep paint, sealant, and glitter away from utensils, counters, and open ingredients.
How to store finished ornaments so they keep their finish
Store finished ornaments in a dry container with soft padding so they do not rub against each other. Moisture can soften some finishes, and friction can wear away the matte surface or star details.
If you make several ornaments, wrap each one individually or separate them with tissue. That helps preserve the layered look and prevents glitter from transferring between pieces.
Best Uses, Display Ideas, and When This Craft Is the Right Choice
Baking soda galaxy ornaments are best when you want a handmade project with visual impact and a manageable supply list. They are especially useful for gifts, classroom sets, and seasonal decor that needs a little more personality than a plain painted ball.
Choose a different color palette for each person so every ornament feels custom and memorable.
Use the same base technique for all students, then let them personalize stars and shimmer.
Make several at once in coordinated colors to create a fuller holiday tree display.
Gift ideas, classroom projects, and holiday tree decoration
For gifts, the strongest approach is usually a limited palette and neat hanging hardware. For classrooms, the craft works well because it teaches layering, color contrast, and controlled texture without requiring advanced tools.
On a holiday tree, these ornaments pair well with simple lights because the matte finish catches glow instead of reflecting harshly. That makes the galaxy effect feel soft and atmospheric.
When to choose this craft over salt dough, resin, or plain painted ornaments
Choose this craft when you want a lightweight project with a painterly finish and a short supply list. It is often easier than resin, which can require more careful measuring, longer cure times, and stricter safety steps.
Compared with salt dough, baking soda galaxy ornaments usually offer a more modern visual style and less risk of thick cracking from drying dough. Compared with plain painted ornaments, the baking soda version gives you a more distinctive surface without much extra effort.
If you are comparing this craft with other DIY methods, remember that durability depends on the ornament base, the paint used, and whether the piece will be handled often. For long-term storage or repeated yearly use, test one sample first before making a full set.
Final recap: deciding whether baking soda galaxy ornaments fit your project goals
If you want a craft that is simple, visually rich, and easy to personalize, baking soda galaxy ornaments are a strong choice. They work best when you keep the layers thin, protect the finish while drying, and stop before the surface becomes overworked.
For readers who enjoy practical, visually satisfying DIY projects, this is a smart seasonal option. If you are looking for a similar ingredient-based technique in another household setting, you may also like our guide to baking soda and vinegar reaction basics, which explains how the ingredient behaves in a different context.
When the goal is a magical, handmade ornament with a soft cosmic finish, this craft delivers a lot of style for very little complexity.
Frequently Asked Questions
Start with a small amount and add more gradually until the paint becomes thick but still brushable. The right ratio depends on the paint brand and the ornament surface, so test a small batch first.
Foam, plastic, and wood all work well, but each surface behaves differently. Smooth plastic may need cleaning or priming, while wood may show grain and paper ornaments are less durable.
Chalkiness usually means there is too much baking soda in the mixture. Add more paint, then apply thinner coats so the finish stays smooth enough to hold the galaxy effect.
Drying time depends on the thickness of the paint, humidity, and the ornament material. Wait until the surface is fully dry and no longer tacky before adding another layer or hanging it.
Yes, but choose a sealer that matches the ornament material and follow the product directions. Let the paint dry completely first so the finish does not smear or turn glossy in an unwanted way.
They can be kid-friendly with adult supervision. Keep small parts, spray sealers, and sharp hooks away from young children, and protect the work area from paint and glitter.
