Baking soda can safely clean battery posts when the corrosion is light to moderate and the battery case is intact. Use minimal liquid, disconnect the cables in the right order, and stop if the battery is cracked, leaking, or swollen.
Corroded battery posts can stop a device from starting or running reliably, but in many cases you can clean them safely with a simple baking soda solution. The key is to use the right method, keep moisture under control, and know when corrosion points to a bigger problem.
- Best use: Baking soda helps neutralize acidic corrosion on many standard battery terminals.
- Safety first: Wear gloves and eye protection, and keep moisture away from vents and electronics.
- Right order: Disconnect negative first, clean gently, then reconnect positive first and negative last.
- Know the limit: Repeated corrosion, damage, or swelling means cleaning is not enough.
Why Baking Soda Works for Cleaning Corroded Battery Posts
Baking soda is useful because it helps neutralize acidic residue around battery terminals. That makes it a practical first-line cleaner for light to moderate corrosion on many common batteries, as long as you work carefully and follow the battery maker’s instructions.
What battery corrosion looks like and why it forms
Battery corrosion often appears as a white, blue, green, or crusty buildup around the posts or cable ends. On lead-acid batteries, that buildup usually comes from vapors or leaks reacting with metal and air over time, especially when a battery is old, overcharged, loose, or exposed to moisture.
The texture can range from a dry powder to a hard, flaky crust. If the corrosion is thick enough to hide the metal contact points, electricity may not flow well, which can cause weak starting, flickering lights, or intermittent power.
How baking soda neutralizes acidic buildup safely
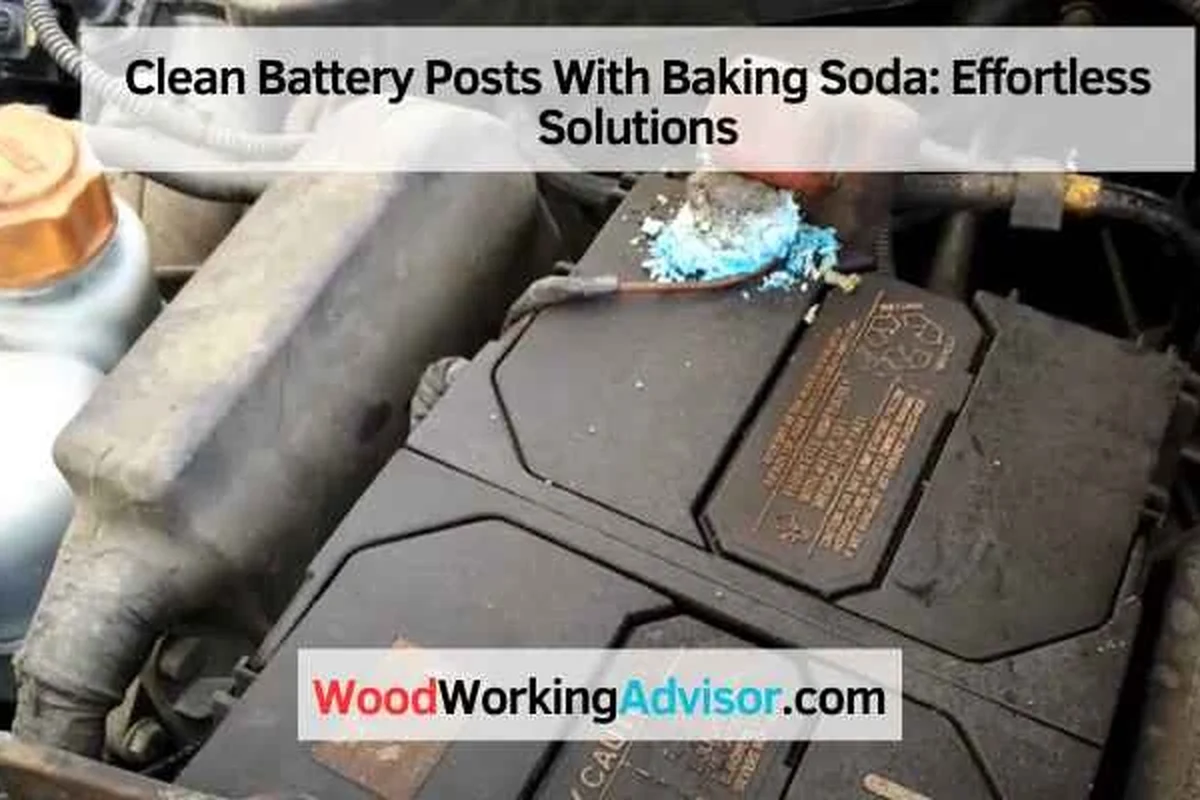
Baking soda is mildly alkaline, so it reacts with acidic corrosion and helps break it down. You may see light fizzing when it touches the residue, which is a normal sign that the cleaner is working.
The goal is not to soak the battery. You want just enough solution to loosen the buildup without letting liquid run into vents, wiring, or nearby components.
A small amount of baking soda can clean corrosion, but it does not repair a failing battery. If corrosion keeps returning quickly, the battery or charging system may need attention.
Before You Start: Safety Gear, Battery Type, and What to Check
Before you try to clean battery posts with baking soda, identify the battery type and look for damage. This method is commonly used on car batteries, lawn equipment batteries, and some household battery terminals, but it is not appropriate for every battery style.
When this method is appropriate for car, lawn equipment, and household batteries
This approach is most often used on standard lead-acid batteries with visible terminal corrosion. That includes many cars, trucks, riding mowers, and generators, as well as some battery-powered equipment with exposed metal terminals.
For household devices, check the manufacturer’s guidance first. Some electronics use sealed batteries or delicate contacts that should not be scrubbed with liquid cleaners.
Safety precautions for gloves, eye protection, and ventilation
Wear gloves and eye protection before touching the battery area. Corrosion can irritate skin and eyes, and a battery can vent harmful material if it is damaged or overcharged.
Work in a well-ventilated area, turn off the vehicle or equipment, and keep sparks, flames, and cigarettes away. If you are cleaning a car battery, remove metal jewelry so you do not accidentally create a short circuit.
If the battery is cracked, leaking, swollen, hot, or smells strongly of sulfur, do not clean it at home. Follow the battery manufacturer’s safety instructions and contact a qualified professional or local disposal service.
Signs the battery should not be cleaned at home
Stop and reassess if you see damage to the case, melted terminals, wet leakage, or heavy white buildup that keeps returning after cleaning. Those signs can mean the battery is near failure or that charging problems are causing the corrosion.
If a battery is difficult to access or sits near sensitive electronics, it may be safer to have a technician handle it. When in doubt, follow the owner’s manual or manufacturer guidance rather than guessing.
Supplies Needed to Clean Battery Posts with Baking Soda
You do not need special products for a basic cleaning, but having the right tools nearby makes the job safer and cleaner. Gather everything before you disconnect the battery so you are not searching for supplies with exposed terminals.
Exact materials: baking soda, water, brush, cloth, and terminal protectant
A simple paste or light solution of baking soda and water is usually enough for normal corrosion. A soft brush helps lift residue from the posts and cable ends, while a cloth or paper towel is useful for wiping away loosened debris.
After cleaning, a terminal protectant spray or a small amount of grease can help slow future buildup. Use only a product intended for battery terminals, and apply it according to the label.
Helpful tools for tight spaces and heavy corrosion
A terminal brush, small nylon brush, or cotton swabs can help in tight spots. For heavy corrosion, a plastic scraper can lift loose crust without gouging the metal.
Some people also keep a wrench that fits the terminal clamps, since you may need to loosen them slightly to clean the cable ends properly. Avoid metal tools that can bridge both terminals at once.
Step-by-Step Method to Clean Battery Posts Safely
Work slowly and keep your movements controlled. The process is simple, but battery safety depends on the order you disconnect and reconnect things.
Turn the equipment off first. Remove the negative cable before the positive cable so you reduce the risk of accidental shorting, then set the cables where they cannot spring back onto the posts.
Mix a small amount of baking soda with water until you have a light paste or thin slurry. Dab it onto the corroded areas with a brush or cloth instead of pouring it over the battery, and keep the liquid away from vents and nearby electronics.
Use the brush to work around the posts and inside the cable clamps until the crust loosens. Reapply a little solution only where needed, and wipe away the residue as it lifts so you can see the bare metal contact points.
Wipe the area with a barely damp cloth if needed, then dry everything completely. Reconnect the positive cable first and the negative cable last, then tighten the clamps so they are snug but not forced.
Even though this is not a kitchen task, the same rule applies: do not over-wet the surface. Excess liquid around electrical parts can cause shorts, corrosion spread, or damage that is harder to fix than the original buildup.
If you are also comparing other safety-sensitive appliance topics, our guides on are air fryers dangerous and air fryer electricity use show why it matters to match the method to the equipment and power source.
Common Mistakes That Can Damage the Battery or Create Hazards
Most cleaning problems come from using too much liquid or reconnecting too soon. A careful approach protects both the battery and the device it powers.
Using too much liquid near electrical components
Flooding the area with solution can push moisture into vents, cable insulation, or nearby connectors. That may leave behind more corrosion later or create a short if the battery is reconnected before the area is dry.
Mixing the wrong cleaners with baking soda
Do not mix baking soda with bleach, ammonia, or strong household acids. Those combinations can create fumes or neutralize the cleaner in ways that make the process less safe and less effective.
Stick to baking soda and water, then use a separate approved terminal protectant after the metal is clean and dry.
Reconnecting cables before everything is fully dry
Moisture trapped under a clamp can reduce contact quality and encourage new corrosion. If the metal still feels damp, wait longer and wipe again before reattaching the cables.
Snug, clean contact matters more than rushing the final step. A battery that looks clean but is still wet may perform worse than one that was left alone for a few extra minutes.
How to Tell Whether the Cleaning Worked
A successful cleaning should leave the posts and cable ends visibly cleaner and more secure. You are looking for bare metal contact, not just a surface that looks less crusty.
Visual signs of restored metal contact
The metal should look brighter and more even, with the powdery buildup removed from around the clamp surfaces. The cable ends should sit flush against the posts without a thick layer of residue in between.
If you still see heavy pitting, flaking metal, or broken clamp edges, the hardware may be too damaged to rely on for long.
Performance changes to watch for after reconnecting
After reconnecting, the engine or device should start more consistently, and electrical accessories should behave more normally. In many cases, the change is immediate, but some problems only show up under load, such as when starting a cold engine.
If the battery still struggles, the issue may be low charge, an aging battery, or a charging system problem rather than surface corrosion alone.
When a weak battery or damaged terminal means cleaning is not enough
Cleaning cannot fix a battery that no longer holds a charge or a terminal that is cracked or badly worn. If corrosion returns quickly, the battery may be venting too much gas or the cable connection may be loose.
Repeated buildup is a sign to inspect the whole system, not just the visible crust. In some cases, replacement is the more reliable and safer choice.
For vehicles, a battery test and charging-system check can help separate a dirty terminal from a deeper electrical issue. That is often more useful than cleaning the same posts over and over.
Preventing Future Corrosion on Battery Posts
Once the terminals are clean, a few small habits can slow the return of corrosion. Prevention is usually easier than repeated deep cleaning.
Applying protective grease or terminal spray
A thin layer of terminal protectant or battery-safe grease can help block moisture and slow oxidation. Apply only after the posts and clamps are fully dry and reconnected.
Do not pack on a thick layer. A light coating is usually enough to create a barrier without interfering with contact.
Keeping terminals tight, dry, and inspected on a schedule
Loose clamps can create tiny gaps that encourage arcing and corrosion. Check that the terminals are snug during routine maintenance, and look for early buildup before it becomes a hard crust.
If the battery sits in a damp or dusty area, wipe it down periodically and keep the top of the battery clean and dry. Dirt can hold moisture, which speeds up corrosion.
Practical maintenance examples for seasonal vehicles and stored equipment
For lawn equipment, check the battery before the first spring use and again before storage. For boats, campers, and seasonal machines, inspect terminals after long periods of sitting, since inactivity can hide slow corrosion until the equipment is needed.
If you store a battery for months, follow the owner’s manual for charging and storage conditions. Different battery types have different needs, so a one-size-fits-all routine is not always right.
Final Recap: When Baking Soda Is the Right Fix and When to Replace Parts
Baking soda is a sensible DIY fix when the corrosion is light to moderate, the battery is intact, and you can safely access the terminals. It is a cleaning method, not a repair for damaged hardware or a failing power source.
Best-use cases for DIY cleaning versus professional service
DIY cleaning works well when the posts are dirty, the clamps are intact, and the battery case looks normal. Professional service is the better choice when the battery is leaking, swollen, hard to reach, or part of a system you are not comfortable disconnecting.
If you want to compare this kind of practical maintenance mindset with other appliance questions, our article on whether air fryers need to preheat shows the same idea: the right process depends on the equipment and the result you need.
Decision guide for damaged terminals, repeated corrosion, or battery replacement
Replace damaged cable ends or terminals when cleaning does not restore a solid metal contact. If corrosion keeps coming back quickly, ask whether the battery is overcharging, undercharging, or nearing the end of its service life.
For the safest outcome, treat baking soda cleaning as the first step, not the final answer. When the battery itself is weak or visibly damaged, replacement is usually the more dependable fix than repeated scrubbing.
- Simple and inexpensive for light terminal corrosion
- Helps restore metal contact quickly
- Uses common household supplies
- Not safe for cracked, leaking, or swollen batteries
- Will not fix a weak or failing battery
- Can cause problems if over-wet or reconnected too soon
In short, use baking soda when the corrosion is the main issue and the battery is otherwise sound. Replace parts or get professional help when the battery, terminals, or charging system show signs of damage that cleaning cannot solve.
Frequently Asked Questions
Baking soda is best for standard lead-acid batteries with light to moderate corrosion. Do not use it on cracked, leaking, swollen, or manufacturer-restricted battery types without checking the manual first.
Disconnect the negative cable first, then the positive cable. That lowers the risk of accidental shorting while you work.
Use only a light wipe or minimal rinse if needed, and keep moisture away from vents and electronics. Dry everything completely before reconnecting the cables.
Repeated corrosion can mean the battery is overcharging, undercharging, or nearing failure. It can also mean the terminals or cable ends are loose or damaged.
Gloves are strongly recommended because corrosion can irritate skin and battery residue should not be handled bare-handed. Eye protection is also important in case the cleaner splashes.
Replace the terminal or cable end if it is cracked, badly pitted, loose, or still has poor contact after cleaning. Cleaning cannot restore damaged metal.
