A baking soda and vinegar science project shows kids a fast acid-base reaction that makes carbon dioxide gas, foam, and movement. It is a simple, safe STEM activity when done with supervision and a controlled setup.
A baking soda and vinegar science project is a simple way to show kids how a chemical reaction can create gas, foam, and movement. It is also one of the easiest at-home STEM activities to connect kitchen ingredients with real science.
- Science concept: The reaction teaches acid, base, and gas production in a visible way.
- Best setup: Use a tray, a stable container, and small measured amounts to control mess.
- Learning value: Add prediction, timing, and simple notes to turn play into a lesson.
- Common issue: Too much of one ingredient or a stale ingredient can weaken the reaction.
- Best fit: It works well as an entry-level STEM activity, not a full baking chemistry lesson.
What a Baking Soda and Vinegar Science Project Actually Teaches Kids
This project looks playful, but it teaches several core science ideas at once. Kids see that ingredients can react to form something new, and they can observe how changing the amount of each ingredient affects the result.
The chemistry behind the fizz: acid, base, and carbon dioxide
Vinegar is acidic, while baking soda is a base. When they meet, they react and release carbon dioxide gas, which creates the fizzing and bubbling that children notice right away.
That gas needs space, so it pushes foam upward or inflates a balloon if the setup is sealed correctly. If you want a simpler chemistry explanation for children, see our baking soda and vinegar reaction explained simply guide.
Why this experiment is popular in classrooms and at home in 2026
It is popular because the materials are common, inexpensive, and easy to set up with basic supervision. It also gives fast visual feedback, which helps younger learners stay engaged.
In 2026, many parents and teachers still favor short, hands-on STEM activities that do not require special equipment. This project fits that need well, especially when you want a science lesson that can be done in a kitchen, classroom, or outdoor space.
What kids can observe, measure, and record during the reaction
Children can watch how quickly the fizz starts, how high the foam rises, how long the reaction lasts, and whether the reaction changes with more or less ingredient. Older kids can also note sound, temperature changes, and which container shape affects the overflow.
Carbon dioxide is the same gas used in many baking reactions to help batters and doughs rise, although the science in a baking recipe is more controlled than in a volcano-style experiment.
Simple Materials, Measurements, and Safe Setup for the Experiment
You do not need much to get started, but small measurement changes can make a big difference in the reaction. A clean setup also helps children focus on the science instead of the mess.
Common ingredient amounts for small, medium, and larger reactions
For a small reaction, many families start with about 1 to 2 tablespoons of baking soda and a few tablespoons of vinegar. For a medium reaction, use more of both ingredients in a larger container, but keep enough empty space so the foam has room to rise.
For a larger reaction, increase slowly rather than all at once. The exact amount depends on container size, vinegar strength, and how dramatic you want the reaction to look.
Choosing the right container, tray, and cleanup surface
A narrow bottle makes balloon experiments easier, while a wider cup or small bowl works well for open fizzing. Put the container on a tray, rimmed baking sheet, or washable surface so spills stay contained.
If you want a kitchen-friendly cleanup setup, a baking sheet can work better than a flat plate because it catches overflow more reliably. For readers who already use baking soda in the kitchen, our baking soda vinegar cleaning ovens article shows how the same ingredient can be useful outside science projects too.
Safety basics for younger kids, supervision, and eye protection
Young children should have close adult supervision, especially if the project uses balloons, food coloring, or glass containers. Eye protection is a smart choice whenever a reaction may splash upward.
Do not let children taste the mixture, and keep the activity away from electrical outlets, open flames, and fragile glassware. If a child has a known sensitivity to vinegar fumes or skin contact, stop the activity and use safer alternatives under adult guidance.
Step-by-Step Project Ideas That Go Beyond the Basic Fizz
The basic reaction is useful, but the project becomes more educational when you change one part at a time. That lets children see that science is not magic; it is pattern, cause, and effect.
Classic volcano-style reaction
Build a small mound with clay, dough, or paper around a cup or bottle, then add baking soda to the center and pour in vinegar. The foam will rise and overflow like lava, which makes the reaction easy to see from across a room.
Place the container on a tray and add baking soda to the bottom.
Mix in a few drops of food coloring or colored water before the vinegar goes in.
Pour in vinegar slowly and watch how the foam rises and spreads.
Balloon inflation experiment for gas production
Put vinegar in a bottle and baking soda inside a balloon, then stretch the balloon over the bottle opening. When the baking soda drops into the vinegar, carbon dioxide forms and inflates the balloon.
This version is especially useful because it shows gas production without relying on a messy overflow. It also helps older kids understand that gases take up space even when you cannot see them directly.
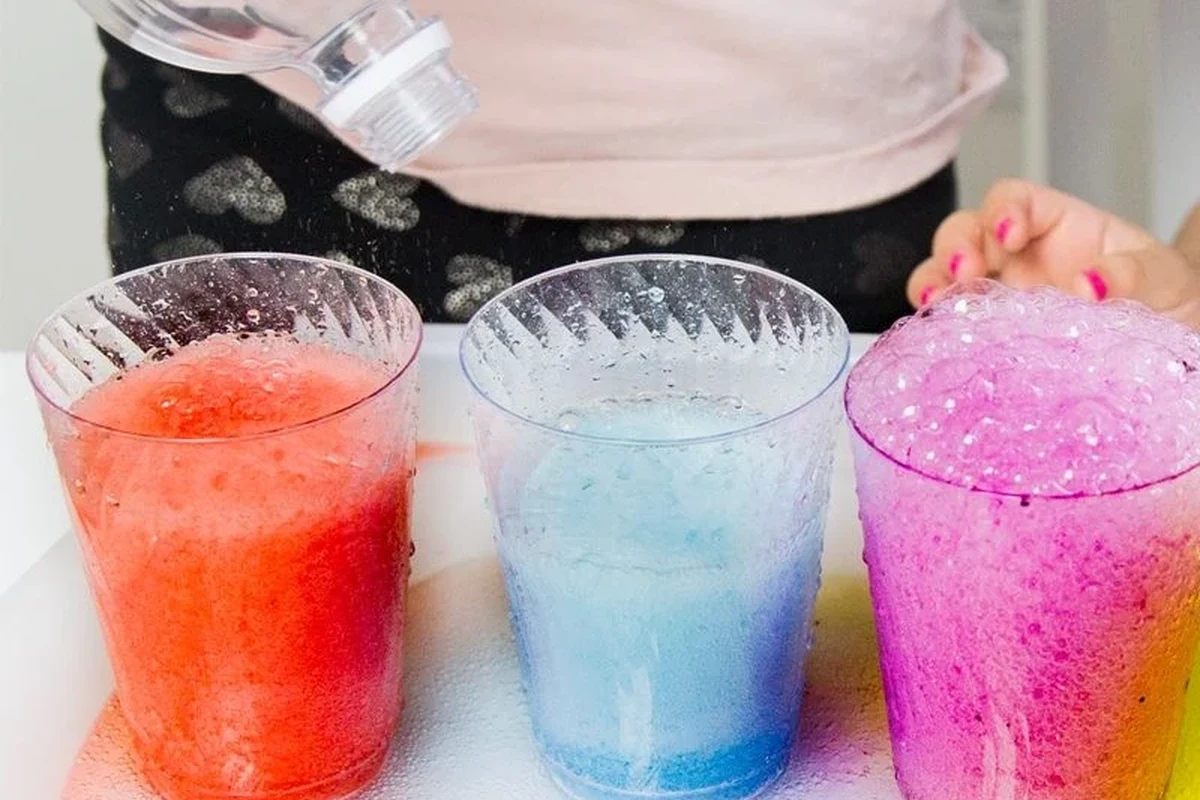
Colored foam, sensory play, and STEM variation ideas
Food coloring can make the foam more visible, and a little dish soap can create a thicker, longer-lasting froth. That said, soap changes the look of the reaction, so it is better for sensory play than for a pure chemistry comparison.
If you add soap, you are changing the experiment’s outcome. That is fine for creative play, but it is not the best choice if you want to compare reaction strength with accuracy.
How to Turn the Project into a Real Science Lesson
A good science lesson starts with a question, not just a reaction. Ask children what they think will happen, then let them test their idea and describe the result.
Teaching prediction, variables, and fair testing
Prediction means making a guess before the experiment begins. A variable is the one thing you change, such as vinegar amount, container size, or whether the vinegar is warm or room temperature.
Fair testing means changing only one variable at a time. If you change the vinegar amount, the container, and the amount of baking soda all at once, it becomes hard to know what caused the difference.
Using measurement to compare reaction strength and duration
Older children can measure how long the fizz lasts with a timer or how high the foam rises with a ruler. These measurements do not need to be perfect to be useful; they just need to be consistent from one test to the next.
Recording results with charts, drawings, or simple lab notes
Children do not need formal lab notebooks to practice science. A simple chart with columns for “prediction,” “what happened,” and “what I noticed” is enough for most beginner projects.
Drawings also work well, especially for preschool and early elementary learners. If the child is older, encourage short written observations such as “foam rose quickly” or “reaction lasted longer in the larger cup.”
Common Mistakes That Reduce the Reaction or Create a Mess
Most problems with this project come from imbalance or poor setup. The good news is that these issues are easy to correct once you know what to look for.
Using too much of one ingredient and not enough of the other
If you use a large amount of baking soda with too little vinegar, some powder may remain dry and unused. If you use too much vinegar, the reaction may look weak because the baking soda runs out too soon.
The best starting point is a small test batch, then adjust from there. That approach is more useful than trying to force one “perfect” amount for every container.
Choosing the wrong vinegar strength or stale baking soda
Standard household vinegar usually works well, but stronger or weaker vinegar can change the result. Baking soda can also lose effectiveness over time if it has absorbed moisture or odors from storage.
If you are unsure whether your baking soda is still active, our does baking soda expire guide can help you judge when to replace it. This matters in both science projects and baking, where freshness affects performance.
Overfilling containers and ignoring spill control
One of the most common mistakes is using a container that is too small for the amount of foam created. That can push the mixture over the edge and make cleanup harder than necessary.
Keep the container on a tray and leave extra headspace above the ingredients. A controlled spill is much easier to manage than a reaction that runs across the table.
Age-Appropriate Project Variations for Preschool, Elementary, and Older Kids
The best version of this activity depends on the child’s age, attention span, and ability to follow directions. A project that is too open-ended for one child may be perfect for another.
Easy supervised versions for preschoolers
For preschoolers, keep the project short, colorful, and fully supervised. Use a tray, a small cup, and a simple “pour and watch” setup with no complicated measurements.
At this age, the goal is sensory discovery. Children can name colors, describe bubbles, and notice that the foam grows quickly when the two ingredients meet.
Hands-on comparison tests for elementary students
Elementary students can compare one cup with a second cup that has a different amount of vinegar or baking soda. They can also predict which mixture will bubble longer or rise higher.
This is a good time to introduce simple vocabulary such as reaction, gas, variable, and observation. The lesson becomes more meaningful when children explain what they saw in their own words.
More advanced hypothesis and variable experiments for older learners
Older children can test questions such as whether warm vinegar reacts differently than cool vinegar, or whether a narrow bottle creates a different balloon result than a wider one. These experiments do not need advanced equipment, but they do need careful note-taking.
If you want to extend the lesson into food science, this is also a good time to compare the project with baking leavening. Our baking soda versus baking powder guide is helpful for understanding why some recipes need acid and others do not.
How Baking Pastry Schools Would Frame This as an Early STEM Skill Builder
At Baking Pastry Schools, we would treat this project as an early introduction to kitchen chemistry, not just a fun trick. It helps children see that ingredients have behavior, and that behavior can be observed, measured, and explained.
What children learn about kitchen chemistry and ingredient behavior
Kids learn that some ingredients react when combined, while others mainly provide structure, moisture, or flavor. That idea is central to baking, where the wrong ingredient ratio can flatten a cake or make a batter rise too fast.
They also learn that texture changes matter. In the same way foam expands during this project, baking dough expands when gas is trapped inside a structure strong enough to hold it.
How this experiment connects to baking, leavening, and food science
The experiment connects directly to leavening, which is the process of making baked goods rise. Baking soda is a leavening agent, and in recipes it usually needs an acid to produce gas in a controlled way.
That is why kitchen chemistry matters in pastry and baking. A science project can show the reaction instantly, while a muffin or cake shows how that reaction behaves inside batter, heat, and time.
When to move from playful exploration to structured learning
Move toward structured learning when a child starts asking “why” instead of only “what happened.” That is the moment to introduce simple vocabulary, measurement, and comparison tests.
- Fast, visual, and easy to set up
- Great for basic observation and prediction
- Connects naturally to baking science
- Does not teach full baking chemistry on its own
- Results can be messy without a tray
- Needs supervision for younger children
Final Recap: Best Use Cases, Limits, and What Parents Should Expect
This project works best when you want a quick, visual science activity that also opens the door to kitchen chemistry. It is especially effective for introducing prediction, observation, and simple measurement.
When the baking soda and vinegar project is most effective
It is strongest as a beginner STEM activity, a rainy-day lesson, or a first introduction to chemical reactions. It also works well when paired with a short discussion about why baking soda behaves differently in recipes than in a science demo.
What it does not teach on its own
By itself, the project does not explain all of pastry science. It does not cover gluten development, sugar caramelization, or how heat changes structure in a baked item.
It also does not replace a real baking lesson if your goal is to teach recipe balance or oven behavior. For that, you would need a more structured baking activity with careful ingredient measurement and heat control.
How to decide whether to repeat it, expand it, or try a new STEM activity
Repeat the project if the child is still curious and wants to test a new variable. Expand it if they are ready to measure, compare, and write down results.
If the child already understands the basic fizz, move on to a related baking or kitchen science lesson so the learning keeps growing. That is the best way to turn a simple baking soda and vinegar science project into a lasting STEM habit.
—
Frequently Asked Questions
Start small, such as 1 to 2 tablespoons of baking soda with a few tablespoons of vinegar. The right amount depends on the container size and how much foam you want.
Yes, apple cider vinegar can still react with baking soda. The reaction may look and smell a little different, but the same acid-base chemistry is happening.
The fizz comes from carbon dioxide gas released when baking soda and vinegar react. That gas creates bubbles and foam.
Use a tray or rimmed baking sheet under the container and leave extra headspace. Adding the vinegar slowly also helps control overflow.
Sometimes, but old baking soda may react less strongly if it has absorbed moisture. If the fizz seems weak, replace it and test again.
It can be safe with close adult supervision, a stable setup, and no tasting. Eye protection is a good idea if the reaction may splash.
