Super glue and baking soda creates a very fast, rigid repair for small hard-surface fixes. It works best on clean, dry, close-fitting breaks and is not a good choice for flexible, food-contact, or heat-stressed items.
Super glue and baking soda can create a very fast-setting repair for the right job. Used carefully, this combo is handy for filling small gaps, reinforcing broken edges, and making short-term fixes on hard materials.
- Fast cure: Baking soda helps super glue set almost immediately and adds filler strength.
- Best uses: Small chips, cracks, and broken edges on rigid materials are the sweet spot.
- Main limits: Flexible, oily, hot, or food-contact items usually need a different repair.
- Application matters: Thin layers, clean surfaces, and good alignment improve results.
- Safety first: The mix can heat up and bond skin quickly, so use ventilation and care.
What Super Glue and Baking Soda Do Together in Real-World Repairs
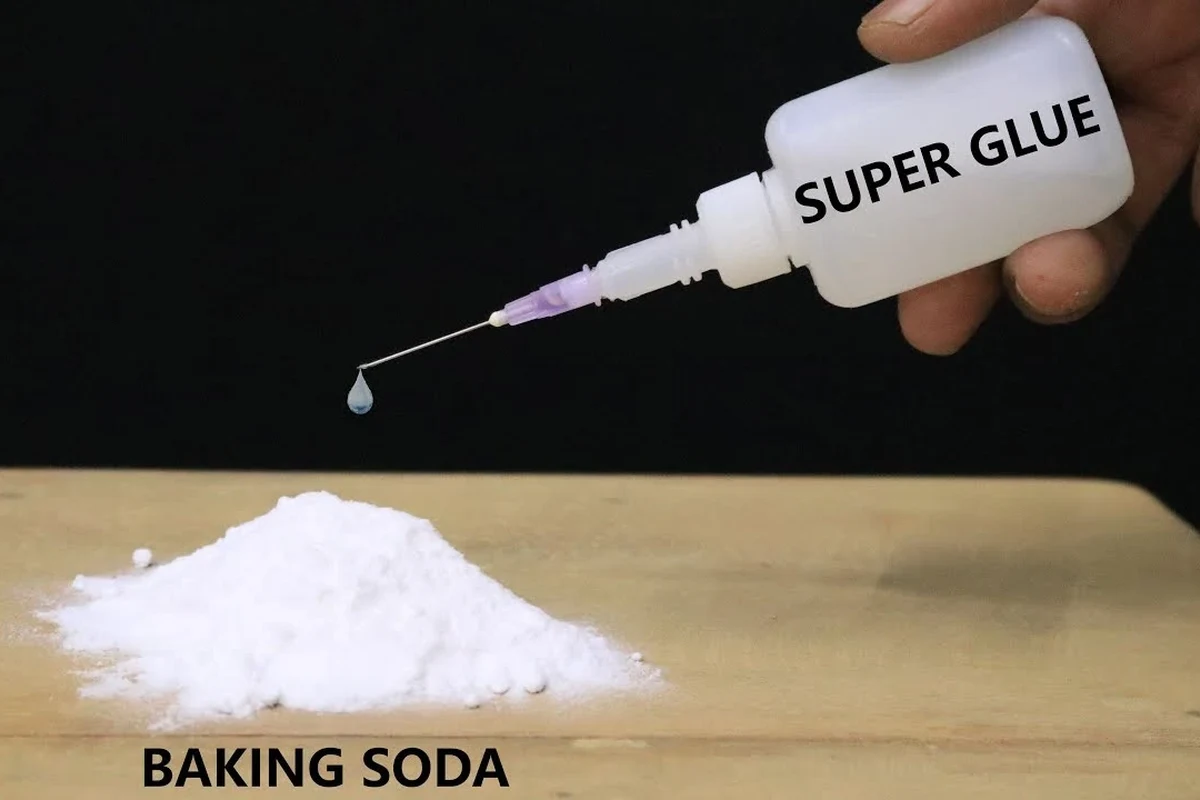
Super glue, also called cyanoacrylate, bonds quickly on its own. Baking soda speeds the set and adds bulk, so the mixture can harden into a more rigid patch instead of a thin glue line.
Baking soda does not just “dry” the glue. It helps trigger a rapid cure and can act like a filler, which is why the repair often feels more like a hard composite than a simple adhesive layer.
Why the combination cures so fast
Cyanoacrylate adhesives react very quickly when they meet moisture and certain fine powders. Baking soda has a very large surface area, so the glue spreads through it and hardens almost immediately.
That fast cure is useful, but it also means you have less working time. If the parts are not aligned before you mix them, the bond can lock in crooked or lumpy.
Where the bond is strongest and where it falls short
The bond is strongest on rigid, close-fitting surfaces where the repair does not need to flex much. It tends to do well as a filler-reinforced patch on plastic, ceramic, metal, and dry wood.
It falls short on oily, dusty, rubbery, or constantly moving surfaces. If the item bends often or carries weight, the hardened patch can crack instead of stretch.
Best Uses for Super Glue and Baking Soda Around the Home
This method is most useful when you need a fast, practical repair on a small area. It is not a universal fix, but it can save a broken item long enough to keep using it safely.
Filling chips, cracks, and small gaps in hard materials
One of the best uses is filling a chip or hairline crack in a rigid object. The baking soda gives the glue body, so the repair can bridge a tiny void instead of sinking into it.
This is often helpful on decorative items, trim pieces, or small household parts where appearance matters less than restoring shape. For a neat result, use only enough to fill the damaged area, not the whole surface.
Rebuilding broken edges on plastic, ceramic, and wood trim
Broken corners and edges are a common use case because they need support at the point of impact. A layered application can rebuild the missing shape and make sanding easier afterward.
If you are repairing something like a plastic tab, a ceramic rim, or a small section of trim, build the patch in thin layers. That gives you more control and reduces the chance of a brittle lump.
Simple emergency fixes that hold until a proper repair
This combo can work as a temporary fix when you need an item to stay together until you can replace it, epoxy it, or have it professionally repaired. It is especially useful for small household objects that are not exposed to heat or heavy stress.
For example, it may help stabilize a snapped clip, a loose corner, or a small crack in a non-food item. If the object is structural, load-bearing, or safety-related, treat this as a stopgap only.
Do not use super glue and baking soda on food-contact items, utensils, cookware surfaces, or anything that will be heated, microwaved, or washed aggressively unless the product instructions clearly allow it. When in doubt, replace the item instead of repairing it.
How to Use Super Glue and Baking Soda Safely and Effectively
Good results depend on preparation more than quantity. A clean, dry, well-fitted break usually matters more than adding extra glue.
Surface prep, dryness, and fit before applying
Start by cleaning off dust, grease, and loose crumbs of old adhesive. A dry cloth and, when appropriate, a little isopropyl alcohol on a cloth can help remove residue; let the surface dry completely before bonding.
Dry fit the pieces first so you know how they line up. If the break has a gap, the baking soda can help fill it, but the parts should still sit as close together as possible.
- Test the fit without glue
- Make sure both surfaces are clean and dry
- Work in a ventilated area
- Keep paper towels and gloves nearby
Layering glue and baking soda for a stronger set
Apply a small amount of super glue to one side, then bring the pieces together or sprinkle a light dusting of baking soda over the glue. For a gap fill, alternate thin layers of glue and baking soda until the area is built up.
The best approach is usually to add less than you think you need. Thin layers cure more evenly and are easier to shape than one thick mound.
Apply a small bead of super glue to the damaged area or edge.
Sprinkle a small amount of baking soda onto the wet glue so it hardens quickly.
Repeat only as needed, letting each layer set before adding more.
How much to use without creating a brittle mess
Too much baking soda can make the repair chalky and crumbly. Too much glue can create a glossy outer shell with soft spots inside, which may look solid but fail under pressure.
Think in terms of filling the damaged space, not coating the whole object. A modest repair is usually stronger than a thick one because it sets more evenly and is easier to sand flat.
If the repair needs shaping, let the patch fully harden before sanding. Sanding too early can tear the surface and leave a rough, weak edge.
Common Mistakes That Make the Bond Fail
Most failed repairs come from rushing the setup or using the wrong surface. The glue may be fast, but the prep still has to be careful.
Using too much baking soda or too much glue
An overloaded patch can become brittle, bulky, and harder to finish. Excess baking soda may leave a powdery surface, while excess glue may skin over before the inside cures evenly.
If the repair looks swollen or uneven, that is often a sign the layers were too heavy. In many cases, removing the bad patch and starting over is better than trying to bury the problem under more material.
The patch hardened fast but cracked when handled.
Use thinner layers next time, and make sure the break is clean, dry, and closely fitted before applying the glue.
Trying to bond oily, dusty, or flexible surfaces
Oil, dust, and release residues block the adhesive from reaching the surface. Flexible materials can also pull the hardened patch apart because the repair does not move with them.
If the item is rubbery, bendable, or textured in a way that prevents close contact, this method is usually not the best choice. For those materials, a flexible adhesive or a replacement part is often more reliable.
Ignoring curing time, heat buildup, and poor alignment
Super glue can generate noticeable heat as it cures, especially when used in larger amounts with baking soda. That heat is usually brief, but it can be enough to surprise you or damage delicate surfaces.
Alignment matters too. Once the reaction starts, you may only have a moment to position the pieces correctly, so dry-fitting first is essential.
Keep your fingers away from the bond line while the glue is curing. Accidental skin bonding is one of the most common problems with cyanoacrylate adhesives, and the reaction can get warm very quickly.
Materials, Compatibility, and Limits You Should Know
This repair method is popular because it is quick and inexpensive in small amounts, but it still has limits. The right material and the right job make a big difference.
What it works on best: plastics, ceramics, metal, and wood
Rigid plastics, broken ceramic pieces, metal tabs, and dry wood trim are among the best candidates. These materials hold their shape, which helps the glue-and-baking-soda patch stay stable.
For wood, the repair often works best on tight breaks or tiny chips rather than large missing sections. For ceramics, it is usually better for decorative or light-use pieces than for anything that must handle heat or frequent washing.
What to avoid: skin, food-contact items, and heat-stressed parts
Do not use this method on skin. Cyanoacrylate can bond skin quickly, and baking soda makes the set even faster and harder to separate.
Avoid food-contact items, hot surfaces, stove-adjacent parts, and pieces exposed to repeated heat. If the part gets warm in normal use, the repair may weaken or release sooner than expected.
If you are repairing a household item that touches food, check the manufacturer’s guidance first. For anything related to food safety, official guidance from recognized agencies such as the FDA or USDA is the safest reference point.
When epoxy, filler, or replacement is the better choice
Choose epoxy when you need a stronger, more gap-filling, and often more durable repair. Choose a filler when the goal is mostly cosmetic shaping, and choose replacement when the item is critical, cracked badly, or likely to fail again.
If the break is large, load-bearing, or repeatedly stressed, super glue and baking soda may only buy time. In those cases, a proper structural adhesive or a new part is usually the smarter solution.
- Sets very fast
- Good for small rigid repairs
- Can fill tiny gaps
- Can be brittle
- Poor for flexible or oily surfaces
- Not ideal for heat or food-contact use
Cleaning Up, Sanding, and Finishing the Repair
Once the patch has cured, the finish usually determines whether the repair looks tidy or obvious. A little cleanup goes a long way.
How to smooth hardened residue after curing
After the repair is fully hard, use fine sandpaper or a small file to level the surface. Work gently so you do not chip the surrounding material.
If the patch is still slightly soft in the center, give it more time. The outside can feel hard before the inside is fully cured, especially if the layer was thick.
Painting, sealing, or disguising the repaired area
Once smoothed, the repair can sometimes be painted or sealed, depending on the item and the product used. Test any finish on a hidden spot first, because some coatings react poorly with cyanoacrylate residue.
For visible household items, matching the color is often less important than blending the shape. A neat edge usually hides better than a thick, shiny lump.
Storage tips for keeping glue and baking soda usable
Store super glue tightly sealed in a cool, dry place, and keep baking soda in a moisture-resistant container. Humidity can shorten the shelf life of the glue and make the baking soda clump.
Keep both products away from sinks, steam, and direct sunlight. If the glue thickens or the nozzle clogs, it may still be usable for some repairs, but verify the product’s condition before relying on it.
Safety Tips for Fast-Cure DIY Repairs in 2026
Fast-setting adhesives deserve respect because they can bond skin, create heat, and release fumes. A few simple precautions make the process much safer.
Heat, fumes, and accidental bonding precautions
Use the smallest practical amount, especially on larger repairs. Bigger piles generate more heat as they cure, and that can damage the item or make handling uncomfortable.
Work in a well-ventilated space and avoid leaning directly over the repair. If you feel irritation from fumes, stop and move to fresh air.
Protecting skin, eyes, and work surfaces
Wear disposable gloves if you are not confident with precise application, and protect the table with paper or a nonreactive mat. Keep the nozzle aimed carefully to avoid splatter.
If glue gets on skin, do not force it apart. Follow the product label and seek proper guidance if the bond is extensive or painful.
Keeping the method away from children and pets
Store both products out of reach after use. Children and pets can be harmed by accidental contact, ingestion, or glued-together surfaces.
Because the set is so fast, this is not a good project to do casually on a crowded counter. Clear the area first so no one bumps the repair while it is curing.
If a repair involves a child’s item, a pet item, or anything that could be mouthed, chewed, or heated, choose a safer replacement or a manufacturer-approved repair method instead of this quick fix.
Final Verdict: When Super Glue and Baking Soda Is the Right Fix
Super glue and baking soda is the right fix when you need a fast, rigid repair on a small, dry, hard surface. It is especially useful for chips, cracks, and edge rebuilds where a little filler strength matters more than flexibility.
Quick decision guide for temporary versus lasting repairs
Use it as a temporary fix when the item is important but not safety-critical, or when you need time before a better repair. Choose another method when the part flexes, gets hot, touches food, or carries real structural load.
Practical recap of the fastest, safest use cases
The best results come from clean surfaces, thin layers, and careful alignment. If you keep the repair small, dry, and well-ventilated, this method can be one of the quickest ways to rescue a broken household item.
For readers who also follow appliance and kitchen-safety topics, it is worth comparing this kind of quick fix with other practical home decisions, like whether air fryer liners are safe or whether air fryers need to preheat. The same rule applies in both cases: match the method to the material, the heat, and the real-world use.
Frequently Asked Questions
Baking soda helps super glue cure much faster and adds body to the repair. It can turn a thin adhesive layer into a harder filler for small chips and gaps.
Yes, it often works well on rigid plastic parts with a clean, tight fit. It is less reliable on flexible or oily plastics.
Too much baking soda or a thick patch can make the bond brittle. Thin layers usually cure more evenly and are less likely to crumble.
Wait until the patch is fully hard all the way through, not just dry on the surface. Thick repairs may need extra time before sanding.
It is best to avoid using this method on food-contact items unless the product instructions clearly allow it. For kitchen items, replacement is often the safer choice.
Epoxy is often better for larger gaps, stronger bonds, or parts that need more durability. Replacement is the best option for safety-critical or heavily stressed items.
