Baking soda can clean some jewellery safely, especially sturdy silver with light tarnish. It should be avoided on delicate stones, plated finishes, and pieces that need professional care.
Baking soda jewellery cleaner can be a simple, low-cost way to brighten some metal pieces at home. It works best on tarnished silver and other durable items, but it is not the right choice for every gemstone, finish, or plated piece.
- Best use: Works well for sturdy silver and light tarnish.
- Main risk: Can scratch soft finishes or damage delicate stones.
- Method choice: Paste, soak, or spot-clean depending on the piece.
- Care step: Rinse and dry completely to avoid residue and spotting.
- Safety rule: When in doubt, test first or use a jeweler.
What Baking Soda Jewellery Cleaner Is and Why It Works for Common Tarnish
Baking soda jewellery cleaner usually means a paste, soak, or foil-assisted method that uses sodium bicarbonate to lift grime and reduce the look of tarnish. It is popular because it is easy to mix, gentle compared with many harsh cleaners, and already common in most kitchens.
Tarnish on silver is a surface reaction, not deep damage. Baking soda helps loosen oily residue and can support a chemical reaction when used with aluminum foil and hot water, which is why silver often looks brighter after cleaning.
How baking soda interacts with metal surfaces, grime, and oxidation
Baking soda is mildly abrasive, so it can help remove stuck-on dirt without the strength of a scouring powder. In the foil method, the baking soda solution helps move sulfur compounds away from silver and onto the foil, which can reduce dark tarnish.
That said, “mildly abrasive” still means abrasive. If a piece has a soft finish, thin plating, or delicate detailing, too much rubbing can leave tiny scratches or a dull look instead of a shine.
Which jewellery materials respond well and which ones need extra caution
Solid silver, many costume jewelry metals, and some plain metal pieces can respond well when the tarnish is light to moderate. Smooth surfaces usually show the best improvement because residue is easier to remove evenly.
Use more caution with plated jewelry, antique pieces, oxidized finishes, glued settings, pearls, opals, turquoise, emeralds, and other porous or delicate stones. If the piece has value beyond its appearance, it is smart to treat it more conservatively.
If you are unsure about a gemstone, check the jeweler’s care instructions first. Many stones and finishes tolerate only a damp cloth and mild soap, not a baking soda scrub.
When to Use Baking Soda on Jewellery and When to Avoid It
The best time to use baking soda is when the piece is visibly dull, lightly tarnished, or coated with everyday skin oils and residue. It is especially useful when you want a quick home method before trying a commercial cleaner.
It is less useful when the item is scratched, heavily damaged, or set with materials that can cloud, etch, or loosen under moisture and rubbing. For valuable pieces, the safest approach is often the least aggressive one.
Best use cases for silver, costume pieces, and lightly soiled items
Silver rings, bracelets, chains, and plain earrings are common candidates for a baking soda jewellery cleaner. Costume jewelry with sturdy metal surfaces can also benefit, as long as it is not plated so thinly that rubbing wears it down.
Light dirt, fingerprints, and faint tarnish usually come off more easily than deep black oxidation. If the piece already has a bright finish, a gentle clean may be enough to restore the look without repeated scrubbing.
Materials that can scratch, dull, or react badly with baking soda
Avoid baking soda on soft gemstones, matte metals, brushed finishes, and thin gold or silver plating unless the maker specifically approves it. The powder can settle into crevices and be hard to rinse out, which leaves a cloudy residue.
It is also a poor match for items with glued components, because soaking can weaken adhesive over time. If a piece includes pearls, coral, amber, or similar delicate materials, a damp microfiber cloth is usually safer.
Do not use baking soda on jewellery if the setting is loose, the stone is cracked, or the piece has a fragile finish. Cleaning can make a small problem worse very quickly.
Signs that a piece needs professional cleaning instead of home care
If tarnish keeps returning quickly, the metal looks pitted, or a stone setting feels loose, professional help is a better choice. Deep scratches, bent prongs, and worn plating are not fixed by cleaning.
Antique or heirloom jewelry deserves extra caution because aggressive home cleaning can reduce value. A jeweler can inspect the piece and recommend a method that fits the metal, stones, and age.
Safe Cleaning Methods for Different Jewellery Types
There is no single best baking soda method for every item. The right approach depends on how much tarnish you see, how sturdy the piece is, and whether the jewelry has stones or special finishes.
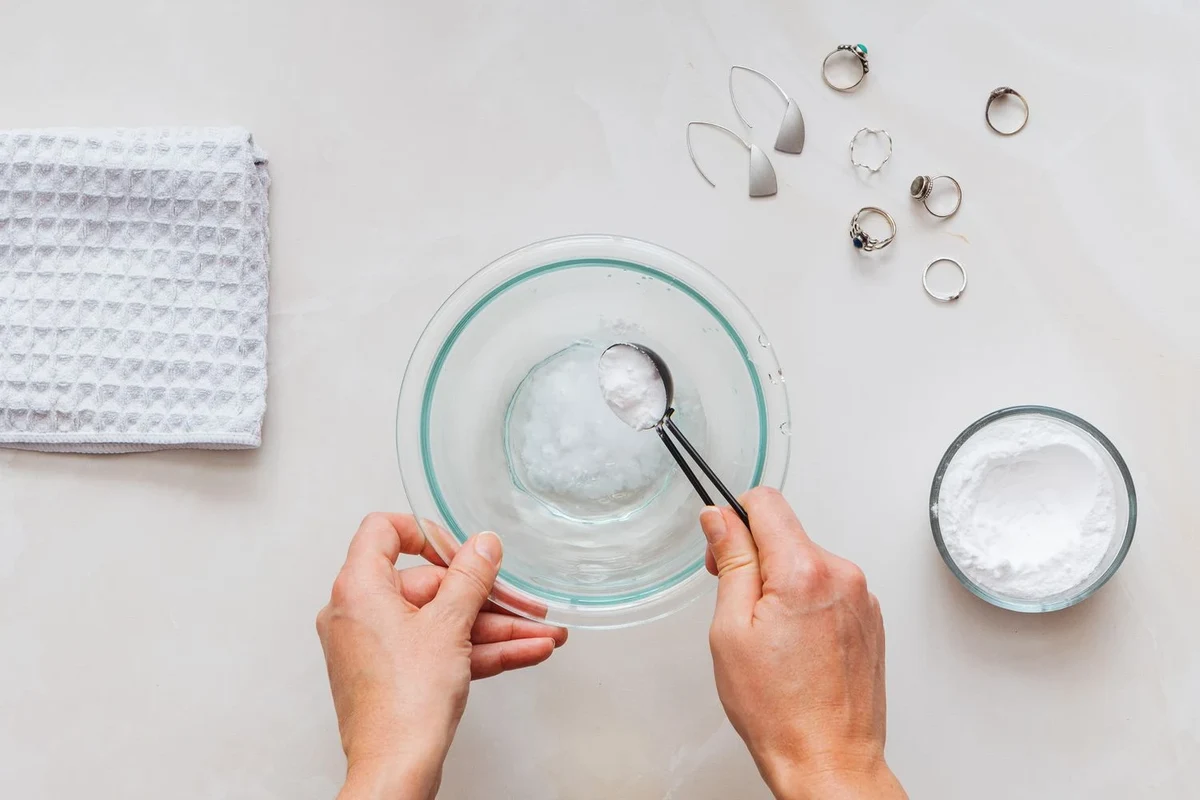
Simple paste method for tarnished silver and durable metal pieces
Mix a small amount of baking soda with just enough water to make a spreadable paste. The texture should be like soft frosting, not dry powder, because a thick gritty paste can scratch more easily.
Apply it with your fingers or a soft cloth, then rub very gently in small circles. Rinse well, dry completely, and buff with a microfiber towel to remove any remaining film.
Remove loose dirt with a dry cloth and check for loose stones, bent clasps, or damaged plating before you begin.
Use a small amount and cover only the tarnished areas. Keep pressure light so you clean the surface without grinding it.
Rinse thoroughly under lukewarm water if the item can be wet safely, then dry every seam, edge, and clasp.
Foil-and-baking-soda soak for removing heavier tarnish from silver
This method is often used for silver because it can reduce heavier tarnish without much rubbing. Line a bowl with aluminum foil, place the silver on the foil, add baking soda, and pour in hot water so the pieces are in contact with the solution.
The reaction works best on silver and silver-plated items that are otherwise sturdy. If the jewelry includes stones or glued parts, skip the soak and use a targeted spot-clean instead.
Foil-assisted cleaning is most useful for tarnish on silver because the reaction helps move sulfur compounds away from the metal surface. It is less helpful for dirt, scratches, or damage that sits below the surface.
Gentle spot-cleaning approach for rings, chains, and detailed settings
For detailed pieces, use a damp cotton swab or soft brush with a little baking soda paste only where grime collects. This is helpful around chain links, prongs, and small decorative edges where dirt can hide.
Work slowly and rinse with care so residue does not stay trapped in crevices. If the design has many tiny openings, drying is just as important as cleaning because trapped moisture can affect metal and adhesives.
Tools, Measurements, and Ingredients You Need for a Reliable Clean
Good results depend more on the right ratio and gentle technique than on using a lot of product. Too much baking soda can turn a simple clean into a scratch risk.
Correct baking soda-to-water ratios for paste, soak, and rinse methods
For a paste, start with about 3 parts baking soda to 1 part water and adjust until it spreads smoothly. For a soak, use enough baking soda to make the water feel lightly alkaline rather than sludgy; the exact amount depends on bowl size and how many pieces you are cleaning.
A rinse can be plain lukewarm water, or a drop of mild soap in water if the jewelry is greasy. Always finish with a clean water rinse so no film stays behind.
- Confirm the piece is safe for wet cleaning
- Test a hidden spot first
- Gather soft drying cloths before you begin
- Keep stones, clasps, and plated finishes under close watch
Soft cloths, bowls, brushes, and non-reactive containers to use
Choose glass, ceramic, or stainless-steel bowls for most cleaning jobs. Avoid anything that could react with the solution or scratch the jewelry while you move it around.
Use a soft toothbrush only when the piece is sturdy enough for light brushing. For delicate settings, cotton swabs and microfiber cloths usually give you better control.
Optional helpers such as mild soap, aluminum foil, and microfiber towels
A few drops of mild dish soap can help remove oily residue before or after the baking soda step. Aluminum foil is useful mainly for the silver tarnish soak, not for every type of jewelry.
Microfiber towels are especially helpful because they dry well and leave less lint behind. This matters on chains, clasps, and textured pieces where fibers can catch.
Step-by-Step Cleaning Process and What a Good Result Looks Like
A good cleaning result should look brighter, not overpolished. The metal should keep its shape, finish, and detail rather than looking stripped or overly shiny in a way that seems unnatural.
Preparing the jewellery, testing a small area, and protecting delicate parts
Start by removing dust and checking the piece under good light. If you see loose stones, peeling plating, or cracks, stop before you add moisture.
Test a hidden area first, especially on vintage or mixed-material jewelry. A small test tells you whether the finish darkens, clouds, or changes texture.
Keep cleaning bowls away from food prep surfaces and rinse all tools well before they return to kitchen use. Even though baking soda is common in cooking, jewellery cleaning residue should not mix with food-contact items.
Applying, waiting, rinsing, and drying without leaving residue
Use the smallest amount of paste that gets the job done. Let it sit only briefly if needed, then rinse thoroughly so no white film remains in seams or under stones.
Drying matters as much as rinsing. Water left in clasps or chain links can cause spotting, and moisture left in settings can collect dust or weaken adhesives over time.
How to judge shine, remove remaining tarnish, and stop before overcleaning
If the metal looks brighter and feels smooth, you are likely done. If tarnish remains in a few spots, repeat gently rather than scrubbing harder.
Stop if the piece begins to look hazy, if color changes in the finish, or if the surface feels rough. Overcleaning can remove protective surface layers and make future tarnish more noticeable.
- Low-cost and easy to mix
- Useful for light tarnish on silver
- Can reach small areas with a paste
- Can scratch soft finishes if used roughly
- Not safe for every gemstone or plated item
- May leave residue if rinsing is incomplete
Common Mistakes That Can Damage Jewellery During Cleaning
Most problems come from using too much force or assuming every piece can tolerate the same treatment. Jewelry care works best when the method matches the material.
Using too much pressure, abrasive scrubbing, or overly thick paste
A heavy hand can leave fine scratches, especially on polished silver and plated jewelry. A thick paste can also drag grit across the surface instead of lifting dirt away.
If the item is still dull after a gentle pass, do not press harder right away. Try a second light round or switch methods instead.
Letting moisture sit in clasps, stone settings, or plated finishes
Clasp mechanisms and stone settings can trap water where you cannot easily see it. That hidden moisture can lead to spotting, residue buildup, or long-term wear.
Always dry these areas with a corner of a soft cloth or a dry cotton swab. Plated finishes need special care because repeated wet cleaning can wear them faster.
Mixing baking soda with the wrong products or using it on unsuitable stones
Do not mix baking soda with cleaners unless the product label says it is safe. Some combinations are unnecessary, and others can create more residue or damage than benefit.
Also avoid using it on stones known to be delicate or porous unless the jeweler specifically approves it. When in doubt, a mild soap-and-water wipe is usually the safer first step.
How to Care for Jewellery After Cleaning and Keep It Looking Bright
After cleaning, the goal is to slow down the next round of tarnish rather than repeating the process often. Good storage and gentle daily habits usually matter more than aggressive cleaning.
Drying, polishing, and storing pieces to slow future tarnish
Dry each item fully before putting it away. A soft polishing cloth can restore the final shine, but avoid buffing too hard if the piece has a plated or brushed finish.
Store jewelry in a dry, closed box or pouch, ideally separated so pieces do not rub together. Less air exposure usually means slower tarnish on silver.
Routine maintenance tips for everyday wear versus special occasion items
Pieces worn daily may need a light wipe more often because skin oils, lotions, and humidity build up faster. A quick cloth clean is often enough between deeper washes.
Special occasion jewelry can usually be cleaned less often, which helps protect delicate surfaces. Clean only when you see dullness or residue instead of following a rigid schedule.
When to repeat cleaning and when to switch to a gentler method
Repeat baking soda cleaning only when there is visible tarnish or grime. If the piece still looks cloudy after one gentle attempt, move to a milder method rather than making the paste stronger.
For fragile pieces, a damp cloth and mild soap may be enough. If the item is valuable, ornate, or sentimental, a jeweler’s cleaning service may protect it better than repeated home treatment.
Final Decision Guide: Is Baking Soda the Right Jewellery Cleaner for Your Piece?
Baking soda jewellery cleaner is a smart option when you are dealing with sturdy silver, light tarnish, and simple metal surfaces. It is less suitable for delicate stones, thin plating, antique finishes, and pieces with glued or fragile parts.
If your jewelry is everyday silver and the tarnish is light, start with the gentlest method that can work. If the piece is valuable, structurally delicate, or still looks dull after a careful attempt, choose a commercial cleaner made for that material or take it to a professional jeweler.
Use baking soda for safe, low-cost cleaning when the material is sturdy and the tarnish is mild to moderate. Skip it when the jewelry is delicate, plated, porous, or valuable enough that a professional touch is the better risk.
- Test a hidden area first
- Use a soft cloth and light pressure
- Rinse and dry every crevice
- Store pieces in a dry, separate pouch
- Scrubbing plated or delicate jewelry
- Leaving moisture in clasps or settings
- Using baking soda on uncertain gemstones
- Cleaning valuable heirlooms without checking care guidance
For readers comparing home care methods, it helps to treat jewellery cleaning the same way you would any careful kitchen technique: start mild, watch the material closely, and stop before you overdo it. That approach gives you the best chance of a clean shine without unnecessary wear.
Frequently Asked Questions
You can use it on sturdy silver when tarnish is light or moderate, but do not overclean. If the piece is plated, antique, or detailed, a gentler method may be safer.
For a paste, start with about 3 parts baking soda to 1 part water and adjust until it spreads smoothly. For a soak, use a light solution rather than a thick slurry, and always rinse well.
Yes, it can scratch, cloud, or stress some stones and finishes. Pearls, opals, turquoise, emeralds, and glued settings need extra caution or a different cleaning method.
The foil method helps move tarnish compounds away from silver through a chemical reaction in the solution. It is most useful for silver and not a fix for scratches or deep damage.
If the stones are loose, the plating is worn, or the piece is antique or valuable, professional cleaning is a better choice. A jeweler can inspect the item and recommend the safest method.
Dry it fully after wear or cleaning, store it in a dry pouch or box, and keep pieces separated. Limiting air exposure and moisture helps slow future tarnish.
