Baking soda can clean light tarnish from silverware and restore a bright finish when used gently. It works best for sturdy everyday pieces and needs careful rinsing and drying to avoid residue or scratches.
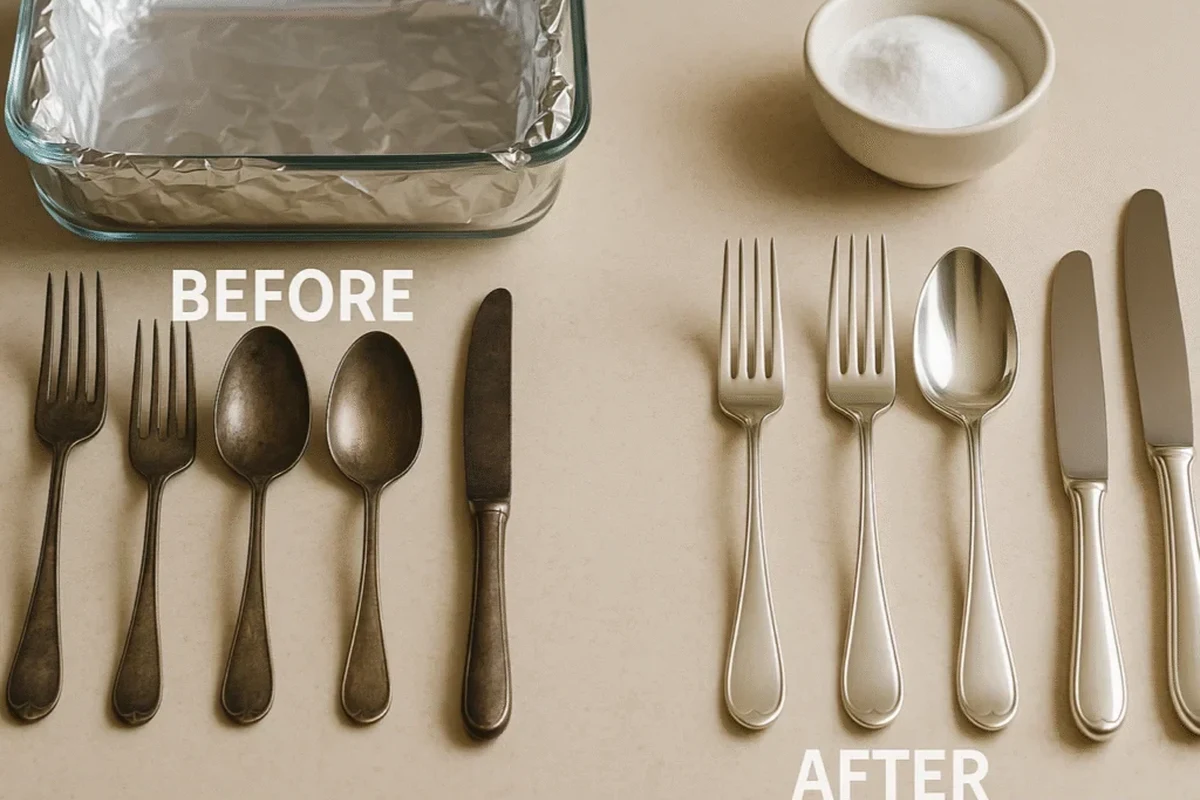
Polishing silverware with baking soda is a simple, low-cost way to bring back shine when cutlery starts to look dull or yellowed. Used the right way, it can lift light tarnish without the heavy smell or residue that some commercial polishes leave behind.
- Best for light tarnish: Baking soda is a good first step for everyday silverware.
- Use gentle tools: Soft cloths protect the finish better than abrasive pads.
- Dry completely: Thorough drying helps prevent spots and dull residue.
- Know the limits: Antique, plated, or fragile pieces may need a different method.
Why Baking Soda Works on Tarnished Silverware
Silver tarnish is not dirt in the usual sense. It is a dark layer that forms when silver reacts with sulfur compounds in the air and on foods, which is why forks and spoons can lose their bright finish even when they are not dirty.
The science of silver tarnish and why it dulls cutlery
Tarnish often appears as gray, brown, or black discoloration. On flatware, it tends to show first on the parts you touch most often, like spoon bowls, fork tines, and knife handles, because oils and moisture speed up surface changes.
Baking soda helps because it is mildly alkaline and can loosen surface grime while supporting a gentle cleaning reaction. It is not a strong abrasive, which makes it useful for maintenance cleaning when the silver is still in decent condition.
How baking soda interacts with tarnish compared with commercial polish
Commercial silver polishes are made to remove tarnish quickly, but they can also be more aggressive and may leave strong odors or require careful rinsing. Baking soda is usually gentler, especially when paired with warm water and soft cloths.
For heavier tarnish, many people use baking soda with aluminum foil in a soak method. That setup helps move the tarnish from the silver to the foil through a chemical reaction, which can be effective for silverware that has dulled but is not deeply damaged.
Silver tarnish is often silver sulfide on the surface, which is why a cleaning method that changes the surface chemistry can brighten the metal without sanding it down.
When this method is suitable and when it is not
This method is best for everyday silverware, light to moderate tarnish, and pieces you want to clean at home without specialized products. It is also useful when you want a quick refresh before setting the table or storing flatware.
It is not the best choice for antique silver, highly ornate heirlooms, pieces with fragile finishes, or anything with unknown metal construction. If you are unsure whether a piece is sterling silver or silver-plated, test a small hidden area first or check the maker’s mark before cleaning.
What You Need Before You Start
Before you begin, gather a few basic kitchen items so you can work steadily and avoid scratching the surface. A careful setup matters more than force when you are polishing silverware with baking soda.
Choosing the right baking soda, water temperature, and bowl or pan
Use plain baking soda, not a scented cleaning powder. Warm water usually works better than cold because it helps dissolve the baking soda and loosen surface residue, but avoid very hot water if your silverware has glued handles or mixed materials.
Choose a nonreactive bowl or pan, such as glass, ceramic, or plastic, if you are making a paste or simple soak. If you use the foil method, line a pan or bowl with aluminum foil, shiny side up, so the silver can make contact during the cleaning reaction.
Optional helpers: aluminum foil, soft cloths, microfiber towels, and gloves
Aluminum foil is the key extra item for the soak method. Soft cloths and microfiber towels help you wipe away loosened tarnish without leaving visible scratches, and gloves can keep fingerprints off freshly cleaned pieces.
If you are cleaning a full set, work in small batches. That keeps the water warm, helps you track progress, and lowers the chance of mixing pieces with different wear levels.
Checking silver-plated versus sterling silverware before cleaning
Sterling silver is solid silver alloy, while silver-plated pieces have a thin silver layer over another metal. Plated items can lose finish if scrubbed too hard, so they need a lighter touch and shorter contact time.
Look for marks such as “sterling,” “925,” or a known maker’s stamp, but do not rely on a mark alone if the piece is old or repaired. Hollow-handled knives, decorative serving pieces, and items with glued joins deserve extra caution because moisture can get trapped inside.
- Separate sterling from plated or unknown pieces.
- Check for glued handles, stones, enamel, or decorative coatings.
- Choose soft cloths instead of abrasive pads.
- Prepare a drying area before you rinse the silverware.
Step-by-Step Method for Polishing Silverware with Baking Soda
There are two practical ways to use baking soda: a gentle paste for hand polishing or a foil-lined soak for light tarnish. Both methods work best when you move slowly and dry the silver completely afterward.
Preparing the sink or tray and lining it safely with foil if using the soak method
If you choose the soak method, line a glass or metal-safe tray with aluminum foil, shiny side up, and place the silverware so it touches the foil. Keep pieces spread out rather than stacked, because contact helps the reaction work more evenly.
Set the tray in a sink or on a stable counter where spills will not be a problem. If your sink has a delicate finish, use a tray or bowl instead of placing foil directly on the surface.
Do not use this method on items with loose handles, glued parts, or decorative inserts that can be damaged by soaking. When in doubt, keep water away from the join and clean only the exposed silver surface by hand.
Mixing the baking soda solution in practical household measurements
For a soak, stir a few tablespoons of baking soda into a bowl or tray of warm water until it dissolves. There is no exact universal ratio because container size, tarnish level, and piece count vary, but the water should feel lightly cloudy rather than heavily pasty.
For hand polishing, mix a small amount of baking soda with just enough water to form a spreadable paste. You want a texture similar to loose toothpaste, not a dry scrub, so it can glide over the metal.
Soaking, wiping, rinsing, and drying without scratching the surface
Let the silverware sit in the solution for a short time, then check progress. If tarnish lifts, remove the pieces and wipe them with a soft cloth rather than rubbing hard with your fingers or a rough sponge.
Rinse each piece with clean water to remove any baking soda residue. Dry immediately with a microfiber towel so water spots do not form, especially on knife blades and spoon bowls where droplets tend to collect.
The silver still looks cloudy after rinsing.
Too much paste or leftover residue can leave a dull film. Rinse again with clean water, wipe with a fresh cloth, and dry fully before judging the final shine.
Hand-polishing stubborn spots and engraved details
For engraved handles, seams, and stubborn dark spots, apply a small amount of paste with a soft cloth or cotton swab. Work in light circles and follow the shape of the design instead of scrubbing across it.
This is the best place to slow down. Fine details collect tarnish in grooves, but they can also catch on rough pads, so patience matters more than pressure.
If a piece still looks uneven after drying, repeat a gentle pass instead of using more force. Multiple light cleanings are safer than one aggressive scrub.
Common Mistakes That Can Damage Silverware
Most silverware damage comes from friction, trapped moisture, or cleaning the wrong type of piece with the wrong method. A careful approach protects both shine and surface detail.
Using abrasive scrubbing pads or too much pressure
Steel wool, rough scouring pads, and gritty cleaners can leave fine scratches that make silver look dull again later. Even if the tarnish comes off quickly, those scratches can catch light unevenly and make the finish look worn.
Use the lightest pressure that removes the tarnish. If the silver does not respond, switch methods rather than pressing harder.
Leaving silver in contact with harsh cleaners, salt, or acidic foods
Do not leave silverware soaking in bleach, strong detergents, or cleaners not meant for silver. Salt and acidic foods can also speed up tarnish, so wash cutlery soon after use, especially after serving eggs, salad dressings, citrus, or other acidic dishes.
For broader kitchen cleaning habits, it can help to pair this routine with other gentle maintenance practices, like the ones covered in our guide to the baking soda trick that actually works fast and easy.
Overlooking plated items, hollow-handled pieces, and decorative finishes
Silver-plated pieces can wear through if cleaned too often or too roughly, revealing the base metal beneath. Hollow handles may trap water, and decorative finishes such as blackened details or gold wash can be removed by overcleaning.
When a piece has mixed metals or unusual construction, treat it as delicate. If you are unsure, cleaning by hand with a damp baking soda paste is safer than a long soak.
- Use soft cloths and short cleaning times.
- Dry every piece right away.
- Test one hidden area on unknown silverware.
- Do not scrub with abrasive pads.
- Do not soak fragile or glued pieces.
- Do not store silver while it is still damp.
How to Handle Heavy Tarnish, Stains, and Mixed Metal Pieces
Some silverware responds quickly to baking soda, while other pieces need a second pass or a different method. The key is knowing when to continue and when to stop.
What to do when a single baking soda pass is not enough
If one cleaning does not remove all the tarnish, repeat the process once with fresh water and a clean cloth. For stubborn areas, use a small amount of paste and let it sit briefly before wiping, but do not let it dry on the metal.
For very dark tarnish, a foil-lined soak may work better than hand polishing alone. If the piece still looks patchy after two careful attempts, the tarnish may be too deep for a simple home method.
Cleaning forks, spoons, knives, and serving pieces with different wear levels
Forks and spoons usually show tarnish on the working surfaces first, while knife handles and serving pieces may have uneven wear from handling and storage. Clean the most tarnished pieces first, then match the rest so the set looks consistent.
Mixed wear is common in busy kitchens and family drawers. If you clean only the dullest pieces, the difference can become more obvious, so it often helps to refresh the whole set together.
Knives with steel blades may need different care from silver handles or silver-plated parts. Keep moisture off the blade as much as possible and dry both ends separately if the knife is a mixed-material piece.
When to stop and choose a professional restoration method
Stop if the silver shows pitting, deep scratches, flaking plating, or loose decorative parts. Those issues are not just tarnish, and extra polishing can make them worse.
For valuable antiques or sentimental heirlooms, a professional silversmith or restoration specialist may be the better choice. Home care is useful, but it should not replace expert repair when the piece has structural or historical value.
Safety, Storage, and Ongoing Silverware Care
Once the silverware is clean, the goal is to keep it that way as long as possible. Good drying and storage habits make a bigger difference than repeated heavy polishing.
Drying thoroughly to prevent spotting and water marks
Dry each piece completely, including grooves near handles and the underside of spoon bowls. Any leftover moisture can leave spots, and trapped water can speed up dulling in storage.
If needed, set pieces on a clean towel for a few minutes before putting them away. That extra step is especially helpful in humid kitchens.
Safe storage tips for drawers, cloth rolls, and anti-tarnish bags
Store silverware in a dry drawer lined with a soft cloth, or wrap it in anti-tarnish fabric if you do not use it often. Cloth rolls and separate slots help prevent pieces from rubbing together, which can cause tiny marks over time.
Avoid storing silver near rubber bands, some paper products with sulfur compounds, or damp dish towels. These small storage choices can affect how quickly tarnish returns.
How often to polish silverware in a busy kitchen or home setting
How often you polish depends on how the silverware is used and stored. In a busy home, a light cleaning may be enough only a few times a year, while frequently used serving pieces may need attention more often.
In a kitchen that sees daily use, quick washing, thorough drying, and careful storage usually matter more than frequent polishing. Reserve stronger cleaning for when you can actually see the tarnish building up.
If silverware is labeled dishwasher-safe by the manufacturer, follow that guidance for routine washing, but remember that repeated dishwasher exposure can still increase tarnish on some pieces. Always check the maker’s care instructions first.
Is Baking Soda the Best Choice for Your Silverware?
For many households, yes, baking soda is one of the best first choices for light tarnish and regular maintenance. It is easy to find, inexpensive, and gentle enough for many everyday silver pieces when used carefully.
Best use cases for everyday maintenance and light tarnish
Baking soda works well when silverware looks a little dull, has a light gray film, or needs a quick refresh before guests arrive. It is also a practical option if you prefer a simple cleaning method with ingredients already in the kitchen.
If you want a gentle method that fits into a routine, baking soda is often the right starting point. It pairs especially well with soft cloth drying and good storage habits, which help prevent the same tarnish from returning too quickly.
Limitations for antique, ornate, or highly valuable pieces
Antique silver, ornate serving sets, and valuable heirlooms can have finishes or construction details that do not tolerate casual cleaning well. In those cases, even a mild method can be too much if it is repeated often or used with too much pressure.
If the piece has collectible value, verify the recommended care method from the maker, appraiser, or restoration professional before cleaning. That is the safest way to protect both appearance and value.
Final recap: deciding when to use baking soda and when to use another method
Use baking soda when the silverware has light to moderate tarnish, a sturdy finish, and no fragile decorative parts. Choose a professional polish or restoration method when the piece is valuable, plated and worn, or damaged in ways that go beyond surface discoloration.
For most home kitchens, the best routine is simple: clean gently, rinse well, dry completely, and store carefully. If you want to keep silverware bright without overworking it, polishing silverware with baking soda is a smart place to start.
- Gentle for routine tarnish removal
- Uses common household ingredients
- Works for both soaking and hand polishing
- Not ideal for delicate antiques or damaged plating
- May need repeat cleaning for heavy tarnish
- Can leave residue if not rinsed well
Baking soda is a practical, beginner-friendly choice for brightening silverware when tarnish is light and the pieces are sturdy. For ornate, plated, or valuable items, use extra caution and choose the gentlest method that matches the piece.
For readers who like simple kitchen care methods, this is one of the easiest ways to keep silverware looking presentable without special equipment. The main rule is to let the chemistry do the work, then protect the finish with careful drying and storage.
FAQS
Can I use baking soda on silver-plated silverware?
Yes, but use a lighter touch than you would on sterling silver. Silver-plated pieces can wear down faster, so avoid aggressive scrubbing and long soaking.
Should I make a paste or a soak for polishing silverware with baking soda?
Use a paste for stubborn spots and detailed areas, and use a soak for light tarnish on sturdy pieces. If the item has glued parts, decorative finishes, or mixed metals, hand polishing is usually safer.
How do I know if my silverware is fully dry after cleaning?
The surface should feel dry and look free of water beads or streaks. Check seams, handle joins, and engraved areas, since moisture often hides there.
Can baking soda scratch silverware?
Baking soda is mild, but scratches can still happen if you use too much pressure or combine it with rough pads. Soft cloths and light rubbing help protect the finish.
What should I do if the tarnish comes back quickly?
Focus on storage, humidity, and how soon the silverware is washed after use. Frequent contact with air, moisture, salt, and acidic foods can make tarnish return faster.
Is it safe to use baking soda on silverware with knives or mixed metal parts?
It can be safe if you keep water away from glued handles and dry the piece carefully afterward. For knives or mixed materials, use a minimal amount of moisture and avoid long soaking.
Frequently Asked Questions
Yes, but use a lighter touch than you would on sterling silver. Silver-plated pieces can wear down faster, so avoid aggressive scrubbing and long soaking.
Use a paste for stubborn spots and detailed areas, and use a soak for light tarnish on sturdy pieces. If the item has glued parts, decorative finishes, or mixed metals, hand polishing is usually safer.
The surface should feel dry and look free of water beads or streaks. Check seams, handle joins, and engraved areas, since moisture often hides there.
Baking soda is mild, but scratches can still happen if you use too much pressure or combine it with rough pads. Soft cloths and light rubbing help protect the finish.
Focus on storage, humidity, and how soon the silverware is washed after use. Frequent contact with air, moisture, salt, and acidic foods can make tarnish return faster.
It can be safe if you keep water away from glued handles and dry the piece carefully afterward. For knives or mixed materials, use a minimal amount of moisture and avoid long soaking.
